Applies to
ApexSQL DevOps toolkit
Summary
This article explains how to configure Jenkins server for continuous integration (CI) workflows with ApexSQL DevOps toolkit.
Description
Jenkins is a continuous integration and continuous delivery server, which can be used to build and test software projects continuously, and to continuously deliver software by providing many ways for defining pipelines and integrating with various testing and deployment technologies.
Pre-requisites
Before creating a new job in Jenkins, there is a short list of prerequisites which needs to be fulfilled for running a successful continuous integration process:
- Download and install all ApexSQL tools per the user’s needs
- Link the desired database to the source control
- Download and install ApexSQL DevOps PowerShell cmdlets
- Configure ApexSQL DevOps toolkit PowerShell one-click scripts (as the linked article explains just the global configuration of the one-click DevOps script, more information about configuring specific steps will be explained later in this article)
- Download and install the Jenkins server
The following example will consist of creating two basic processes:
- The first will include creating a new database from the script folder, located on the source control server (Subversion in this example), and populating it with test data
- The second step will include schema and data synchronization of the stage and production databases and, as a result, synchronization scripts will be created along with reports of the comparison results
Notification messages about the pipeline status will be included in both processes.
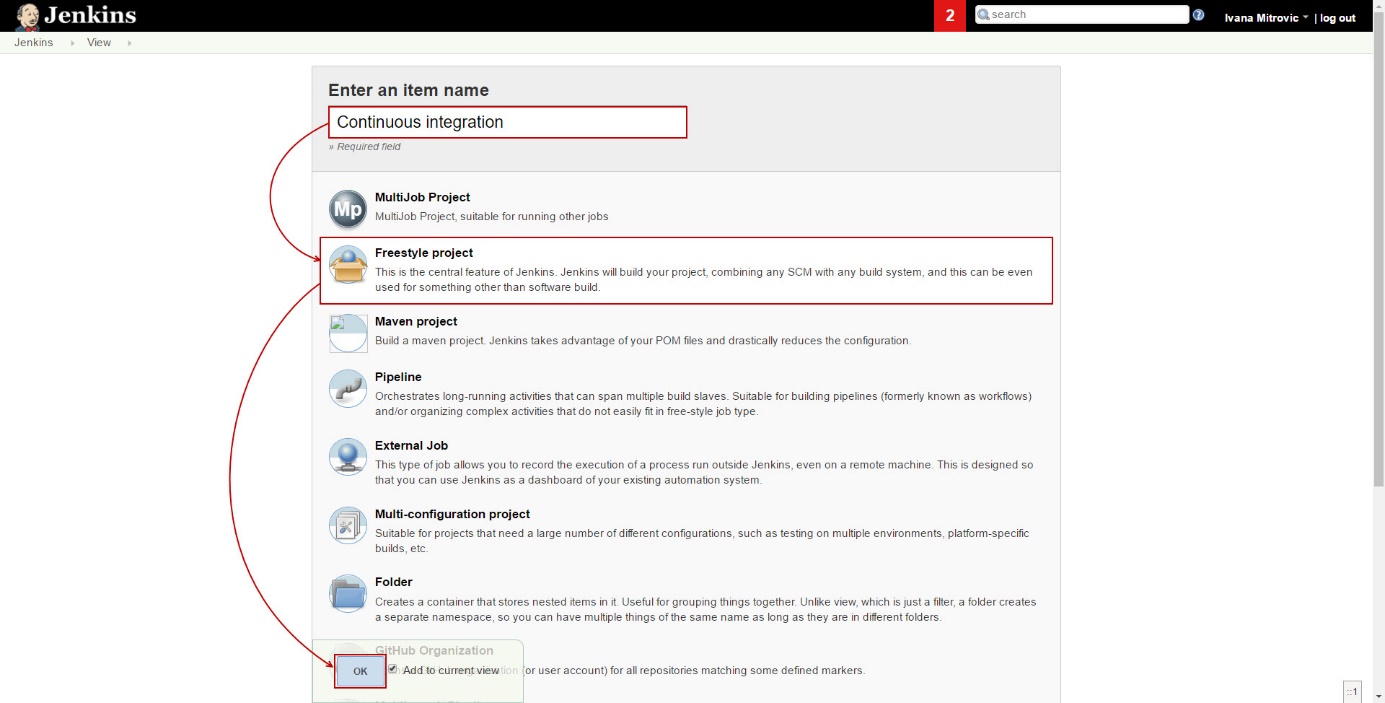
Creating a new job in Jenkins server can be accomplished by following these steps:
-
Click the New Item button:

-
In the New Item window, enter an item name (Continuous integration in this example), select a Freestyle project and click the OK button in the bottom:
-
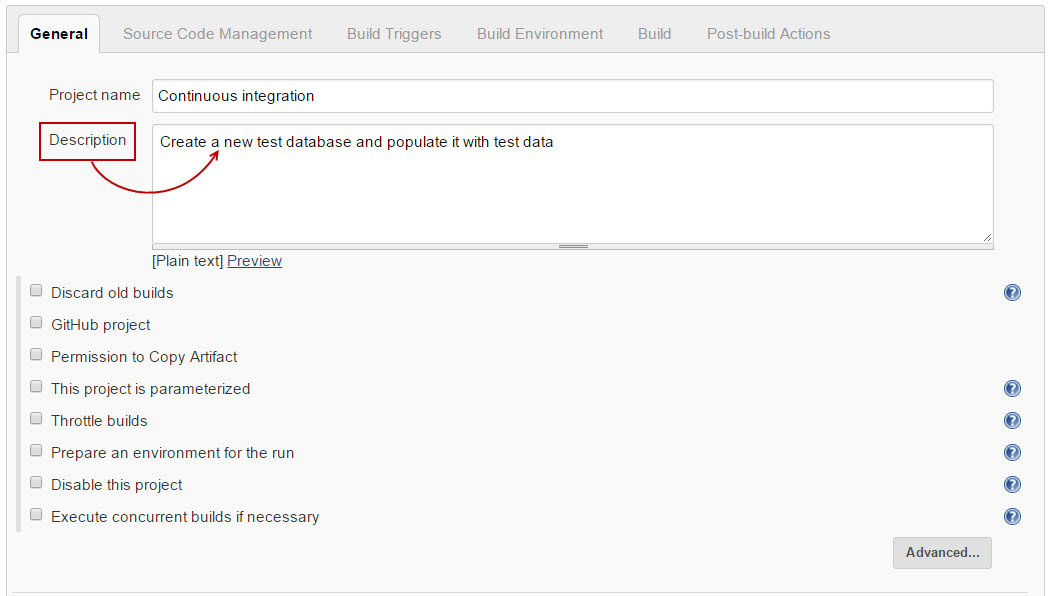
A new window will open, where the project can be configured. In the General tab the Project name window will automatically consist of the name which was selected in the previous step. Optionally, in the Description window, a brief description of the project can be entered:
-
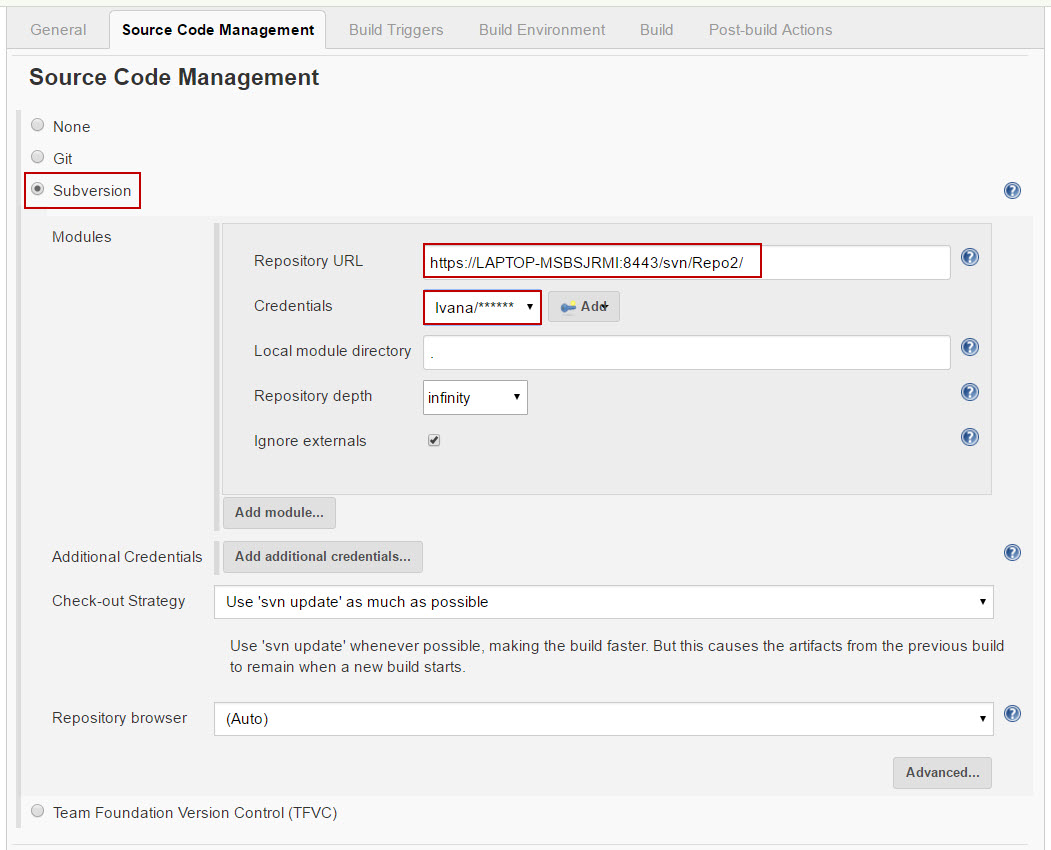
Under the Source Code Management tab define the source control parameters so Jenkins will know where to find the source code for creating a database. Select the type of source control server where your database was previously versioned (Subversion in this example), enter the Repository URL and Credentials:
-
Under the Build Triggers tab check the Poll SCM option and in the Schedule text box enter
H * * * *. This way, Jenkins will run a build every hour of the day from the source code which was selected in the previous step: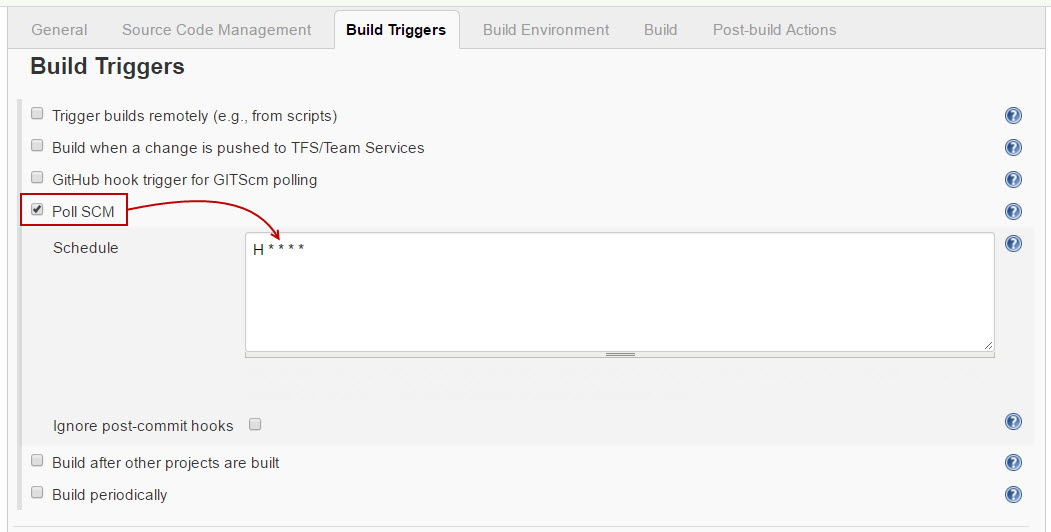

Quick tip:
The process can be scheduled by user’s needs (every minute, every 15 minutes, every day at some hour, etc.).
More information about custom scheduling of the process can be found when clicked on the tooltip next to the Schedule text box. -
Under the Build Environment tab, optionally, the Add timestamps to the Console Output option can be checked. This means that when the build results are shown, they will have a time of execution next to them, so the user will know at what time of which day a particular process was completed:

-
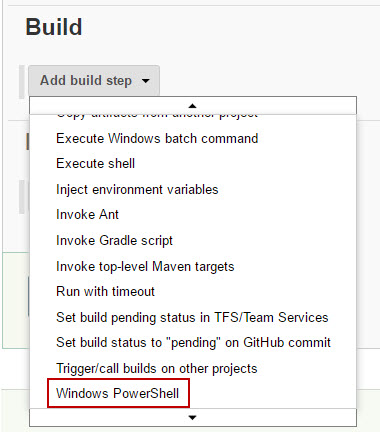
In the Add build step drop down menu, under the Build tab, select the Windows PowerShell option:
The Windows PowerShell window will show, and in the Command text box enter the content of the PowerShell script:
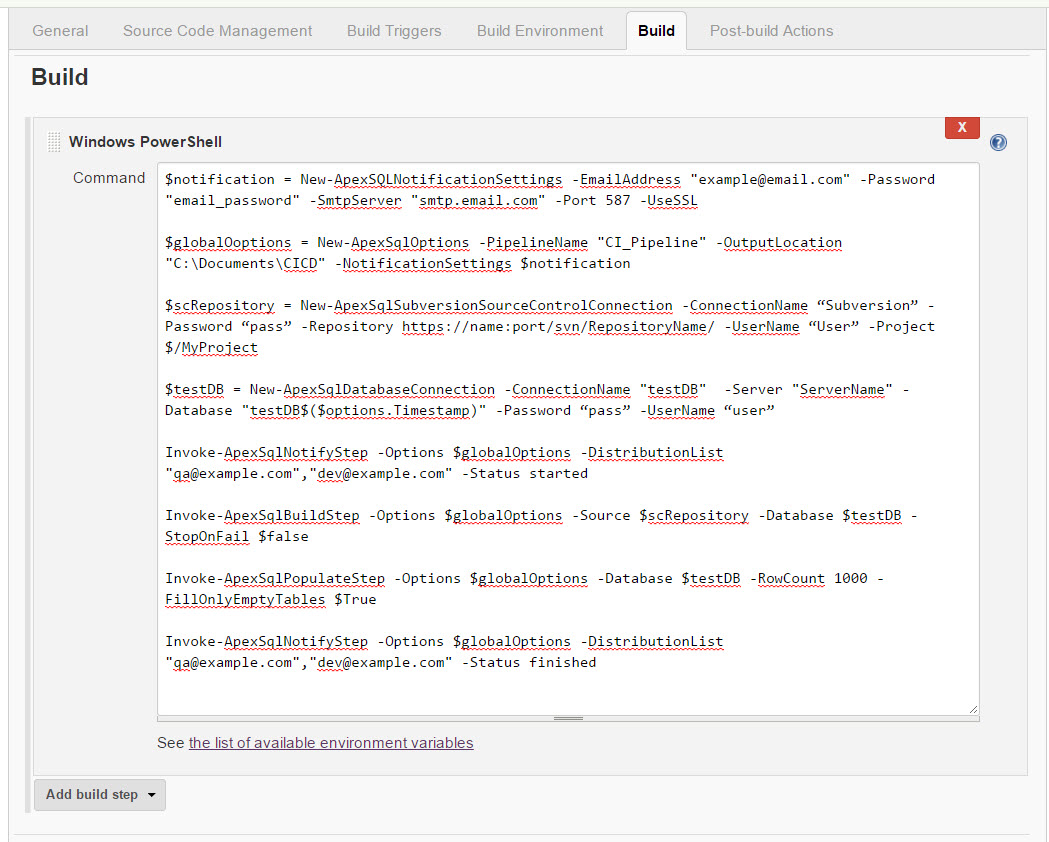
In the above example, the PowerShell script consists of the following segments:
-
Specifying e-mail server settings, which will be used for sending notifications:
$Notification = New-ApexSQLNotificationSettings -EmailAddress "example@email.com" -Password "example_password" -SmtpServer "smtp.example.com" -Port 587 -UseSSL
- EmailAddress: The e-mail address used for login to the user’s e-mail server
- Password: The user’s password used for the above e-mail address
- SmtpServer: The name of the SMTP server, used by the e-mail account of the sender
- Port: Port number of the SMTP server
- UseSSL: An optional switch. The Secure Sockets Layer protocol will be used to establish a connection to the remote e-mail server
-
Specifying global options (the name of the pipeline, location of the output folder and notification settings):
$GlobalOptions = New-ApexSqlOptions -PipelineName "New_CI_Pipeline" -OutputLocation "C:\Documents\CICD" -NotificationSettings $Notification
- PipelineName: The name of the pipeline – e.g. NewPipeline
- OutputLocation: The Path to the folder where all output files and results will be stored for this Pipeline
- NotificationSettings: Assigned settings for notifications, previously defined by the $Notification variable
-
Specifying a data source to be used as a source for starting a build. In this example, an existing Subversion repository will be used, while ApexSQL Source Control will be used for establishing the connection:
$Repository = New-ApexSqlSubversionSourceControlConnection -ConnectionName "testDB" -Server "https://name:port/svn/RepositoryName/" -Project "$/MyProject" -UserName "user" -Password "password"
- ConnectionName: Custom name of the connection
- Server: Link to the source control repository (Subversion in this example)
- Project: Path to the source control project (the $ – root folder will be used as a default path, if omitted)
- UserName: The username used to connect to this source control repository
- Password: The password which corresponds to the above username
-
Specifying parameters for a new test database:
$testDB = New-ApexSqlDatabaseConnection -ConnectionName "testDB" -Server "ServerName" -Database "testDB$($GlobalOptions .Timestamp)" -WindowsAuthentication
- ConnectionName: A name for this connection (testDB in this example)
- Server: The name of the SQL Server where this database will be created
- Database: The name of the database which will be created
- WindowsAuthentication: Optionally, UserName and Password can be used as an authentication method used to connect to the SQL Server
-
Send an email notification that the pipeline has started:
Invoke-ApexSqlNotifyStep -Options $GlobalOptions -DistributionList "qa@example.com","dev@example.com" -Status started
-
Build a test database from a Subversion repository:
Invoke-ApexSqlBuildStep -Options $GlobalOptions -Source $Repository
-Database $testDB -StopOnFail $false
-
Fill only empty tables in the created database, with 1,000 rows of generated test data:
Invoke-ApexSqlPopulateStep -Options $GlobalOptions -Database $testDB -RowCount 1000 -FillOnlyEmptyTables $True
-
Send an email notification that the pipeline has ended:
Invoke-ApexSqlNotifyStep -Options $GlobalOptions -DistributionList "qa@example.com","dev@example.com" -Status completed
Quick tip:
The Execute Windows batch command can also be selected as a build step, instead of Windows PowerShell. When selecting that option, only the local path to the .ps1 script should be provided, and that script should consist of all the above-mentioned variables and steps.
-
-
After everything is set and ready, click the Save button in the bottom of the page and created project will load in the new window.
-
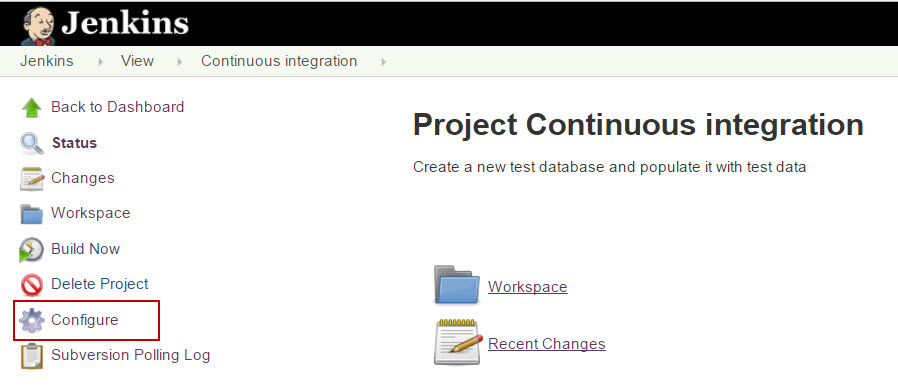
To configure the existing project, click the Configure button from the menu on the left side:
The previously described window will open, and user will be able to change any of the earlier defined parameters. Click the Save button
-
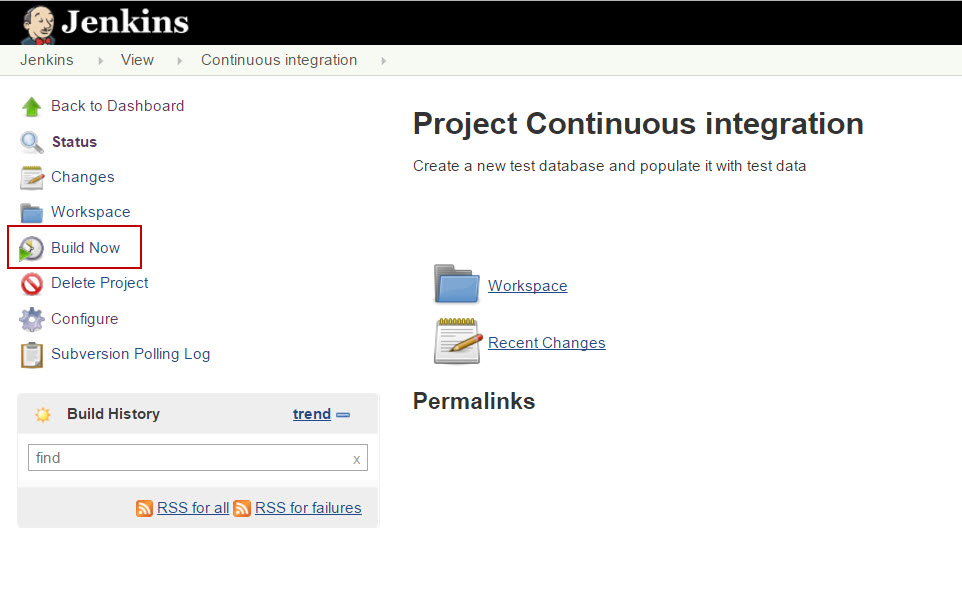
To start a process, click the Build Now button on the left side menu:
The Build History window will show that one process is running:

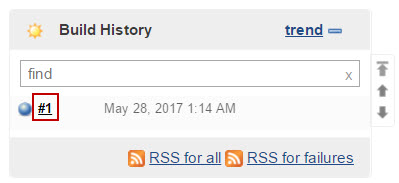
The color of the blinking circle, next to the number of the build, represents the result of the previous build (gray in this example represents that this is the first build in the dashboard).
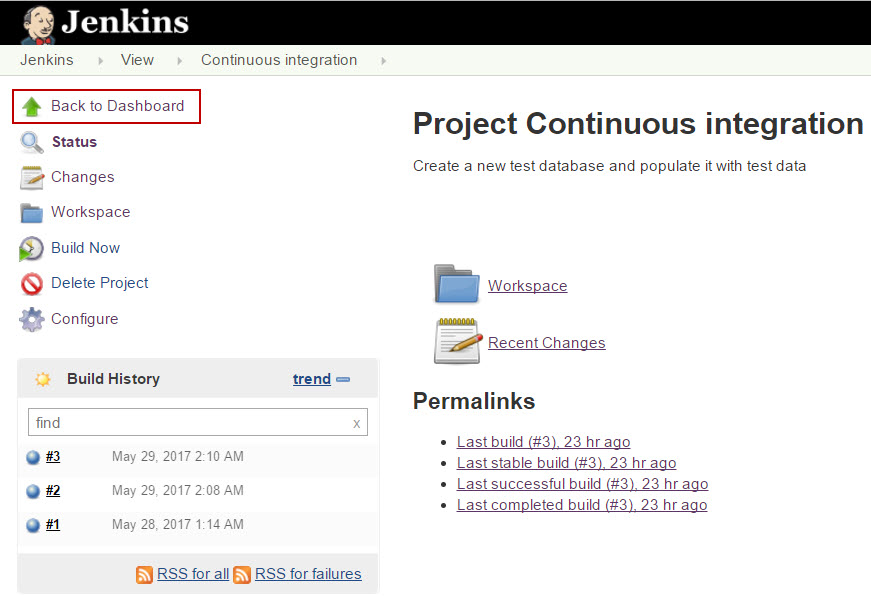
When the build process is completed, in the Build History window, the circle next to the build number will stop blinking and will change the color depending on the result (blue – if success, red – if fail), and the progress bar will disappear. Also, the Permalinks will appear on the window, which can be used for quick access to the previous builds:
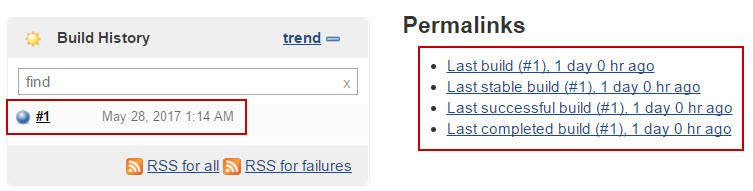
Permalinks allow user to quickly access the results of:
- The last build which was run (no matter if the build was completed or not)
- The last stable build (build is stable if 80% of previous builds were finished successfully)
- The last successful build (the last build which was completed without errors)
- The last completed build (the last build which was completed no matter of the build’s result)
-
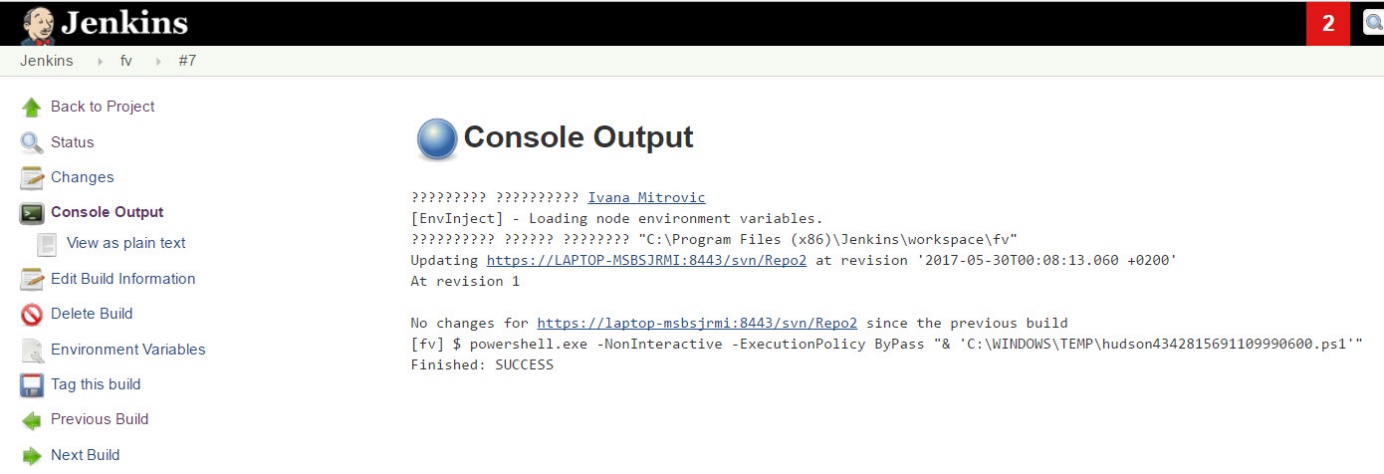
To see the build’s output, click the build number link in the Build History window:
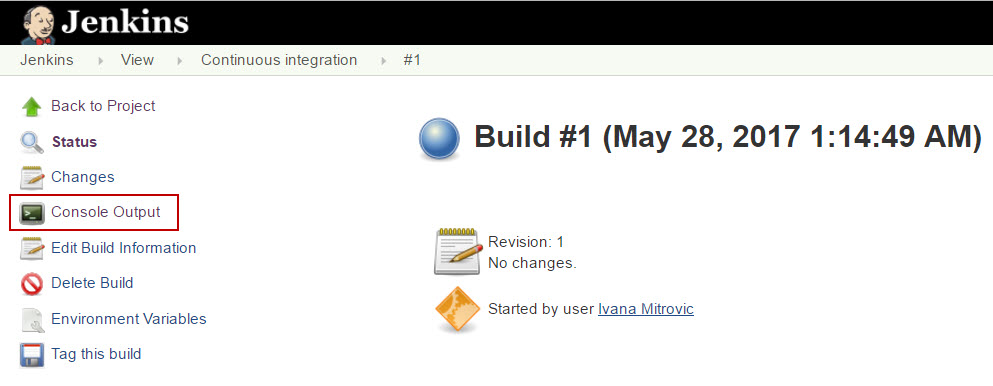
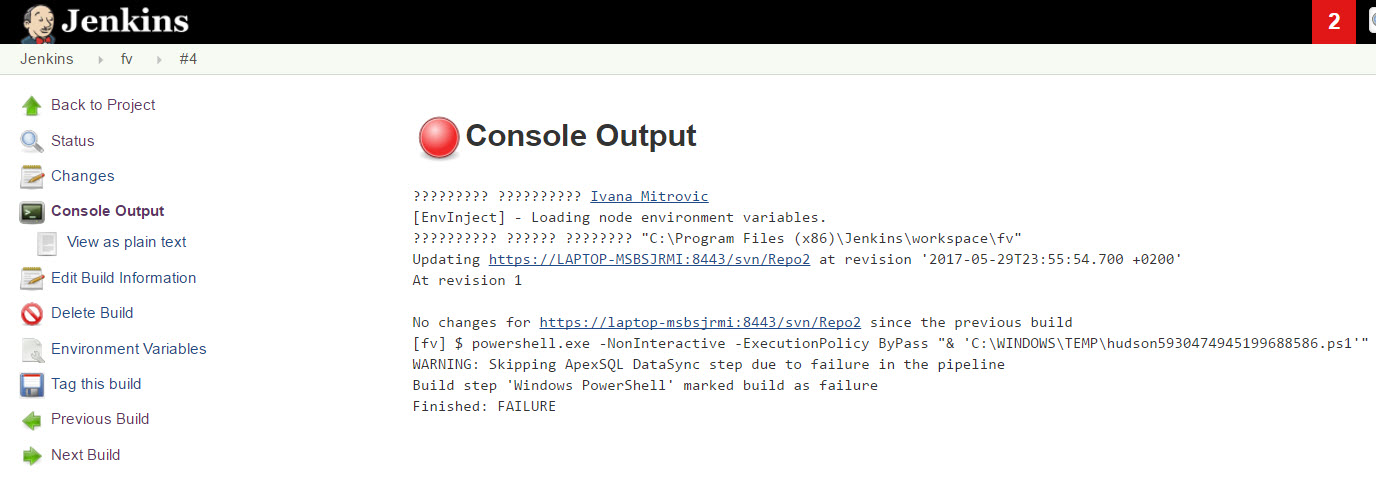
The new window will open and the build’s status will be shown. To see the build’s output, click the Console Output button from the left side menu:
New window will open, showing the project results:
If the project has failed for some reason, information about failure will be presented:
Jenkins server offers several options for adding steps to the project. In the following examples, Sync steps will be added to the existing Build and Populate steps.
The PowerShell script for the sync steps should include:
-
Defining settings for the e-mail to be used for sending notifications:
$Notification = New-ApexSQLNotificationSettings -EmailAddress "example@email.com" -Password "example_password" -SmtpServer "smtp.example.com" -Port 587 -UseSSL
-
Defining global options (the name of the pipeline, location of the output folder and notification settings):
$GlobalOptions = New-ApexSqlOptions -PipelineName "New_Pipeline" -OutputLocation "C:\Documents\CICD" -NotificationSettings $Notification
-
Defining parameter for the database to be used as a source during the schema and data synchronization:
$sourceDB = New-ApexSqlDatabaseConnection -ConnectionName "sourceDB" -Server "ServerName" -Database "sourceDB$($options.Timestamp)" -WindowsAuthentication
-
Defining parameter for the database to be used as a destination during the schema and data synchronization:
$destinationDB = New-ApexSqlDatabaseConnection -ConnectionName "destinationDB" -Server "ProductionServer" -Database "destinationDB" -UserName "user" -Password "password"
-
Send notification that the pipeline has started:
Invoke-ApexSqlNotifyStep -Options $GlobalOptions -DistributionList "qa@example.com","dev@example.com" -Status started
-
Compare schemas of the source and destination databases, create a HTML report of the comparison results, and a synchronization script:
Invoke-ApexSqlSchemaSyncStep -Options $GlobalOptions -Source $sourceDB -Database $destinationDB
-
Compare data of the source and destination databases, create a HTML report of the comparison results, and a synchronization script:
Invoke-ApexSqlDataSyncStep -Options $GlobalOptions -Source $sourceDB -Database $destinationDB
-
Send notification that the pipeline has ended:
Invoke-ApexSqlNotifyStep -Options $GlobalOptions -DistributionList "qa@example.com","dev@example.com" -Status completed
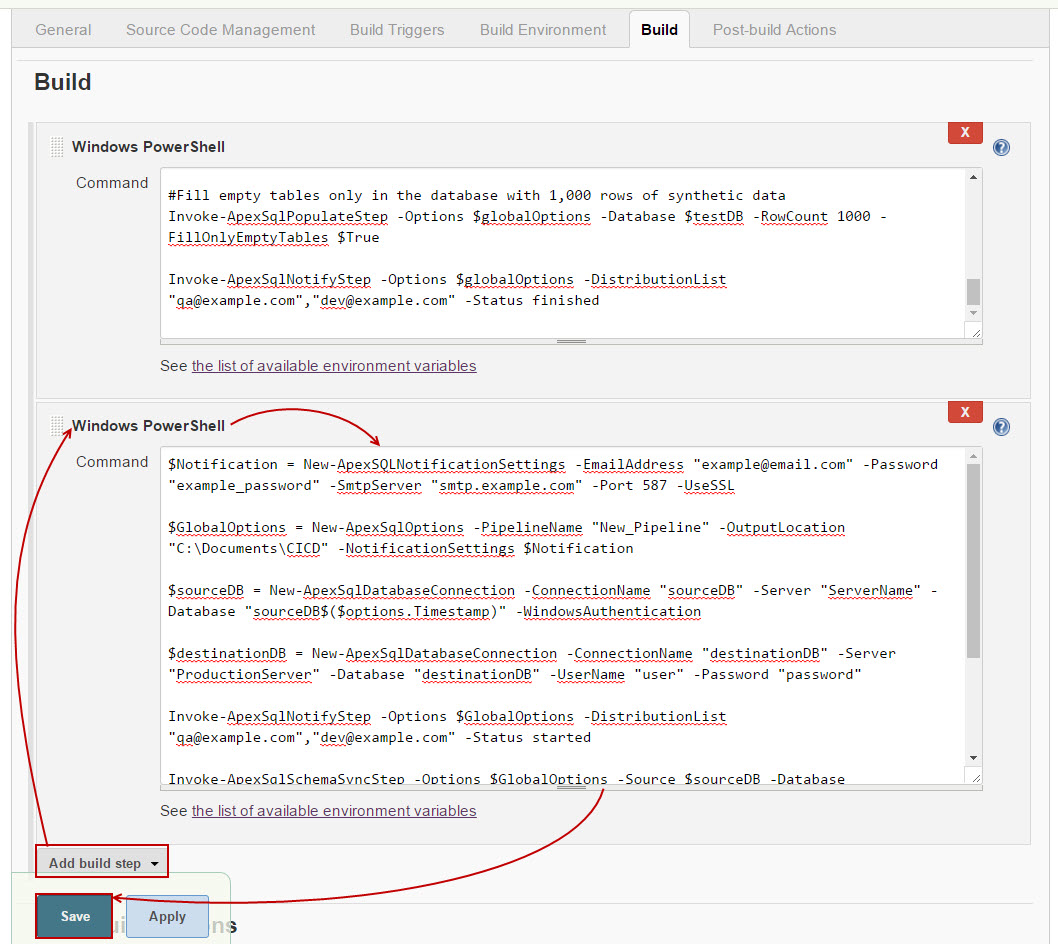
Option 1: Add schema and data synchronization steps as a part of the existing pipeline. The order of executing steps will be Build, Populate, Sync (schema then data).
When the window opens for customizing the pipeline (either if user wants to configure existing or he is creating a new one) under the Build tab click the Add build step button (like explained in the first example – Add build step → Windows PowerShell → Enter the PowerShell script → Save). If one step already exists, one more should be added to include sync step:
Option 2: Add schema and data synchronization steps as a new project which will start after the previous project is built.
In the current project window click the Back to Dashboard button on the left side menu:
When the dashboard opens, click the New item button on the left side menu, and continue creating a new project as explained earlier in this article:

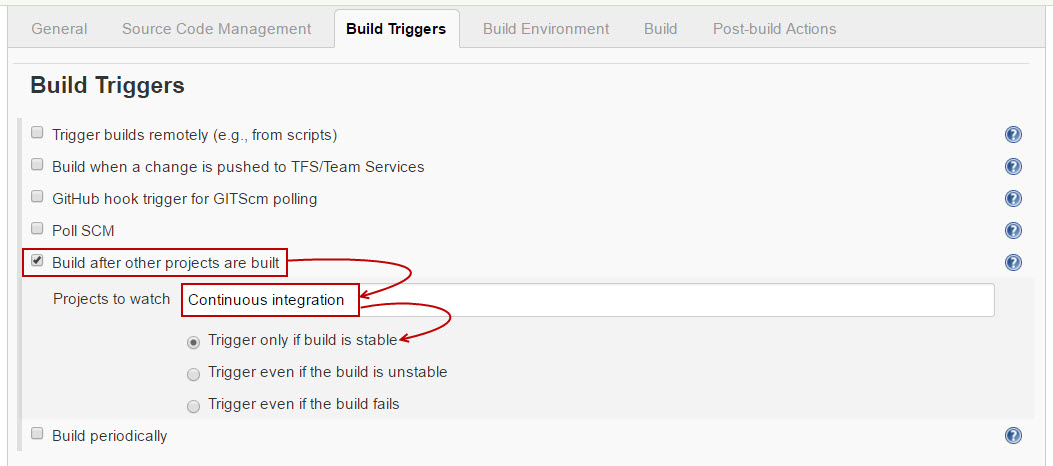
In the Build triggers tab check the option Build after other projects are built, then name the project to be watched for this action (Continuous integration in this example) and select the option Trigger only if build is stable. This way, this project is scheduled to start only if previous project (Continuous integration) is stable:
|
Quick tip: Using the “Build after other projects are built” option is reasonable only if those two projects are connected in some way. For other situations, running this process can be scheduled like explained in the first example (e.g. every hour). |
After the new project is created, it will be visible in the dashboard:

FAQs
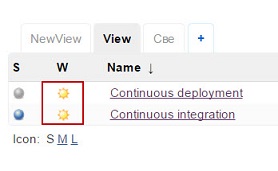
Q: How will I know if particular build is stable?
A: Jenkins server has symbols for build stability and they are presented as a weather report. They can be seen next to the project name:
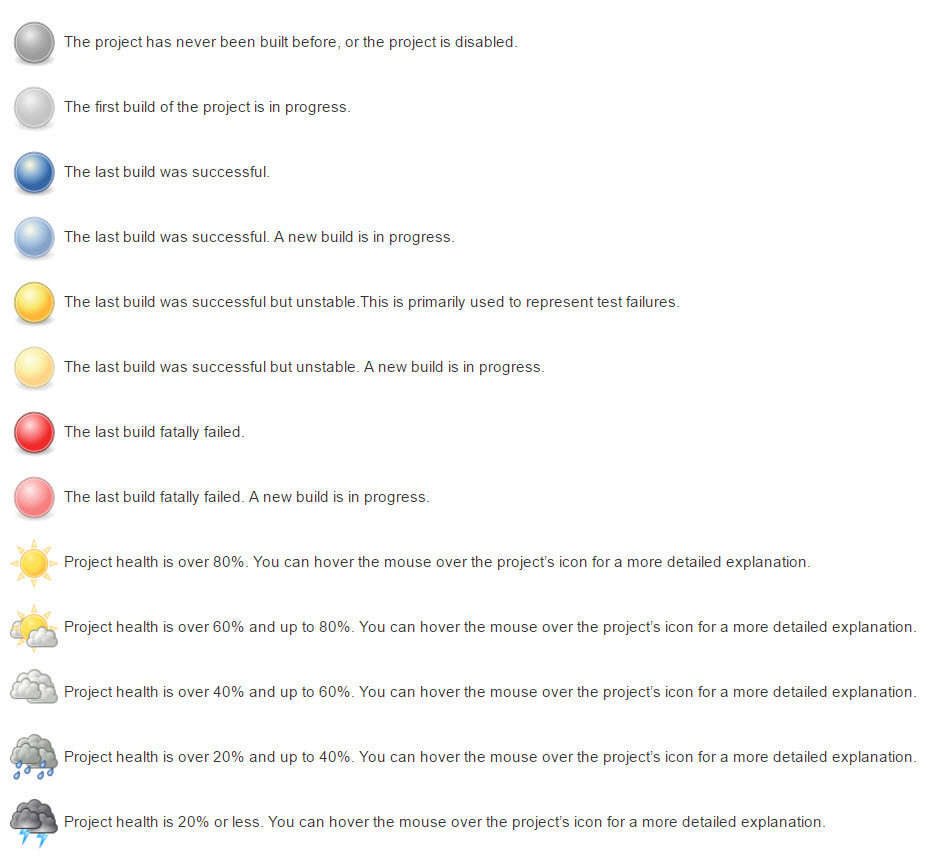
Q: Is there a legend for Jenkins symbols?
A: Yes. The Dashboard window has a link “Legend”:

This link leads to the Legend window with the detailed explanation of all symbols for the build’s status and stability:
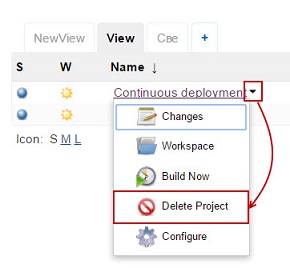
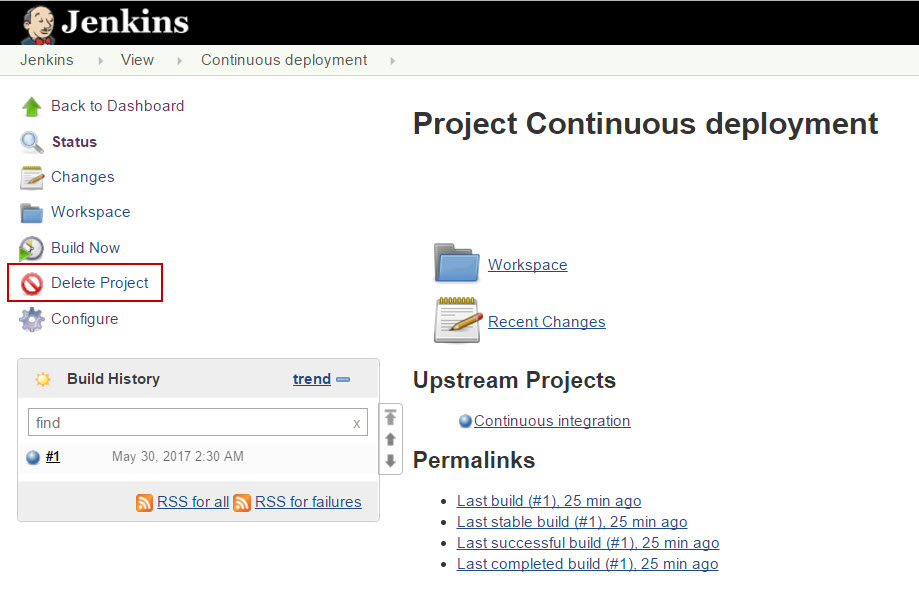
Q: Can a project be deleted when it is not needed anymore?
A: Yes. A project can be deleted by clicking the Delete Project button from the left side menu of the project window:
Another way to delete a project is from the Dashboard window. Click on the arrow next to the project name and select the Delete Project option from the drop-down menu: