


Applies to
Summary
This article outlines the functionality of managing multiple central servers via a single ApexSQL Audit UI console.
Description
Starting with ApexSQL Audit 2024, users are able to administer SQL Server auditing in an environment containing multiple central servers via a single point of control. Understanding the structure of the environment is enabled through the server tree, which provides a full overview of all the servers and databases which have been added for auditing.
The ability to change connections from one central server to another allows users to perform all auditing-related tasks from a single UI console.
Network and permission requirements
To successfully manage multiple central servers from a single UI, the central instances involved need to have the same (build) version, and the following requirements must be met:
Network Connectivity:
All central servers from the configuration must be accessible via the TCP port specified during the installation of the respective central instances (64561 is set as default). Otherwise, ApexSQL components will not be able to communicate and establish remote UI connections.
User Permissions:
The account that will manage multiple central servers from a remote UI console requires access permissions, which are defined through Application roles. The appropriate role must be assigned to the account for each central instance present in the configuration to allow remote UI access.
For more information refer to How to allow or deny certain user access to the ApexSQL Audit GUI article.
Adding multiple central servers to the local UI configuration
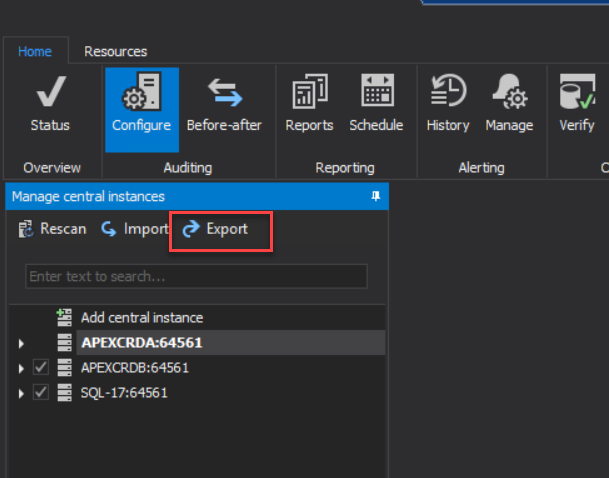
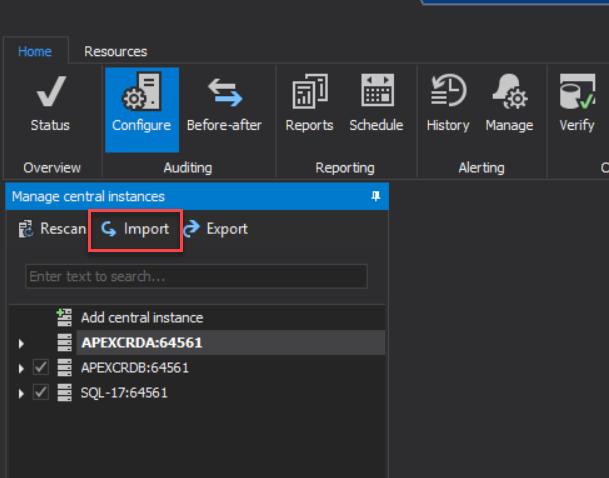
The first step in adding multiple central servers to a single ApexSQL Audit UI is clicking on the Manage central instances button that has been added to the Configure tab.
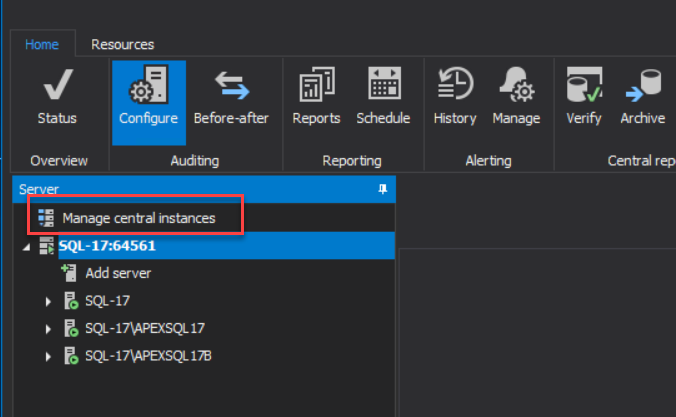
After the Manage central instances button is clicked, a new dialog is displayed (shown in the image below).
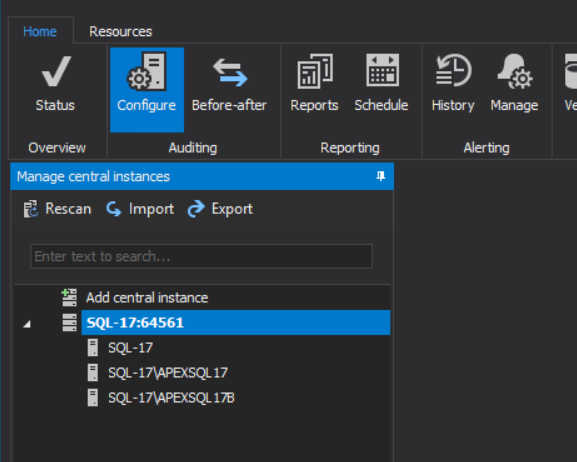
The following options are available:
- Rescan – this option is used to refresh the list of available Central instances in the given network. When it is clicked, it scans the network for central server installations and if any are discovered – they are placed on the list of available central instances that can be added to the local UI configuration.
- Import – this button is used to import previously exported Central server configurations.
- Export – is used to export the Central server configuration as an .xml The file preserves the information about all the central servers that are added to the local UI configuration.
- Remove – the button is used to remove a central instance from the configuration. It will remove the instance that is selected from the list.
- Search box – the text box which can be used to search for specific instances that are available on the list
- Add central instance – this button is used to manually add a central server to the list of available central instances. Upon clicking the button, a connection form is displayed where the name of the Windows machine that hosts the central server needs to be provided as well as the port number that was specified during the installation of the central server (it is automatically populated with the default value – 64561)
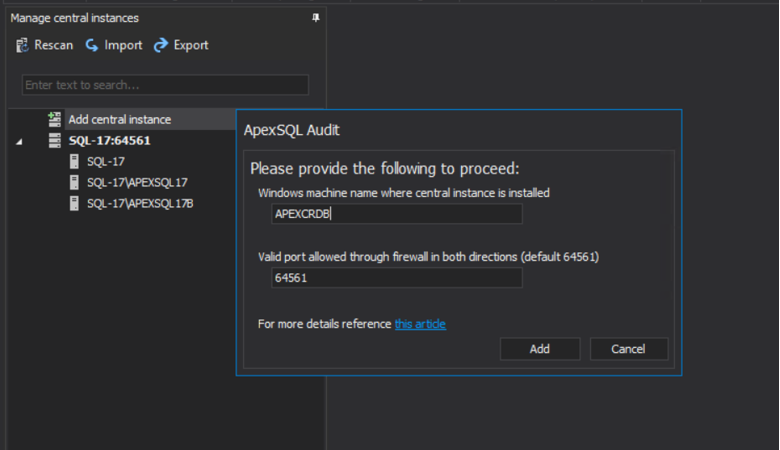
After the required information has been provided, and Add is clicked, the central instance is added to the list of available central servers.

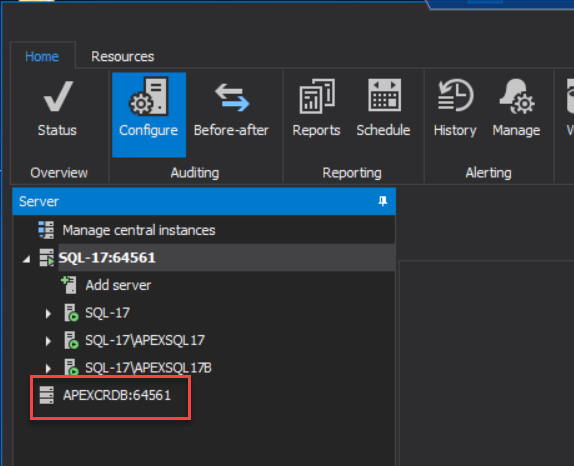
The final step in adding the instance to the local configuration is to select the checkbox next to the server and clicking on OK at the bottom of the dialog. After these steps have been completed, the newly added central server will be present as an available connection in the server tree of the Configure tab.
It is important to stress that if the central server has been discovered by the network scan and placed on the list of available central instances automatically, it simply needs to be selected from the list and added to the configuration.
Switching the connection to another central server UI
ApexSQL Audit 2024 allows the user to work with one central server connection at a time. Therefore, managing the auditing configuration and generating reports will be available only for the currently active connection.
Changing the connection from one central server to another is performed from the Configure tab. There are three ways in which a connection can be made:
- By double-clicking on the specific central server connection in the server tree
- By selecting the appropriate connection and then choosing Connect from the right-click context menu
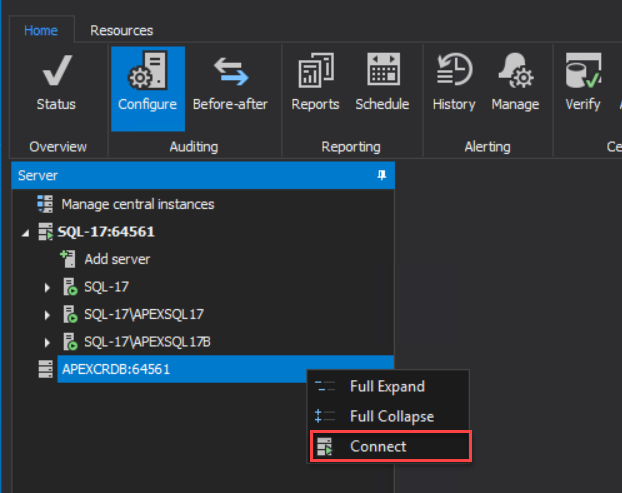
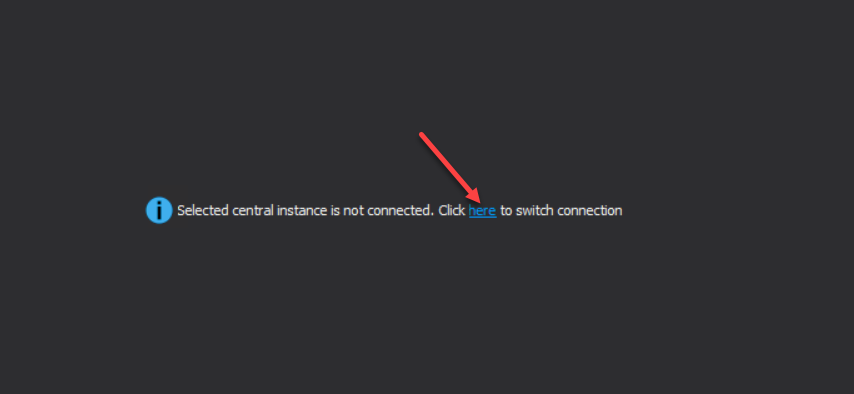
- By selecting the specific central server connection in the server tree and then clicking on the here link from the message displayed in the pane on the right.
Connectivity status of central instances
When opening Manage central instances or clicking on Rescan, Audit scans the network for available central servers and displays their connectivity status.
If a central server is accessible, it is displayed with a star icon (representing a newly detected central instance) and can easily be selected or deselected. However, if the server is in a refreshing state (grey icon), inaccessible or of a different version (red icon), it will contain an appropriate icon and a tooltip.
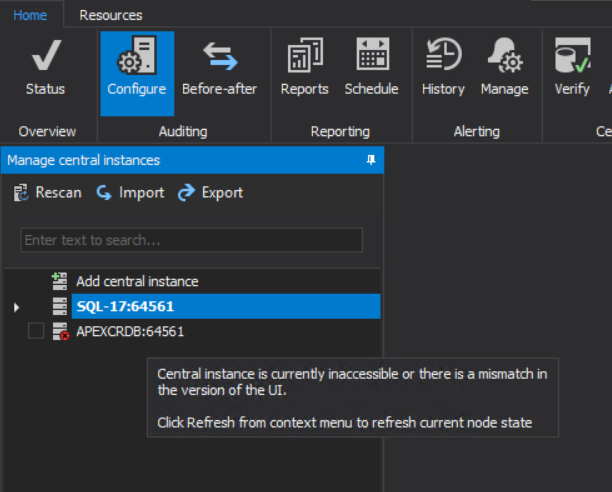
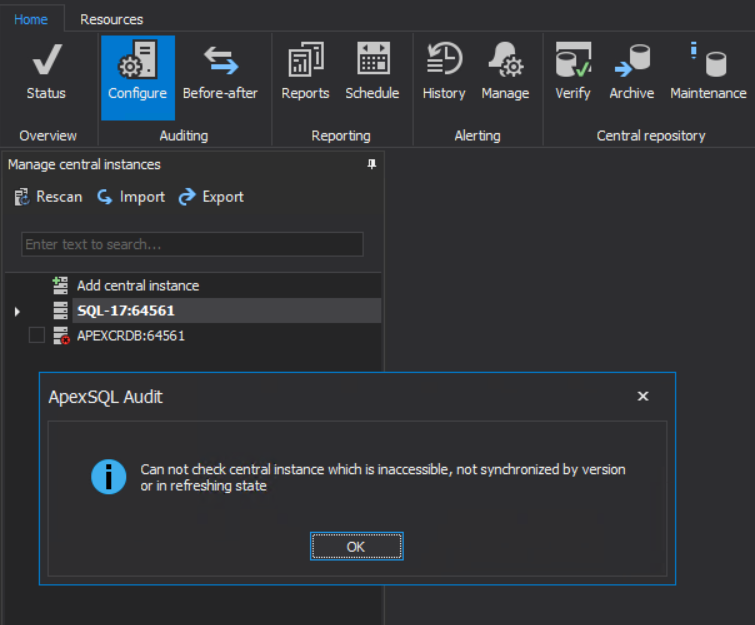
Also, when attempting to select a server that is currently not accessible or that has a different version from the current UI, a message informs the user that the server cannot be selected.
Auditing information available in the UI
Apart from the server tree in the Configure tab, where both the appearance and the functionality have been modified – other features, options and tabs remain unchanged due to the fact that users will be allowed to work with one central server connection at a time.
This means that the information available will depend on the central server connection that is currently active. In the example shown below, APEXCRDA connection is active in the Configure tab,
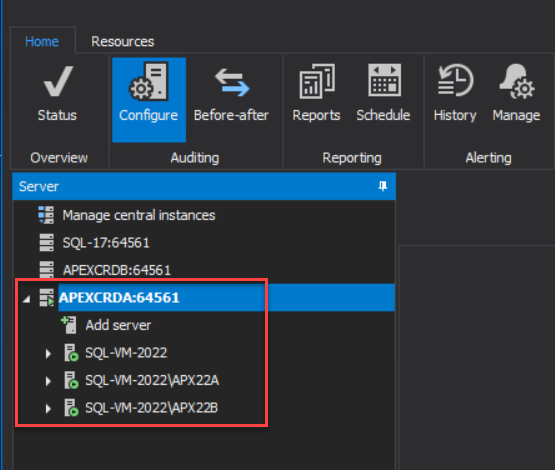
and therefore, only APEXCRDA information is displayed in the Status tab.
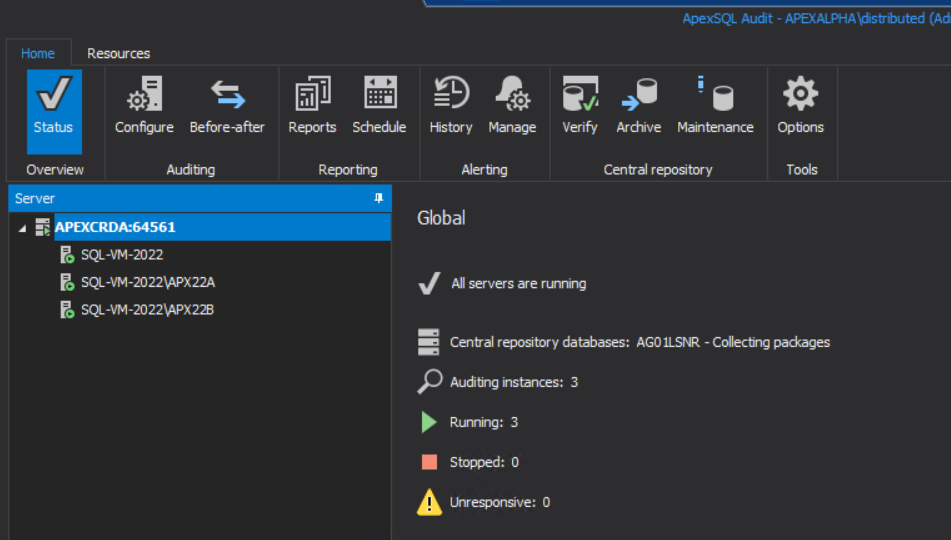
When the connection is changed, the information throughout the UI changes as well and corresponds to the new central server connection.
File management from a remote UI connection
When managing multiple central servers via a remote UI connection, it is beneficial to understand the capabilities of ApexSQL Audit 2024 related to setting file locations for reports and configuration files.
When manually generating reports (or exporting\importing configurations) on a remote central server UI connection, the file system of the local machine will be used by default. Browsing and selecting a path from the file system of the remote central server connection is not supported, unless it is a shared location that is accessible via the network.
Setting the export path for scheduled reports
The remote central server connection has a specific requirement for setting the location of scheduled report exports. When a connection to a remote central server UI is made, the option for setting the custom export path of the scheduled report is disabled and the user is informed that changes can only be made from the local (original) UI connection.
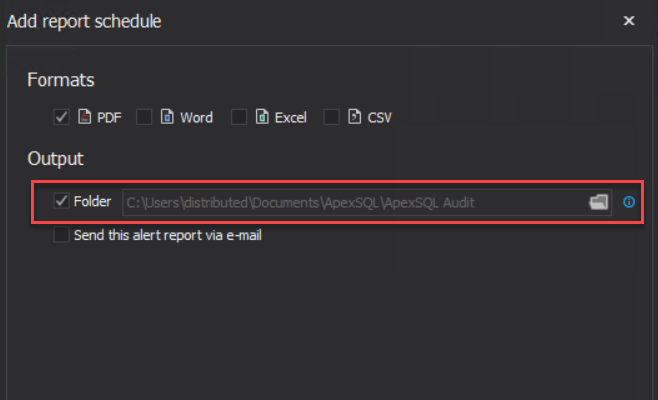
The specified location that is greyed out refers to a path on the machine where the central server is installed, and this is where the scheduled report files will be saved (and not on the local machine from which the remote UI connection is made). Therefore, setting a custom export path will only be available on the local (original) central server connection.
Exporting and importing the configuration
ApexSQL Audit 2024 provides the ability to export and import the configuration in the form of an. xml file that preserves the information about the central servers that have been added to the UI.
To import, open Manage central instances, click Import, and select the .xml file. This configuration can be imported and used on any central server which is accessible via the network.
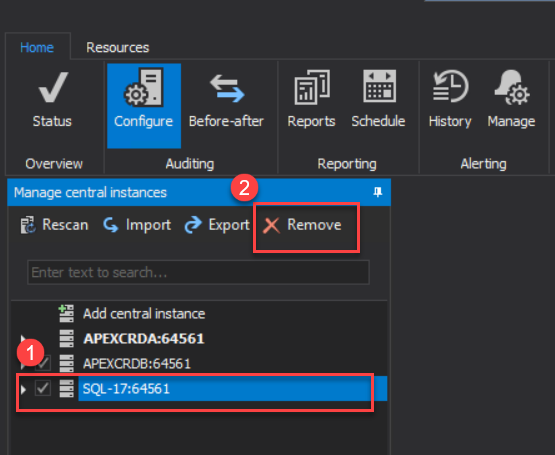
Removing a central server from the configuration
If a specific central instance is decommissioned or migrated to another network, it is best to remove it from the Manage central instances configuration.
The removal can be performed in three ways:
- By deselecting the checkbox next to the appropriate central instance from the list

- By selecting a specific central instance from the list, and then clicking on the Remove button
- By right-clicking on a central instance from the list, and then selecting Remove from the context menu
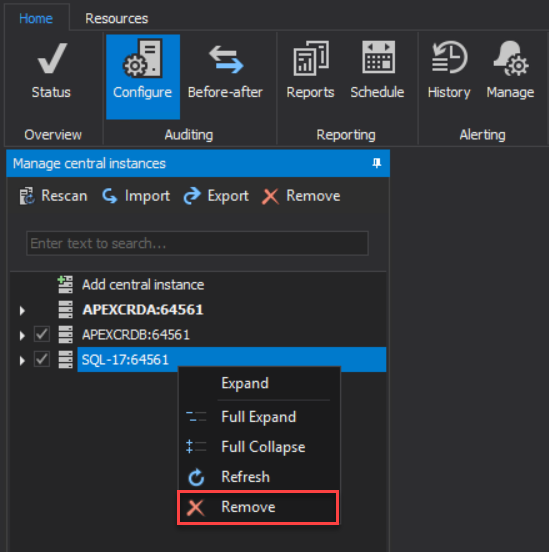
To complete the process and remove the central instance connection from the UI completely, the OK button needs to be clicked.


