


Applies to
All grid based ApexSQL tools
Summary
This article will cover all aspects of filtering rows in grids.
Description
In this article, all filtering options and features will be explained and will be shown how to use them in the best way. We will use ApexSQL Enforce and ApexSQL Backup as example applications for this article.
Filtering
Every ApexSQL grid allows users to set which type of data will be present in the grid. Beside showing/hiding grid columns with a specific type of data, users can additionally filter the data inside of the grid columns.
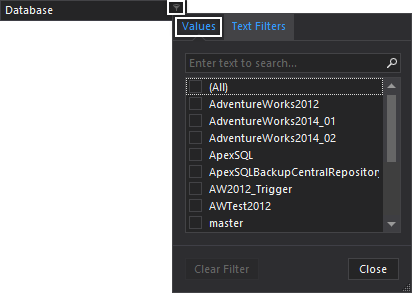
Every column has its own filter, an icon for which is located in the right part of the column header. Clicking on the filter icon will open the filter window, under the Values tab, determines what rows will be shown in that column. Under the Text filters tab, it can be specified, first the condition for filtering and then to the value for that specific filter condition.
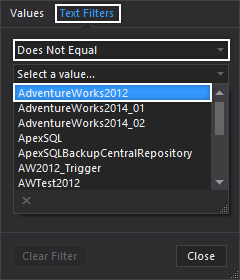
For example, to filter colums data to show only data which is different from the AdventureWorks2012 database, under the Text filters tab select the Does not equal filter and from a dropdown values list check the AdventureWorks2012 database.
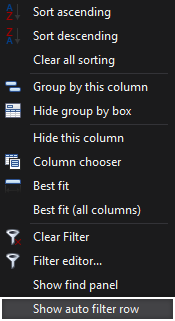
Another way to filter data is through the Auto filter row. By default, this row is hidden, and to add it to the grid, right click on any of the column’s header and from the context menu choose the Show auto filter row command:
In this row, a filter for every column can be specified, as well as the filter value, directly in the grid.
No matter how the filter is specified, from the column header filter or through the auto filter row, every added filter will be included in the Filter panel, located at the bottom of the window.
From the Filter panel, all filters can be removed or edited. To remove all the filter, click on the X button on the left side of the Filter panel. This action will close the Filter panel, since after removing the filter, there is nothing to be shown.
To remove the filter from the specific column, right click on the column’s header and from the context menu choose the Clear filter command. This action will remove the filter from the only selected column, and from the filter panel, and all other filters, if exist will remain intact.
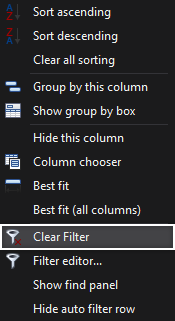
To edit the filter, click the Edit filter command on the right side of the Filter panel. This action will open the Filter editor window. The Filter editor window can be open in one more way. Right click on the column header and from the context menu choose the Filter editor command.

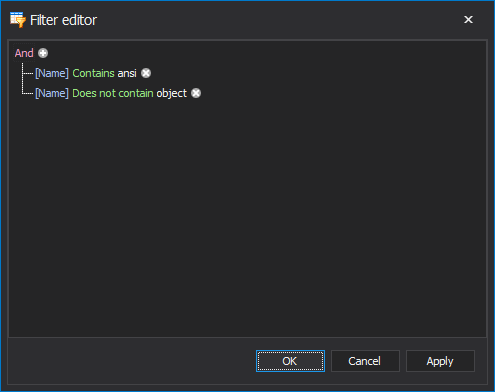
In the Filter editor window, every already specified filter can be edited, and new filters can be added. In this window can be specified several filter conditions for one column, which cannot be done from the auto filter row or from the column filter.
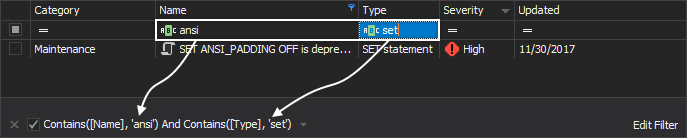
For example, for the Name column, we want to filter objects that contain “ansi” but do not contain “object” in the name. So, we will add two filter conditions for the Name column. First, we will choose the column to which the filter will be applied. Then we will specify the filter condition, “contains”, and entered the filter value “ansi”. For the second filter, we will choose the same column, specified the filter conditions “does not contain” and enter the filter value “object”.
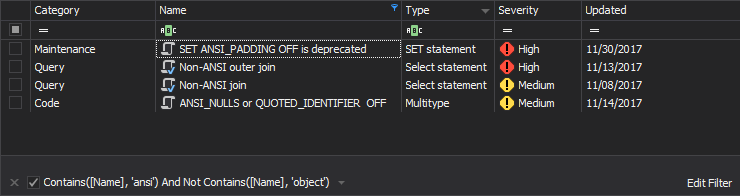
After click on the OK button, these filters will be applied to the Name column, and results will be:
Q: Will filter settings be saved between the sessions?
A: No. but in one session, all filter settings will be saved in the filter panel dropdown list, and they can be chosen from a dropdown list at any time. To apply it, select the filter settings and check it.

See also
For a list of all articles on ApexSQL grid customization and usage see:
- Managing grid columns
- Grouping grid rows
- Sorting columns
- Filtering rows in grids
- Searching data in grids
- Managing rows in grids


