


Applies to
ApexSQL DevOps toolkit
Summary
This article explains how to configure an Atlassian Bamboo build server for setting up a continuous integration and delivery process with the ApexSQL DevOps toolkit.
Description
Atlassian Bamboo is a continuous integration (CI) and continuous deployment (CD) build server, which can be used for automating release management for a software application, by creating continuous delivery pipelines.
Release management is the process of managing, planning, scheduling and controlling a software build through different stages and environments. That includes testing and deploying of software releases.
Continuous integration is a software development methodology in which several actions can be performed, or triggered, like steps for building, unit testing and documentation, whenever a change is recognized in the repository.
In the context of databases, continuous integration refers to the concept of individual database changes recognized and integrated as soon as they are applied and pushed to a source control repository aka committed.
Use case scenario, which will be explained in this article will consist of the following:
- Changes are made on the database and commits these changes to a source control repository. This step will initially trigger the CI process
- Build a new database based on the latest changes committed to the source control repository (static data is also inserted)
- Populate empty tables only, in the newly created database with test data
- Create triggers to audit sensitive data in the previously created database
- Run unit tests against the created database
- Run built-in or custom written rules
- Package database schema and static data
- Generate schema sync script
- Generate data sync script (if there were data changes)
- Generate database documentation
- Deploy sync scripts to update production database
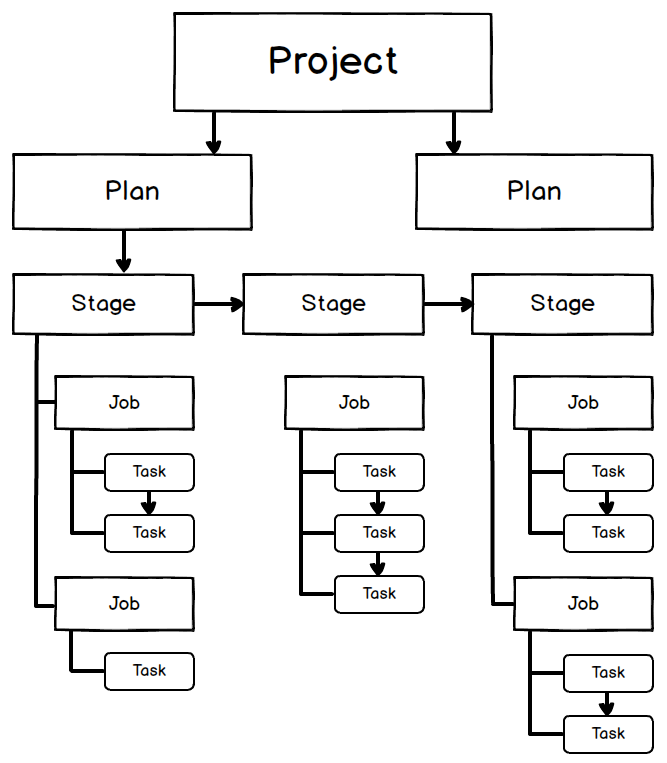
Bamboo has a workflow organized in the following way:
- Task – a small unit of work (run a script for example)
- Job – processes one or more tasks that are run sequentially on the same agent
- Stage – by default has a single job but can be used for grouping multiple jobs
- Plan – by default, a Plan, has a single stage, but can be used for grouping multiple stages
- Project – consists of one or more plans
Each of these steps will be explained with more details later in the article.
Visually, Bamboo workflow could be presented like this:
Before explaining how to setup a process with Bamboo server, let’s make sure that everything Is downloaded, configured and installed.
The following steps should be performed for the successful integration of ApexSQL DevOps toolkit with the Bamboo server:
- Download and install Windows PowerShell
- Download and install all ApexSQL developer tools which will be included in the CI/CD process. List of the ApexSQL products that should be downloaded depends on the user’s needs, but to cover all steps in this workflow, following products should be downloaded:
- ApexSQL Build – to Build a new test/staging database (including static data) from source control
- ApexSQL Generate – to Populate remaining, empty tables with synthetic test data
- ApexSQL Trigger – to add Audit triggers to sensitive tables
- ApexSQL Enforce – to run Review of database based on built-in or custom written rules
- ApexSQL Unit Test – to Unit test the new database
- ApexSQL Script and ApexSQL Data Diff – to Package database schema and static data
- ApexSQL Diff – to create schema sync script
- ApexSQL Data Diff – to create data sync script
- ApexSQL Doc – to document the new database
|
Quick tip: Required versions of Windows PowerShell and ApexSQL tools for successful running of the CI/CD process can be found in the System requirements page |
- Download and install the ApexSQL DevOps PowerShell cmdlets which are used in the ApexSQL DevOps toolkit for running CI/CD pipeline
- Initially configure ApexSQL DevOps toolkit PowerShell scripts (the linked article explains how to configure basic parameters for the PowerShell script)
- Configure ApexSQL DevOps toolkit PowerShell scripts (the linked article explains how to configure each CI step in the PowerShell script). More information about ApexSQL DevOps toolkit can be found in the ApexSQL DevOps toolkit PowerShell FAQs article
- Download and install Bamboo
- Set up Bamboo
|
Quick tip: During the installation of Bamboo, in the Choose a database configuration step, select the External option and from the drop-down list select Microsoft SQL Server |
Once everything is installed and prepared, a new project in the Bamboo can be created.
The following example will consist of creating a new project which will have one plan. That plan will consist of one job and one task. Additionally, creating task for each CI/CD pipeline step individually will be explained as well.
The number and structure of jobs and tasks can vary, depending on user’s needs.
Each task will be followed by notification messages about the status of the pipeline.
To create a new build plan, follow these steps:
-
Click the Create button in the main ribbon and select the Create a new plan command from the drop-down menu:

The Plan consists of all information about the build process i.e. what will be built, how the build will be triggered or what jobs will be executed.
-
In the Configure plan step, under the Project and build plan name, a Project name should be entered (Database CI CD in this example) and the Project key will be automatically created. The same should be done for the Plan name – Plan key will be automatically created. Project description and Plan description is optional field:

-
In the Link repository to a new build plan section, the second part of the Configure plan step, the Repository host should be selected and the type of the source control repository. In this example the Link new repository option is selected as a Repository host and BitBucket Cloud is chosen from the drop-down list. The Display name should be entered, along with Repository access and authentication type. In this example, username and password are provided for accessing an existing repository on BitBucket. Click the Load Repositories button and choose a desired one from the drop-down list. By default, the master branch will be loaded, but if needed, other one can be chosen from its drop-down list. Click the Test connection button to check if the connection repository is good and the Connection successful message will be shown if everything is fine:
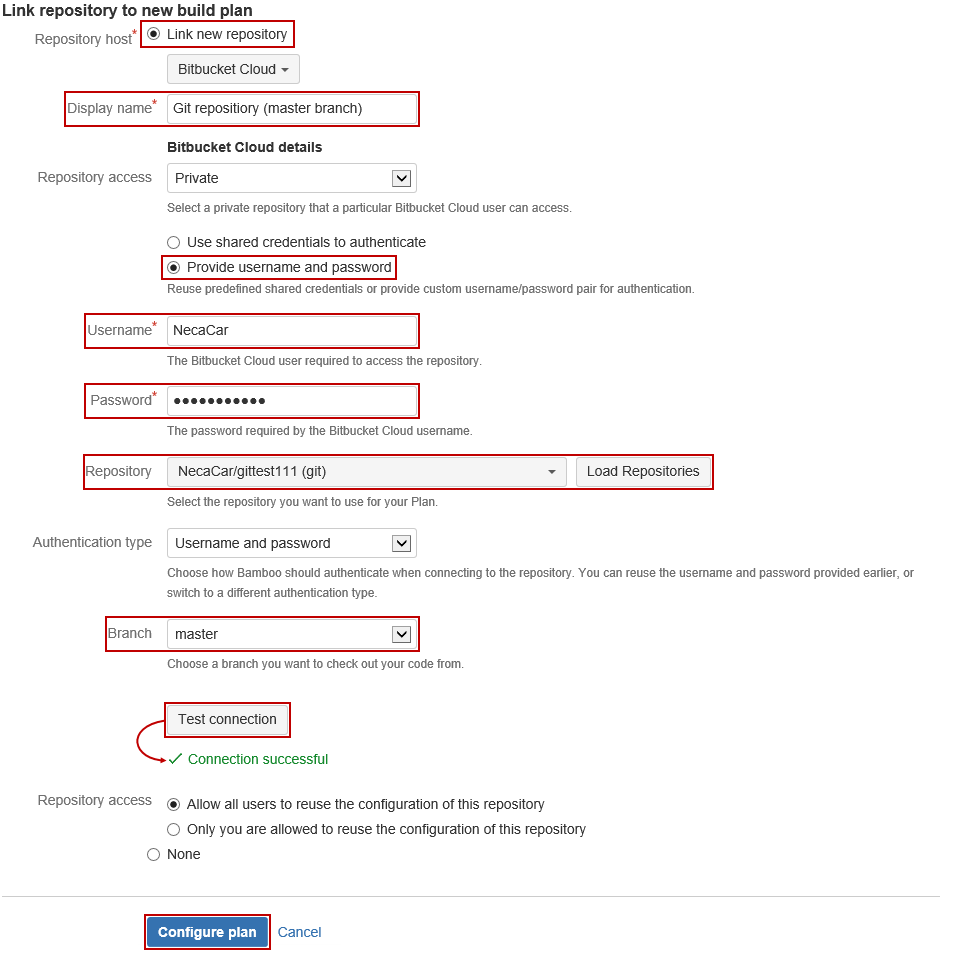
In the bottom of the page is an option to select who can access the repository. If the team is working together, and each team member is working on some part of the database and committing changes to the repository, then the Allow all users to reuse the configuration of this repository option should be selected. In the different situation, if only one user is allowed to access the repository, then the other option should be selected.
After everything is set in this step of the wizard, the Configure plan button should be clicked in the bottom of the page.
-
Next step in this wizard is the Configure tasks step. An explanation of the task is given below the window’s name. By default, the Source Code Checkout task is created already, and it is used for checking out the changes in the default source control repository to which this plan was linked in the beginning. A new task can be created with a click on the Add task button:
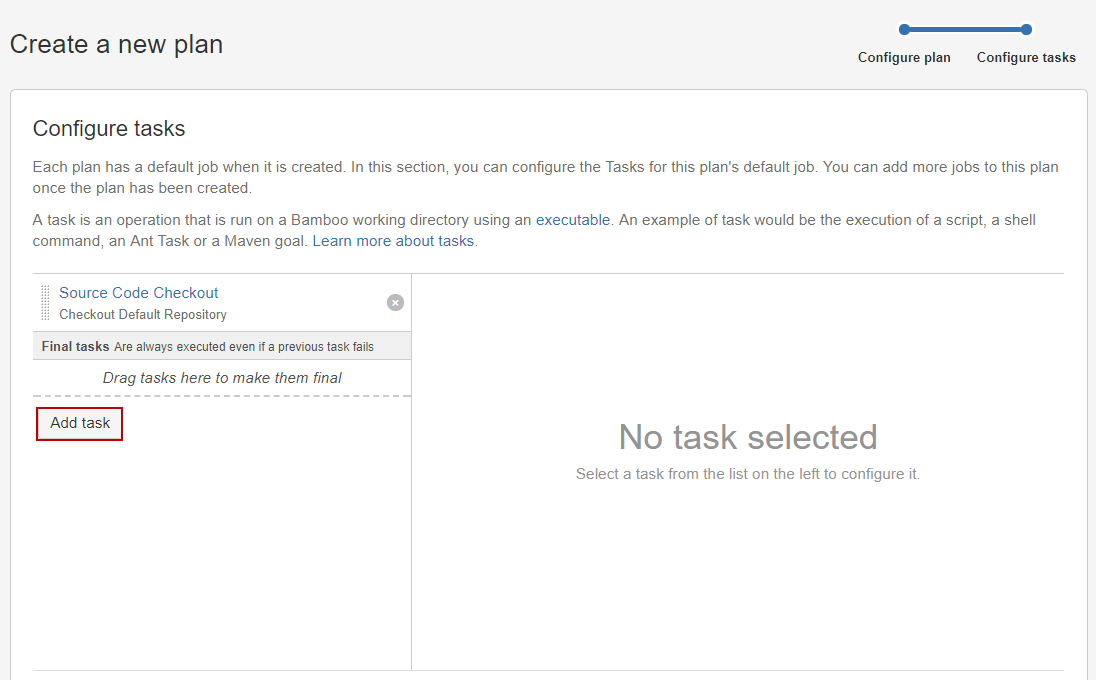
The Task types window will pop up and, in the search field, the word script should be entered for narrowing the search. Then the Script option should be clicked for selecting the PowerShell script for execution:

-
The Script configuration window will open and a task can be configured.
There are 2 ways to configure tasks:
-
Using ApexSQL DevOps toolkit example scripts for CI and CD pipeline:
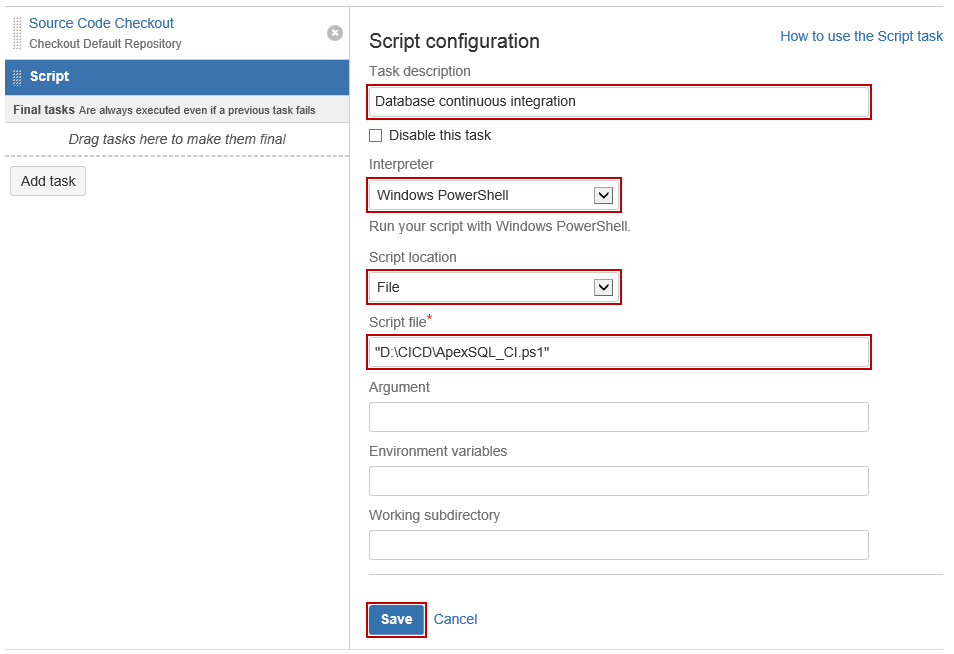
The Task description field is optional, but if there are more than one task of the same type, this is recommended as they will all have the same name (Script in this case), and this way the user will know exactly which tasks are in the job. From the Interpreter drop-down menu, the Windows PowerShell option should be selected, so the server will know which type of script is used. From the Script location drop-down menu, the File or the Inline option can be selected. In this example, the File will be used, thus the path to the PowerShell script should be provided in the Script file text box:

Quick tip:
For the Inline option the content of the PowerShell script should be entered in the Script body text box.
The PowerShell one-click script ApexSQL_CI.ps1 consists of all steps that will be run in the CI pipeline (e.g. Build/Populate/Audit/Review/Test/Package), configured respectively as they were described in the beginning of this article. An example of this script can be found in the ApexSQL DevOps toolkit GitHub page. For more information about how to configure PowerShell script for CI, please check the article on How to configure the ApexSQL DevOps toolkit PowerShell scripts for Continuous integration (CI).
After everything is configured click the Save button for saving this task.
Now, click the Add task button again and the set the same options, but now the PowerShell one-click script ApexSQL_CD.ps1 that consists of all steps that will be run in the CD pipeline (e.g. SchemaSync/DataSync/Document/Deploy/Package) will be added into the Script file text box and Task description will be different, so that these tasks would be easier to recognize:

The PowerShell one-click script ApexSQL_CD.ps1 can be found in the ApexSQL DevOps toolkit GitHub page.
-
Creating separate tasks for each step from CI and CD pipeline:
Creating a task for each CI or CD step separately is another scenario. Each task should be created the same way as explained previously: Add task Script WindowsPowerShell. Script location should be either Inline or File, and a path to the script or script’s content should be provided. In the following example a new task will be created for the Build step with the Inline script location:

When creating individual tasks for each CI or CD step, the above-mentioned example scripts should be used to take the needed parts from them for each step and create “smaller” PowerShell scripts or to paste the code into the Script body text box. These new scripts should consist of the following elements:
- Configuring notification settings and global options
- Configuring the database connection (and only for Build step, configuring data source – source control repository)
- Sending notifications on pipeline start
- Running the CI step (e.g. Build/Populate/Audit/Review/Test/Package) or CD step (eg. SchemaSync/DataSync/Document/Deploy/Package)
- Send notification e-mail on pipeline end
For the Build step example, the PowerShell script would look like this:
#Email server settings used for notifications
$notificationSettings = New-ApexSQLNotificationSettings -EmailAddress "JohnDoe@gmail.com" -Password "mail_password" -SmtpServer "smtp.email.com" -Port 587 -UseSSL

#Global options (pipeline name, output folder location and notification settings)
$options = New-ApexSqlOptions -PipelineName "CI_Pipeline" -NotificationSettings $notificationSettings

#Define data source
$dsSC = New-ApexSQLSource -ConnectionName "git_source" -Source_Type "git" -Repository "https://admin@bitbucket.org/admin/gitproject.git" -Project "$/ProjectName" -UserName "Admin" -Password "P@$$M0Rd"

#Define target: new database (testing)
$dsQA = New-ApexSqlDatabaseConnection -ConnectionName "qaDB_dest" -Server "TestingServer" -Database "QAdb" -UserName "sa" -Password "123"

#Build step
Invoke-ApexSqlBuildStep -Options $options -Source $dsSC -Database $dsQA | Out-Null

#Notification step
Invoke-ApexSqlNotifyStep -Options $options -DistributionList "JohnDoe@gmail.com" -Status completed
For more information on setting up scripts, please check out the article about ApexSQL DevOps toolkit PowerShell scripts initial setup and configuration.
-
Using ApexSQL DevOps toolkit example scripts for CI and CD pipeline:
-
Now, when these two tasks for Database continuous integration and delivery have been created, the Create button should be clicked for finishing the creation of a new plan:
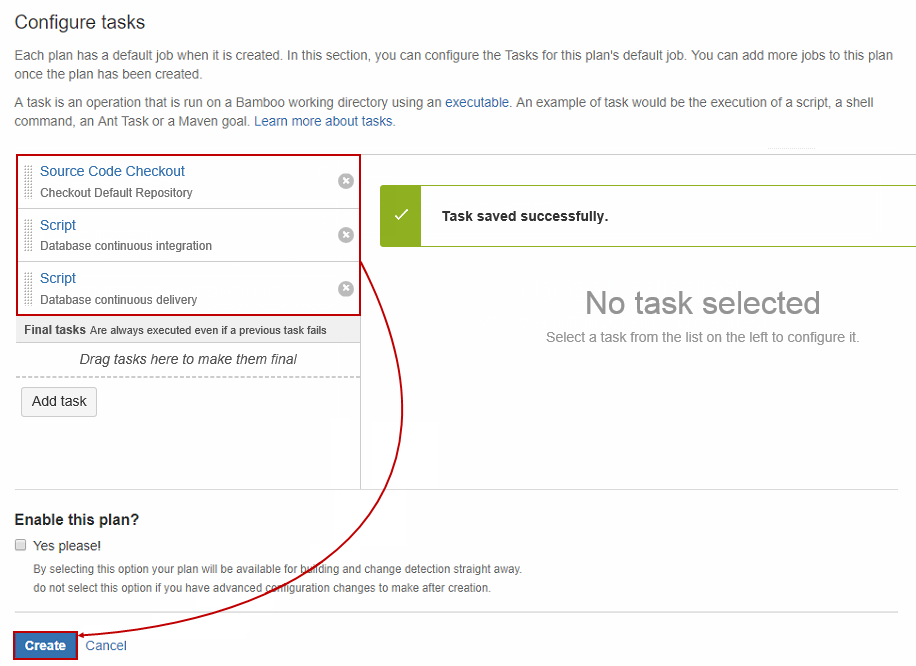
Quick tip:
Enabling a plan can be performed by checking this option in the bottom of the page. If this option is checked and the Create button is clicked after that, this plan will automatically start running. If some additional settings should be configured before running a plan, then the plan should be created without this option checked
-
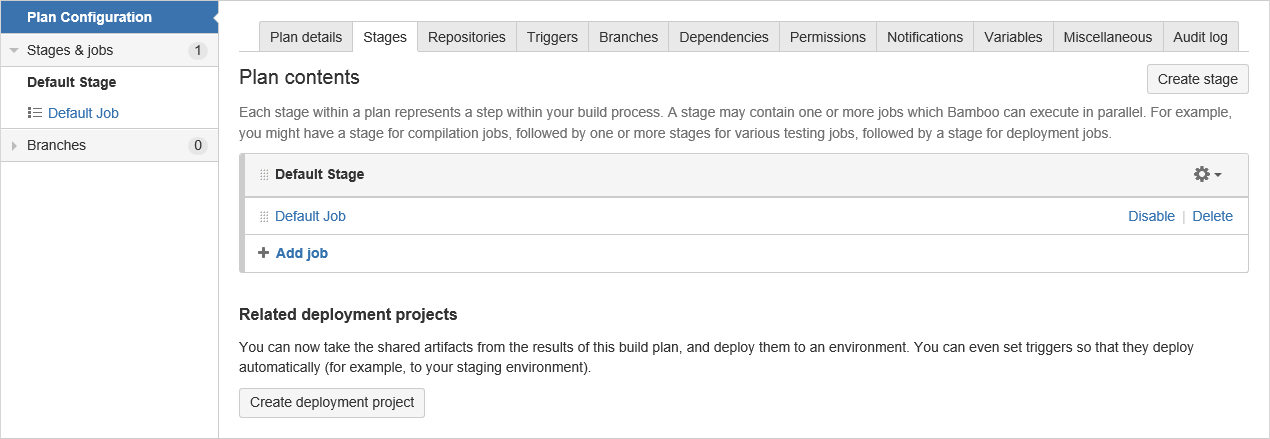
Once a plan is created it will be shown in the Plan configuration window, where additional settings can be configured, like adding a new stage, job, source control repository, etc.:
-
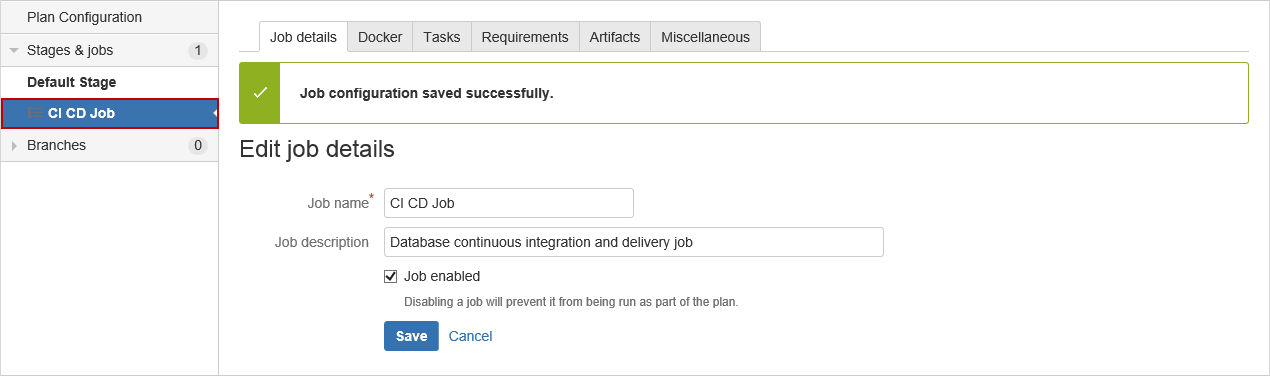
To change job name, expand the Stages and jobs panel of the left side and click the Default job tab:
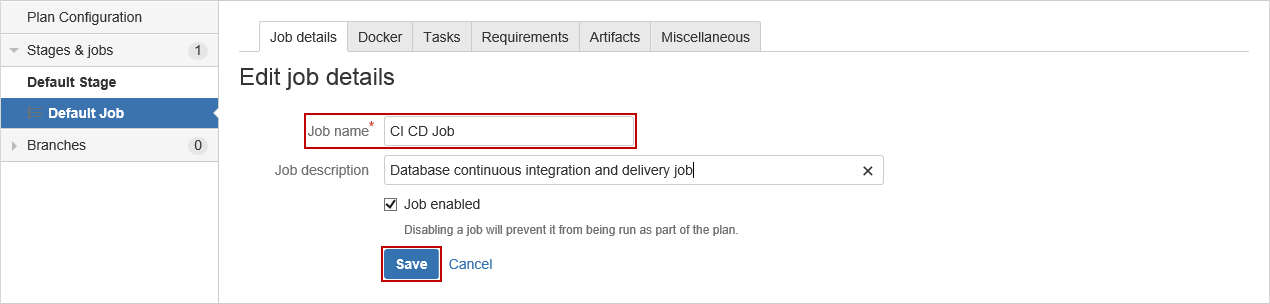
Here, the Job name can be changed and Job description can be provided. Once the Save button is clicked, a job name will be changed under the Stages and jobs panel:
-
For this example, a new trigger will be created. Triggers are used for automatically running the plan. The user should just create a trigger where they will define when the plan should start (e.g. every day at some defined time or after the change is recognized in the source control repository), and the process will run itself.
In this example a trigger will be created to check the source control repository for changes every 15 minutes, and when they recognize a change the plan should run.
Triggers can be created in the Triggers tab. The Repository polling is the default trigger which will be configured and saved for this example.
Trigger description is an optional field. The previously linked repository will be automatically checked, but if there are more than one repository, then they can be checked/unchecked per user’s needs.
Polling strategy is set to Periodically in this example, and Polling frequency is set to 900. This means that selected source control repository will be checked every 900 seconds (15 minutes) for changes:
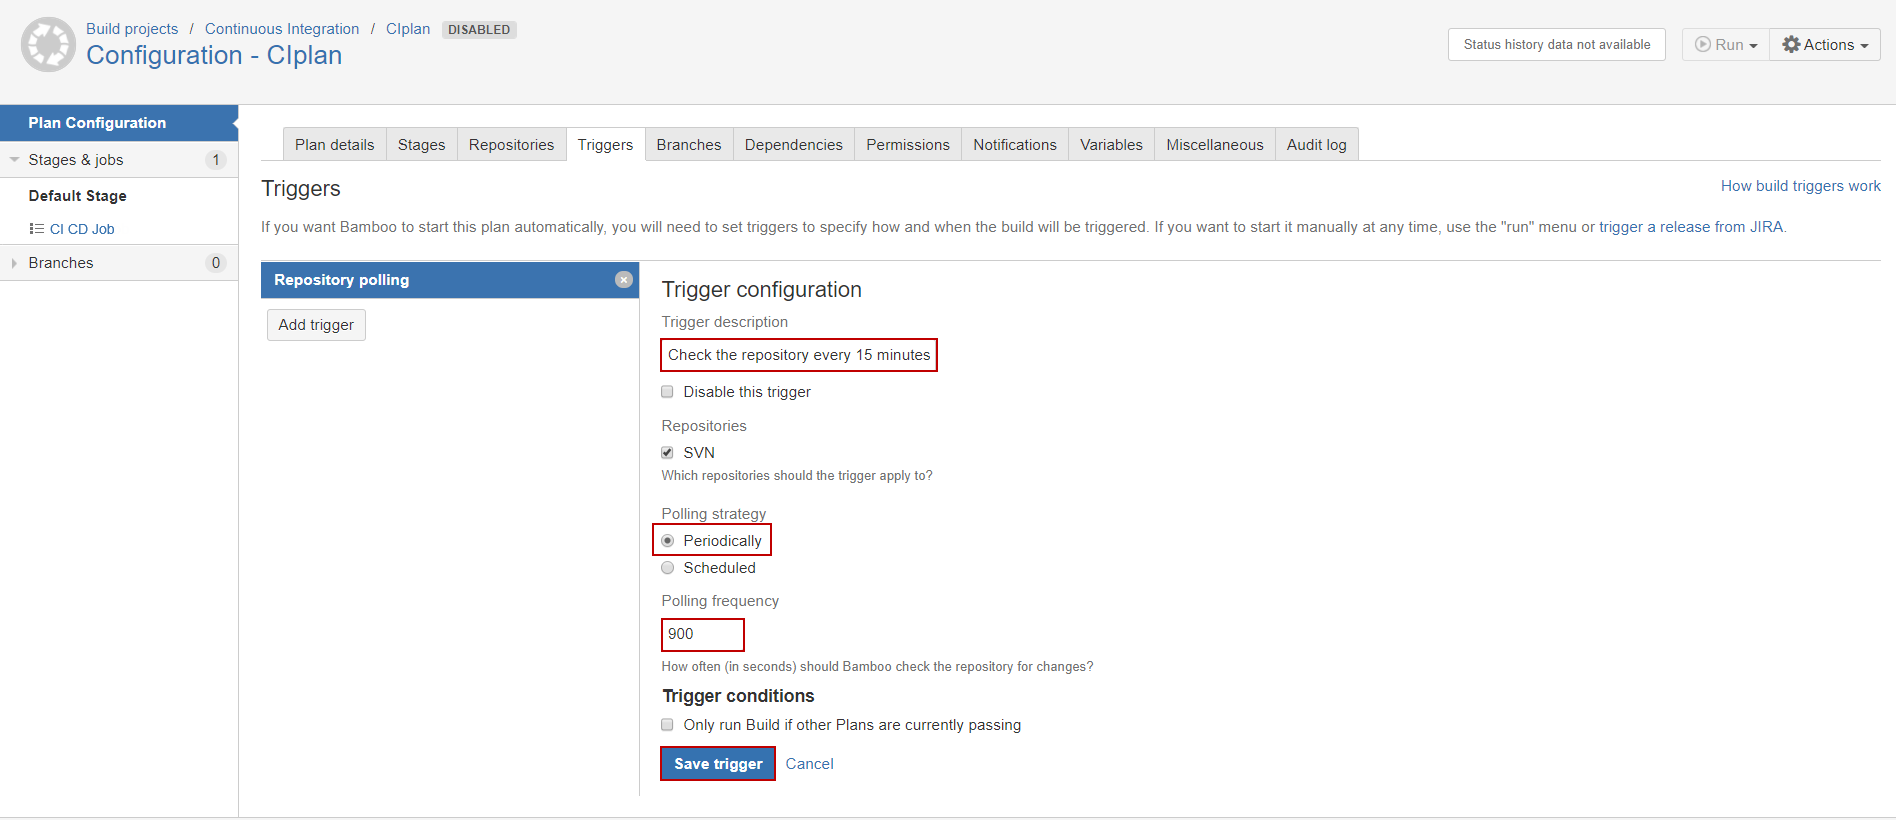
In the end the Save trigger button should be clicked for saving changes for the created trigger.
-
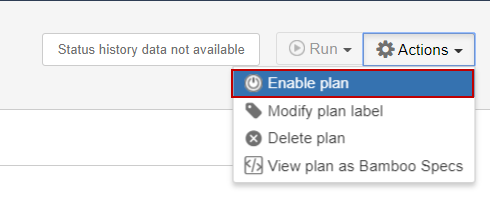
After everything is set and ready, the plan can be run. To run the plan, they should be enabled previously. This can be performed with a click on the Actions button in the upper-right corner and click the Enable plan option from the drop-down list:
Another option is to check the Plan enabled option in the Plan details tab (this option will automatically be checked if the first option is performed):
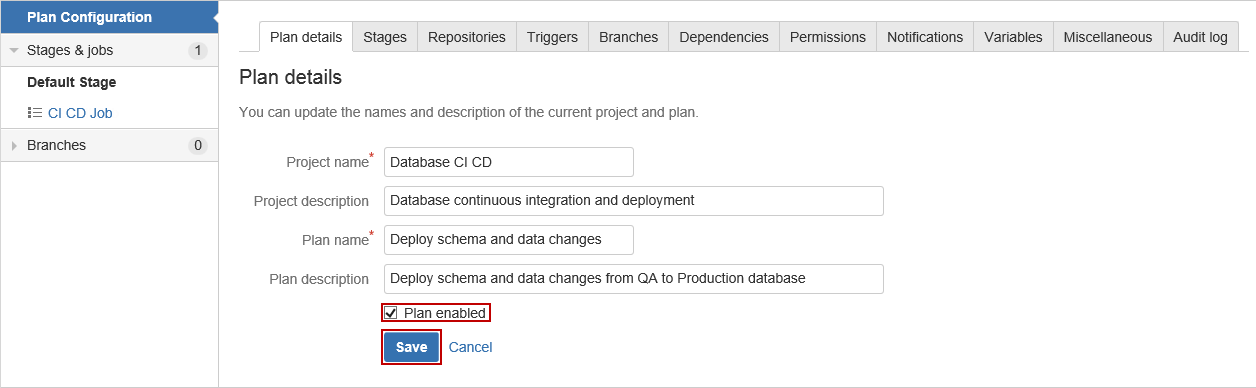
The Save button should be clicked after everything is set and the plan is ready to be run.
-
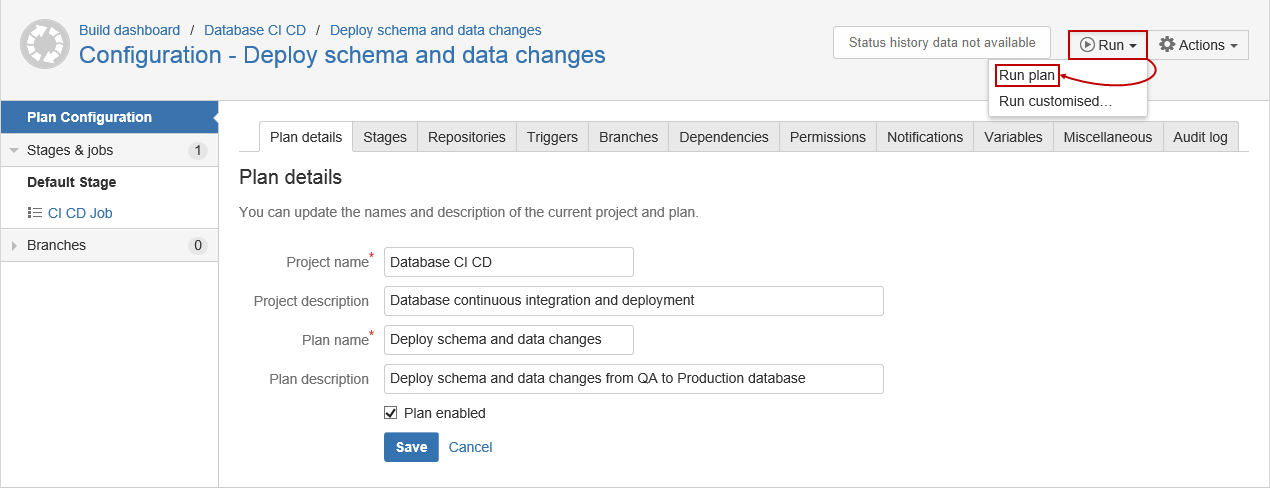
To run the plan, the Run button should be clicked in the upper-right corner, and the Run plan command should be selected from the drop-down list:
-
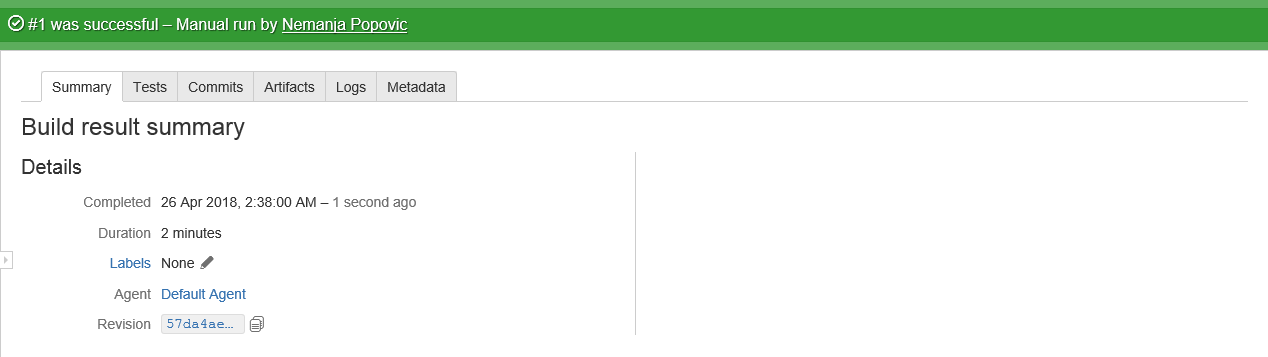
When the plan starts building it will show the Build result summary window, where basic information about that build, like build number, start time, duration, etc., can be seen:

-
Upon a completed build, the results will be shown in the Summary tab:
-
To see more information about executed steps, switch to the Logs tab:
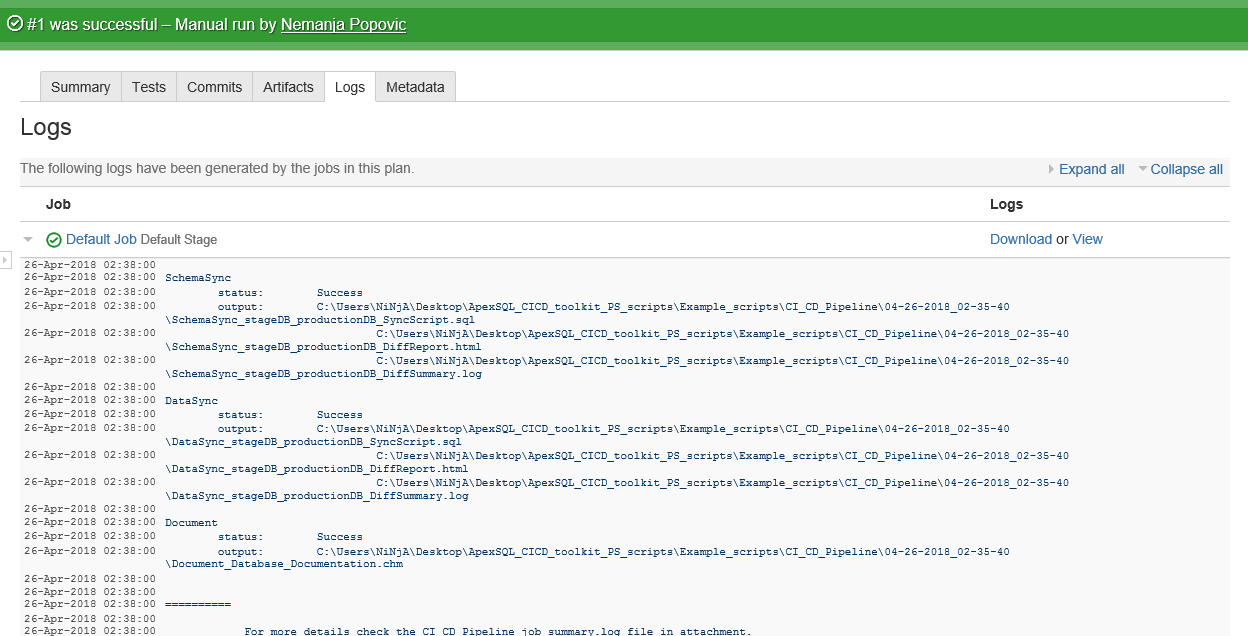
Logs will include information about result of each performed task with status information: Success or Failure.
For more detailed information about CI/CD pipeline execution, check the created CI_CD_Pipeline_job_summary output file (the name of this output file depends on the -PipelineName “CI_CD_Pipeline” switch in the example scripts). In examples below, the following steps are reviewed:
- The Build step:
Executing script C:\Users\NiNjA\AppData\Local\ApexSQL\ApexSQLBuild\script.sql:
Running script
Dropping database
Changed database context to ‘master’.
Create database Book_online_QAtest
Changed database context to ‘Book_online_QAtest’.
Create table Authors
Create table My_friends
Create table Phone_Book
Create table Publishers
Create view v_PhoneBook
Create procedure sp_give_me_the_numberSaved script to:
D:\CI_CD_Pipeline\04-27-2018_12-4853\Build_git_source_qaDB_dest_BuildScript.sqlScript operation completed
Inserting static data started:
Inserting static data completed##### Build step passed. #####
- The Audit step:
Create INSERT trigger [dbo].[tr_i_AUDIT_Publishers] for Table [dbo].[Publishers]
Trigger created: tr_i_AUDIT_Publishers
Trigger tr_i_AUDIT_Publishers has been marked as Last
Create UPDATE trigger [dbo].[tr_u_AUDIT_Publishers] for Table [dbo].[Publishers]
Trigger created: tr_u_AUDIT_Publishers
Trigger tr_u_AUDIT_Publishers has been marked as Last
Create DELETE trigger [dbo].[tr_d_AUDIT_Publishers] for Table [dbo].[Publishers]
Trigger created: tr_d_AUDIT_Publishers
Trigger tr_d_AUDIT_Publishers has been marked as LastScript operation completed successfully
Triggers createdCheck architecture installed
OkFilter: action insert
Filter: action update
Filter: action delete
Filter: action create
Filter: action alter
Filter: action drop
Filter: rows count 1000
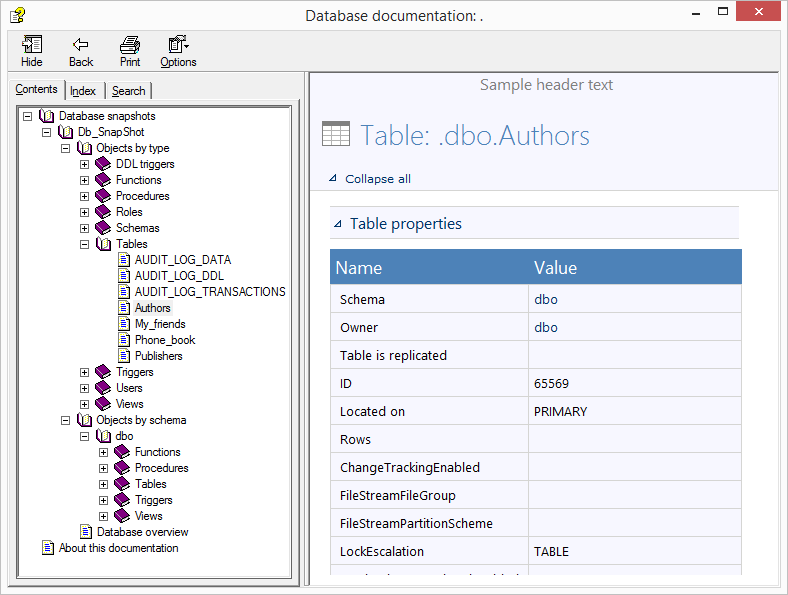
Report created - The Document step:
Documenting Authors
Documenting My friends
Documenting Phone_book
Documenting Publishers
Chm project file creation
Creating the table of contents
Creating the index file
Creating a documentation file
Compiling in progress
Compiling an HTML help projectThe documentation has been written in
D:\CI_CD_Pipeline\04-27-2018_12-
4853\Document_Database_Documentation.chmThe operation has finished successfully
##### Document step passed. #####
Along with the execution information from the CI_CD_Pipeline_job_summary output file, a created .chm file can be viewed in the created date/stamped folder next to the example script:
For more information about output files, check out the Inventory of the CI/CD pipeline output files and Manual review of CI/CD pipeline outputs.
- The Build step:


