Applies to
Summary
This article shows SQL auditing connectivity issues based on prerequisites required for application setup.
Description
The main struggle in small-scale environments is a lack of technicians that can work on dedicated areas regarding management and setup. In other words, it is sometimes expected that the same person should cover different technological aspects to get some jobs, like SQL auditing, up and running. One thing is installing and administering SQL auditing solutions like ApexSQL Audit, but another thing is to, without some previous experience, prepare prerequisites, mostly security-related, to get the application working properly. Additionally, even if there is a dedicated person that can resolve prerequisite issues, it can be difficult to communicate the issues between ApexSQL Audit operator and domain administrator.
This article intends to show what connectivity issues could be encountered during ApexSQL Audit setup due to a lack of security prerequisites and how to resolve them.
Since system interoperability generally requires a domain-controlled environment, further explanation will be related to domain accounts. According to the domain security best practices, it is recommended to create one dedicated account for ApexSQL Audit administration and operation authorization, which can be assigned to one operator and centrally managed. For demonstrating purposes, we will simply name it SQL Audit.
Through the course of this article, we will try to set up auditing without the main prerequisites fulfilled and see what issues may emerge and how to resolve them
Installing ApexSQL Audit central repository
The central repository is a SQL database that needs to be hosted with a SQL Server. When started, the installation for ApexSQL Audit will require the SQL Server where the central repository will be installed and an account that will authorize the application to use that SQL Server to create and manage the repository on it. Without setting proper permissions for the used account the situation shown in the screenshot below will occur when the Configure button (the configuration confirmation button) is clicked:
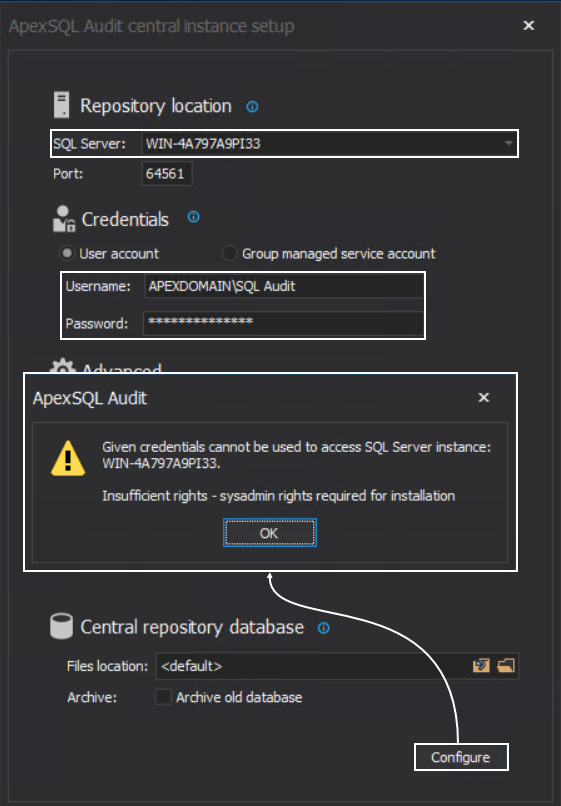
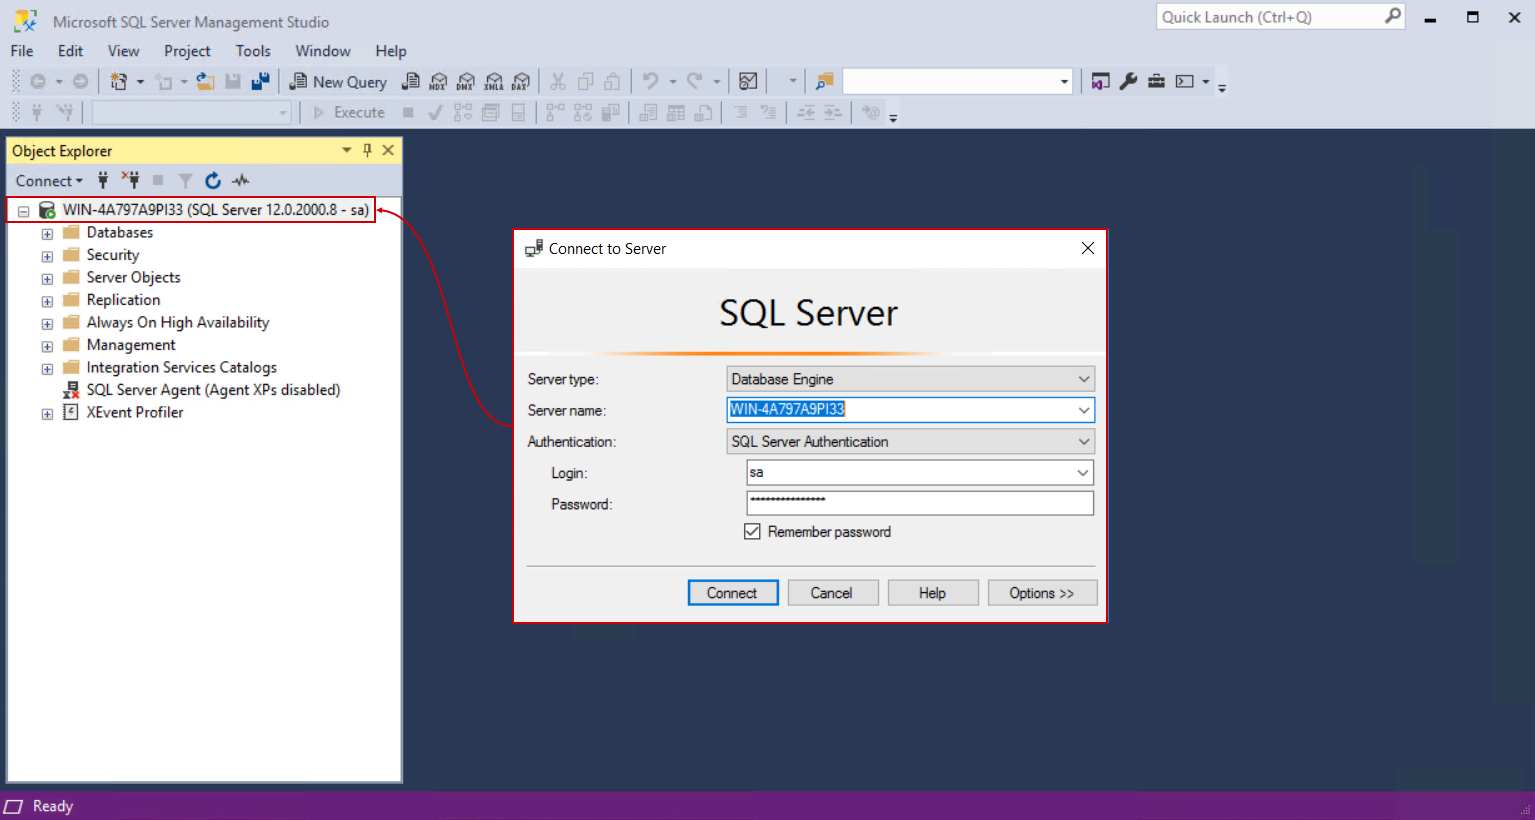
This means that the chosen “SQL Audit” account, seen on the screenshot, has to be added as login account for the chosen SQL Server. To resolve this part, we will use the SQL Server Management Studio and establish the connection to this server using a known account with administrative access to this server, the safest bet would be the built-in “sa” account:
With the connection established, we can continue with the account setup. From the Object Explorer, expand the Security node and then the Logins node which will show current accounts authorized for SQL Server operations. We can confirm here that the chosen account for auditing is missing:
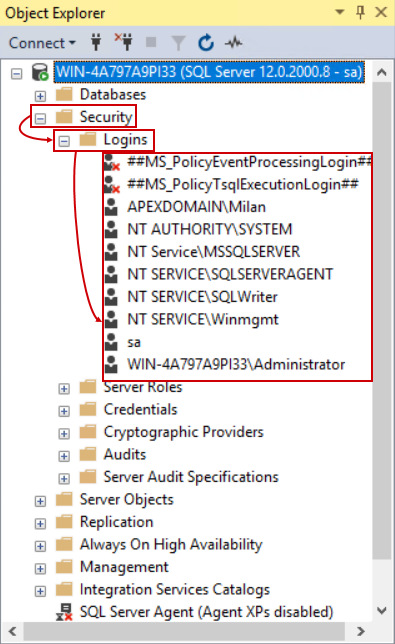
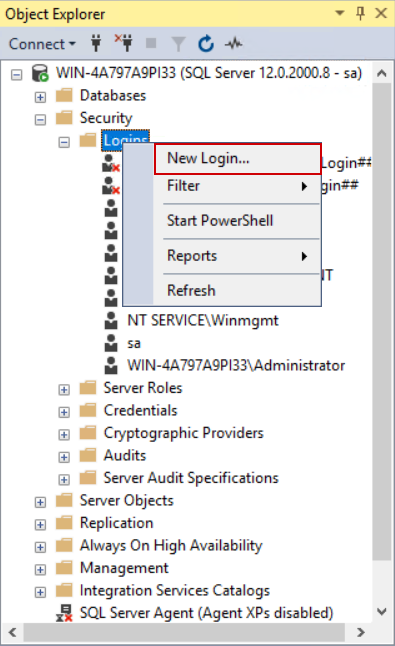
To add the account, open the context menu for the Logins item and choose the New login… option:
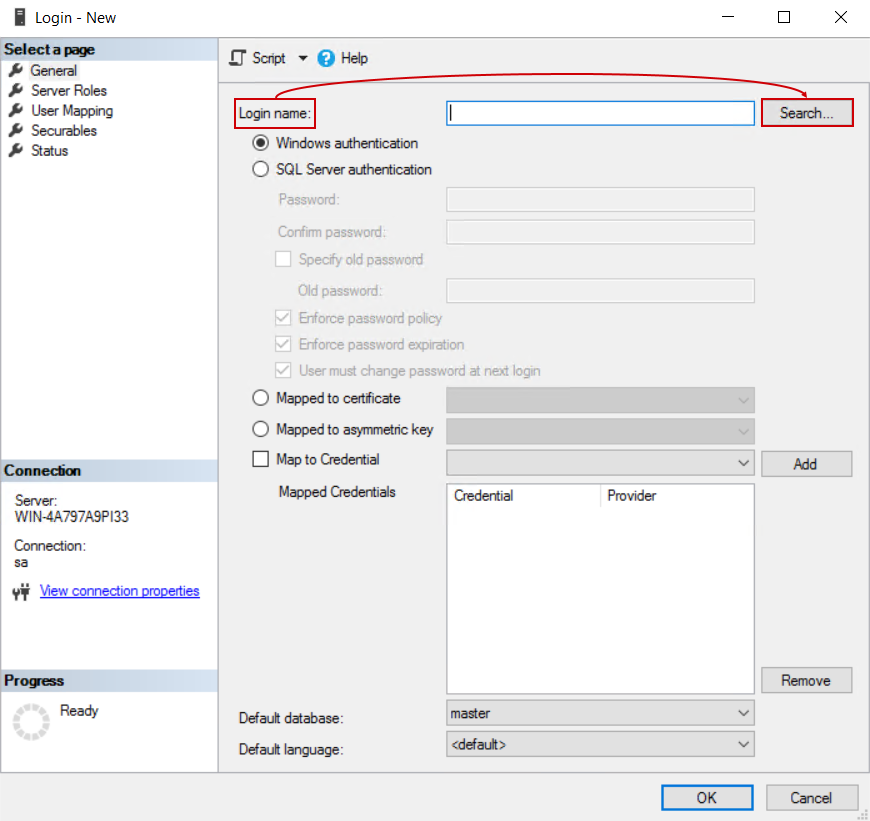
In the shown window there will be a field to enter the account name. We should avoid entering the name manually to prevent mistakes (one of which will be demonstrated in this section), instead, it is recommended to use the Search option:
This will open the Select User or Group dialogue where we can simply type in the account name and with the Check names button, locate it:
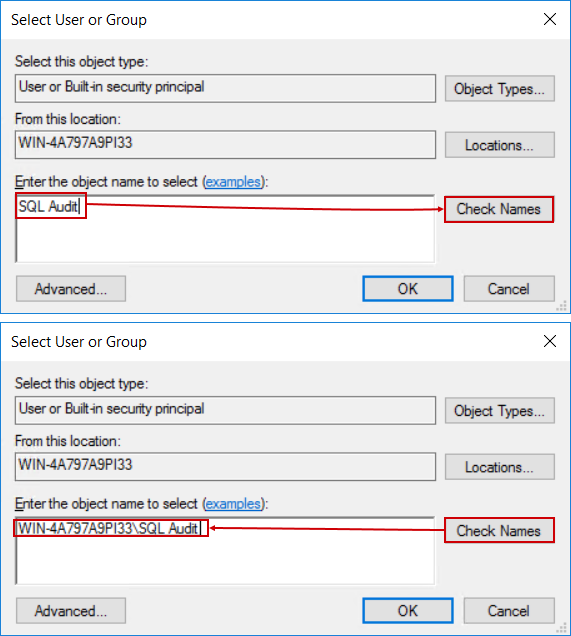
At this point we can see that something is wrong, the account that was found does not look like the one used in ApexSQL Audit install configuration:
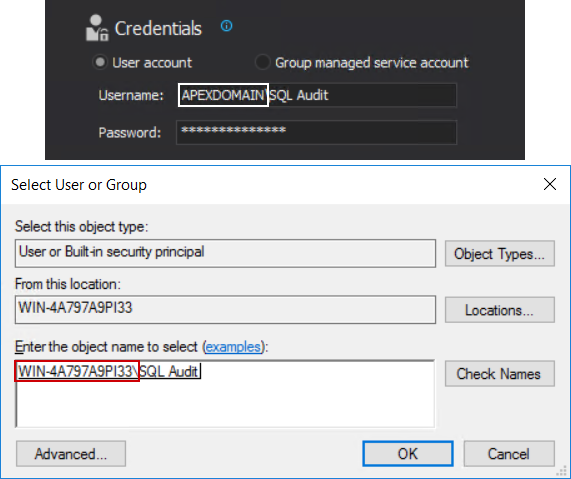
This is explained by the fact that it is possible to have two accounts with the same name where one would be the local Windows account and the other is the domain account. As explained earlier, it is necessary to use a domain account and that one should be added as login for SQL Server, so, this solution will not work.
To correct that, let’s go back to the Select User or Group dialogue and use the Locations… button, which will open the network locations tree, where the domain hosting the required account can be selected:
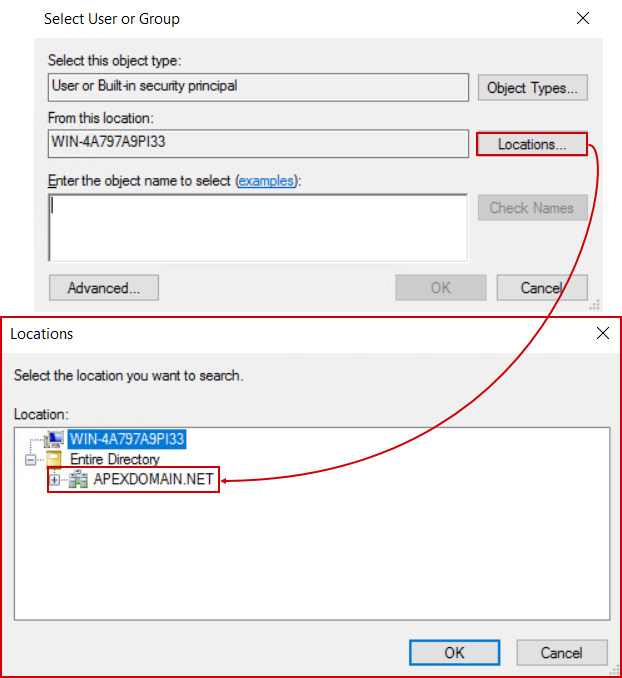
In case there is no domain name present here, it means that the machine hosting this SQL Server is either not a part of the domain or the Domain Controller is not available which should be examined internally.
Repeating the search for the desired account will now give a different result:
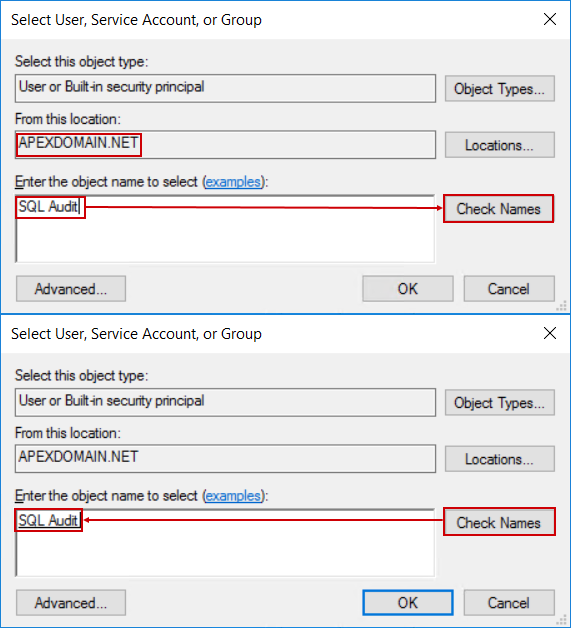
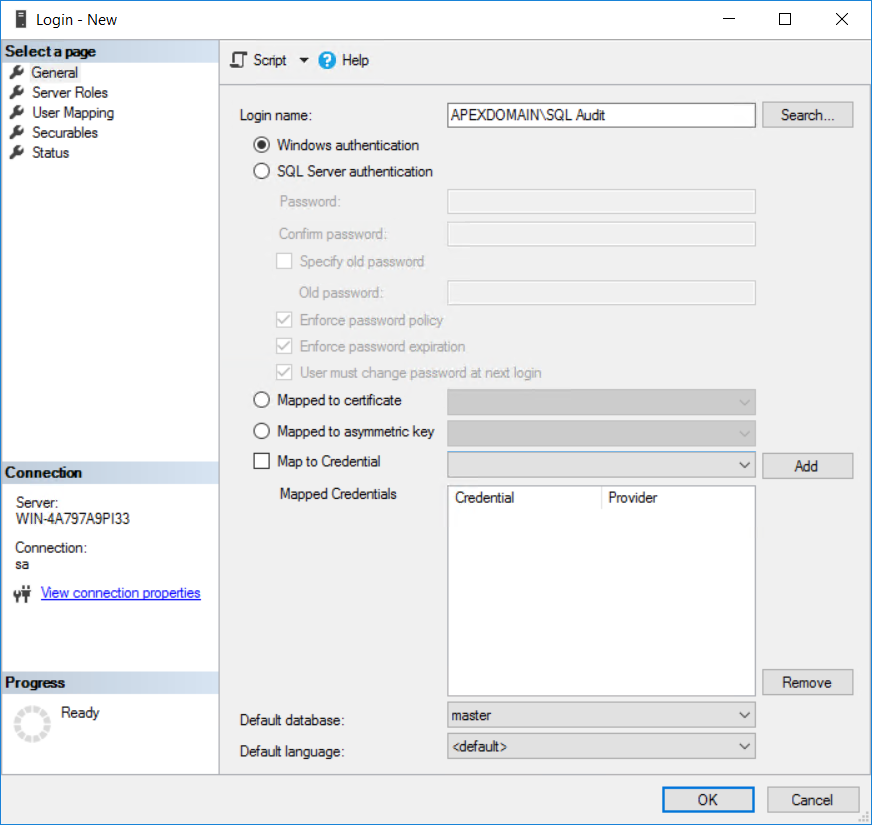
Confirming the account name with OK will return to the initial window with the correct account name added as login:
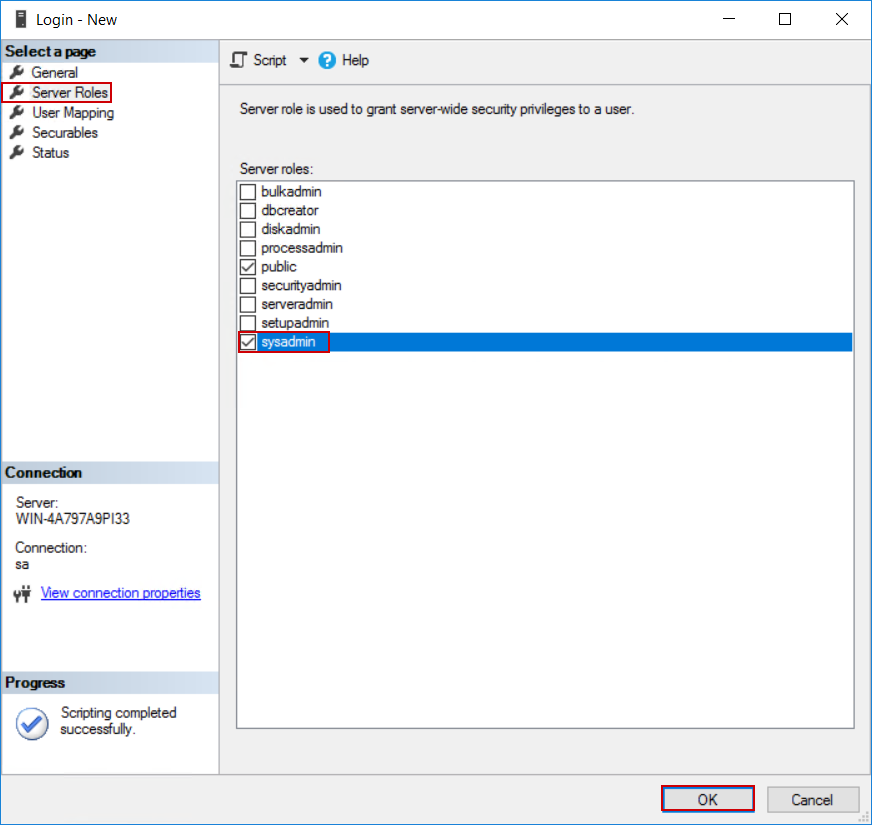
This account will now have to be set with the Sysadmin role. This role gives unrestricted access to the SQL Server for the audit account.
Switch to the Server Roles tab and tick the sysadmin item in the server roles list and confirm the settings with OK:
We can see that the account is properly added to the logins list:
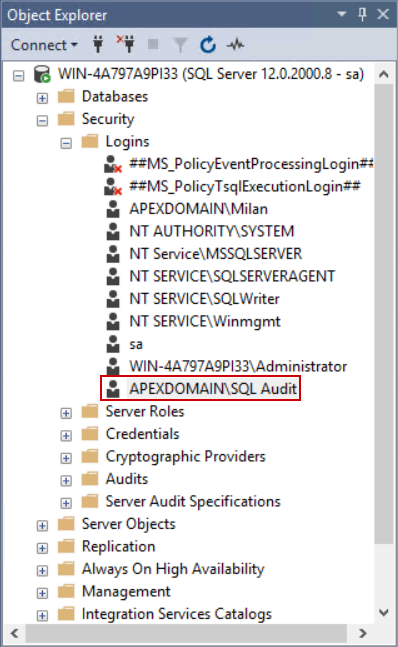
The explained procedure can be done with the following T-SQL script:
USE [master]
GO
CREATE LOGIN [APEXDOMAIN\SQL Audit] FROM WINDOWS WITH DEFAULT_DATABASE = [master]
GO
ALTER SERVER ROLE [sysadmin] ADD MEMBER [APEXDOMAIN\SQL Audit]
GO
With this problem resolved we will try to repeat the installer configuration step, but the same message may appear. The only possible cause for that is that the installer was not started using the “SQL Audit” account but some user account currently logged on the Windows session (e.g. APEXDOMAIN\SQL). The installer requires that this account is also added as SQL Server login with the Sysadmin role. We can use one of the following resolution steps:
- Add the account in question as SQL Server login using the explained method (if this is security liability skip this method)
- Log on to Windows using the “SQL Audit” account and start the installation again
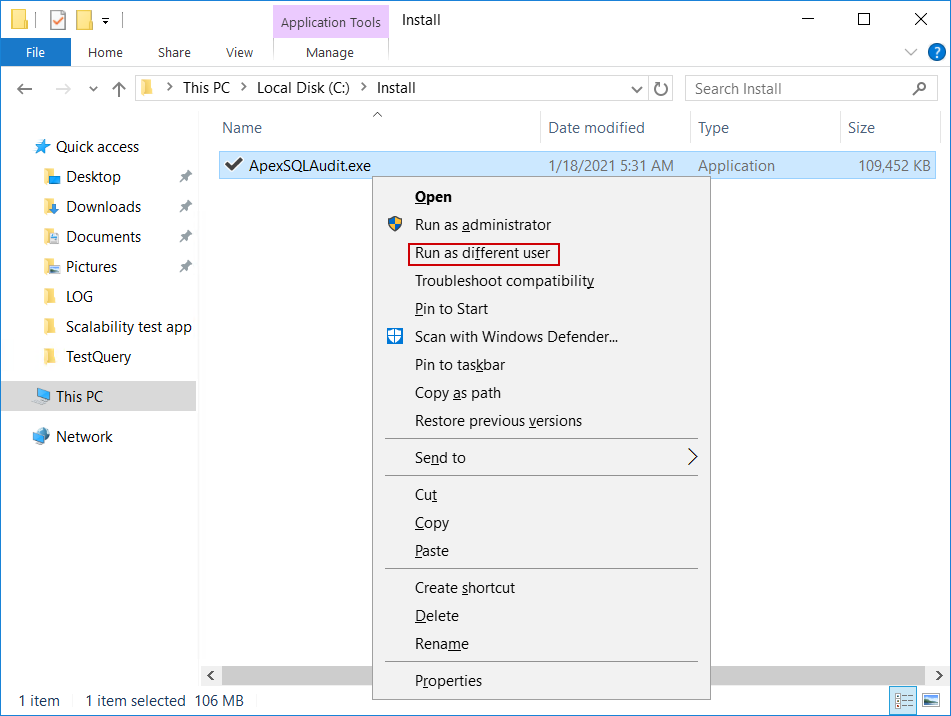
- Start the installer using the Run as different user option (press keyboard Shift Right-click on the installer and this option will appear in the context menu)
And in the popup dialogue enter credentials for the central SQL auditing account:
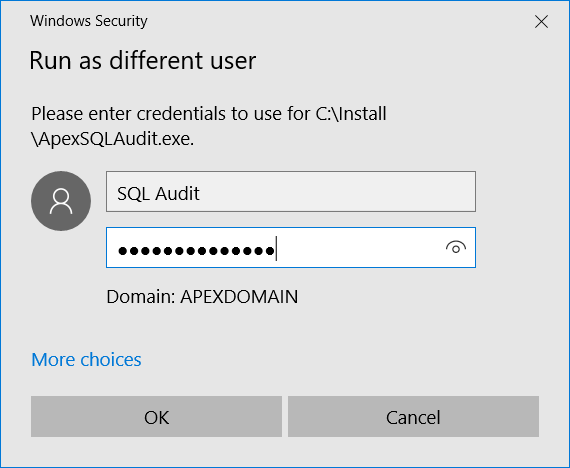
For this to work, the audit account will have to be a member of the local administrators group.
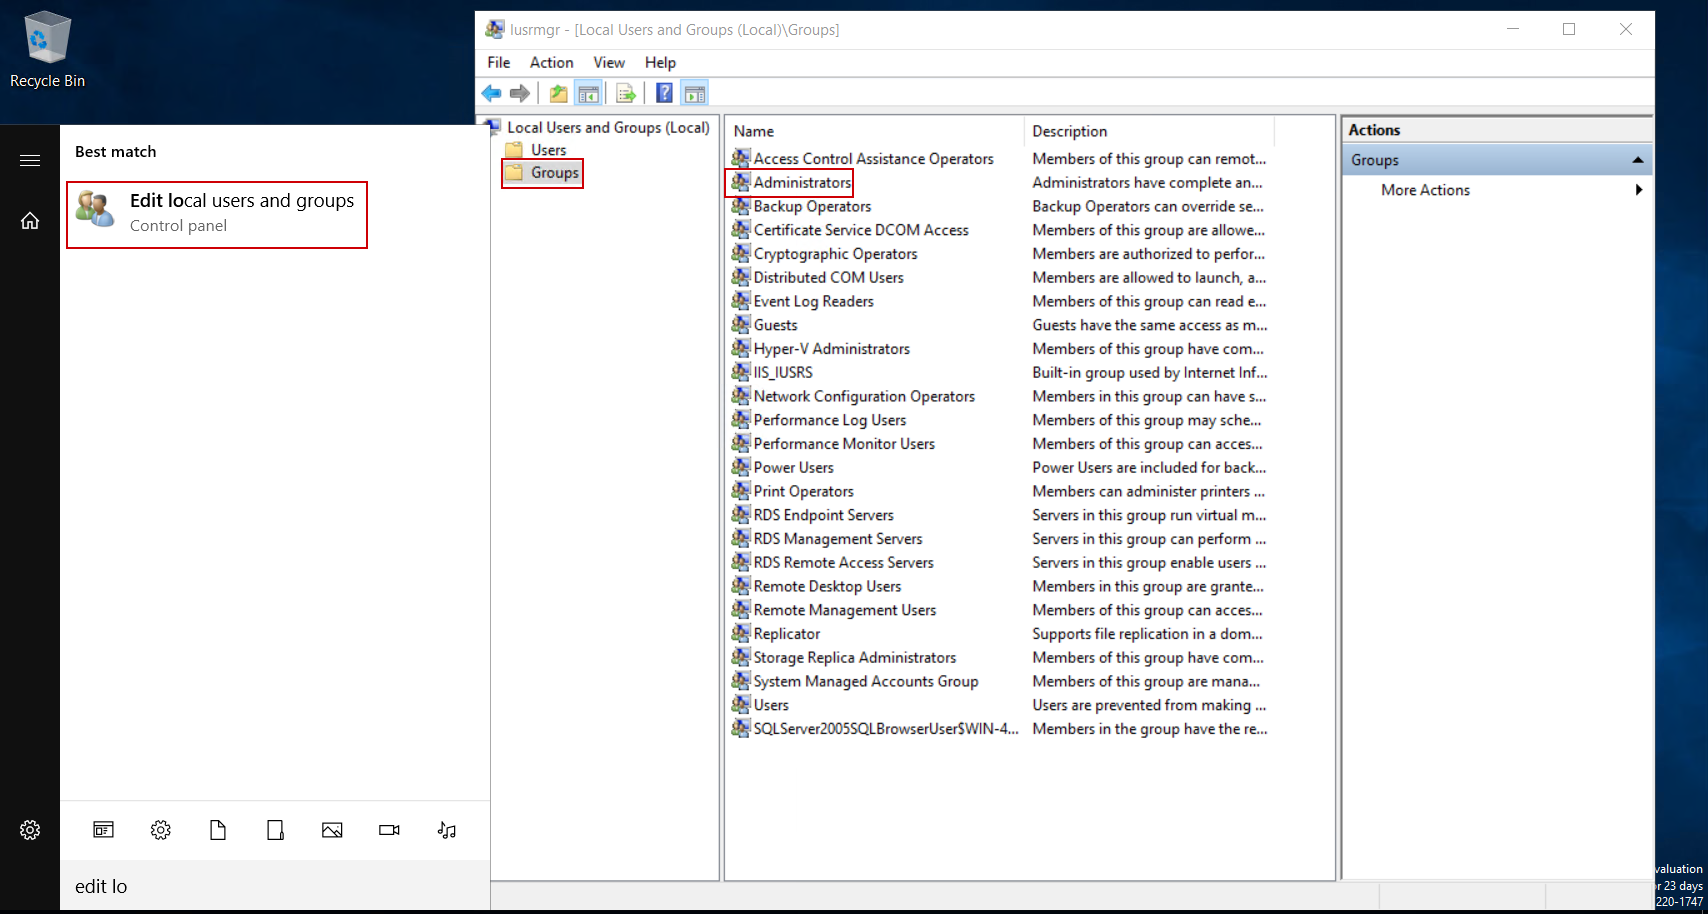
To resolve that, from the Windows Start menu find the Edit local users and groups console and open it. From this console select the Groups item and double-click the Administrators item to open its properties:
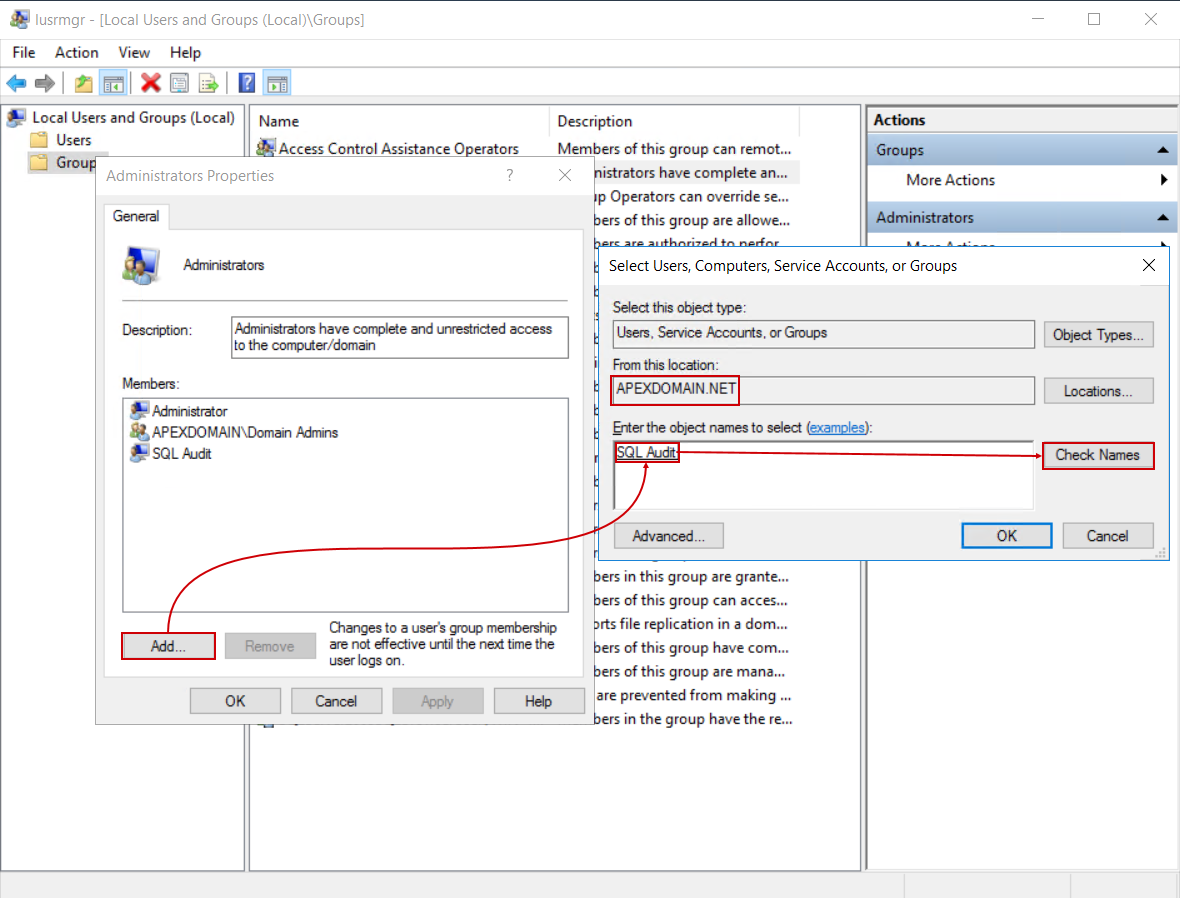
From the properties window, click the Add button and find the audit account name (make sure the correct domain is chosen):
Confirm the account choice and addition to the Administrators group and proceed with the ApexSQL Audit installation:
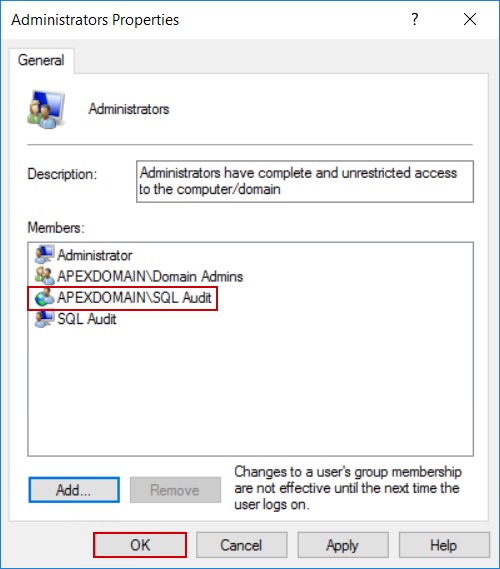
Note that the installer cannot be in the folder associated with the currently logged-in user (Documents, Downloads…) as it will not allow access to a different user.
Starting the application GUI
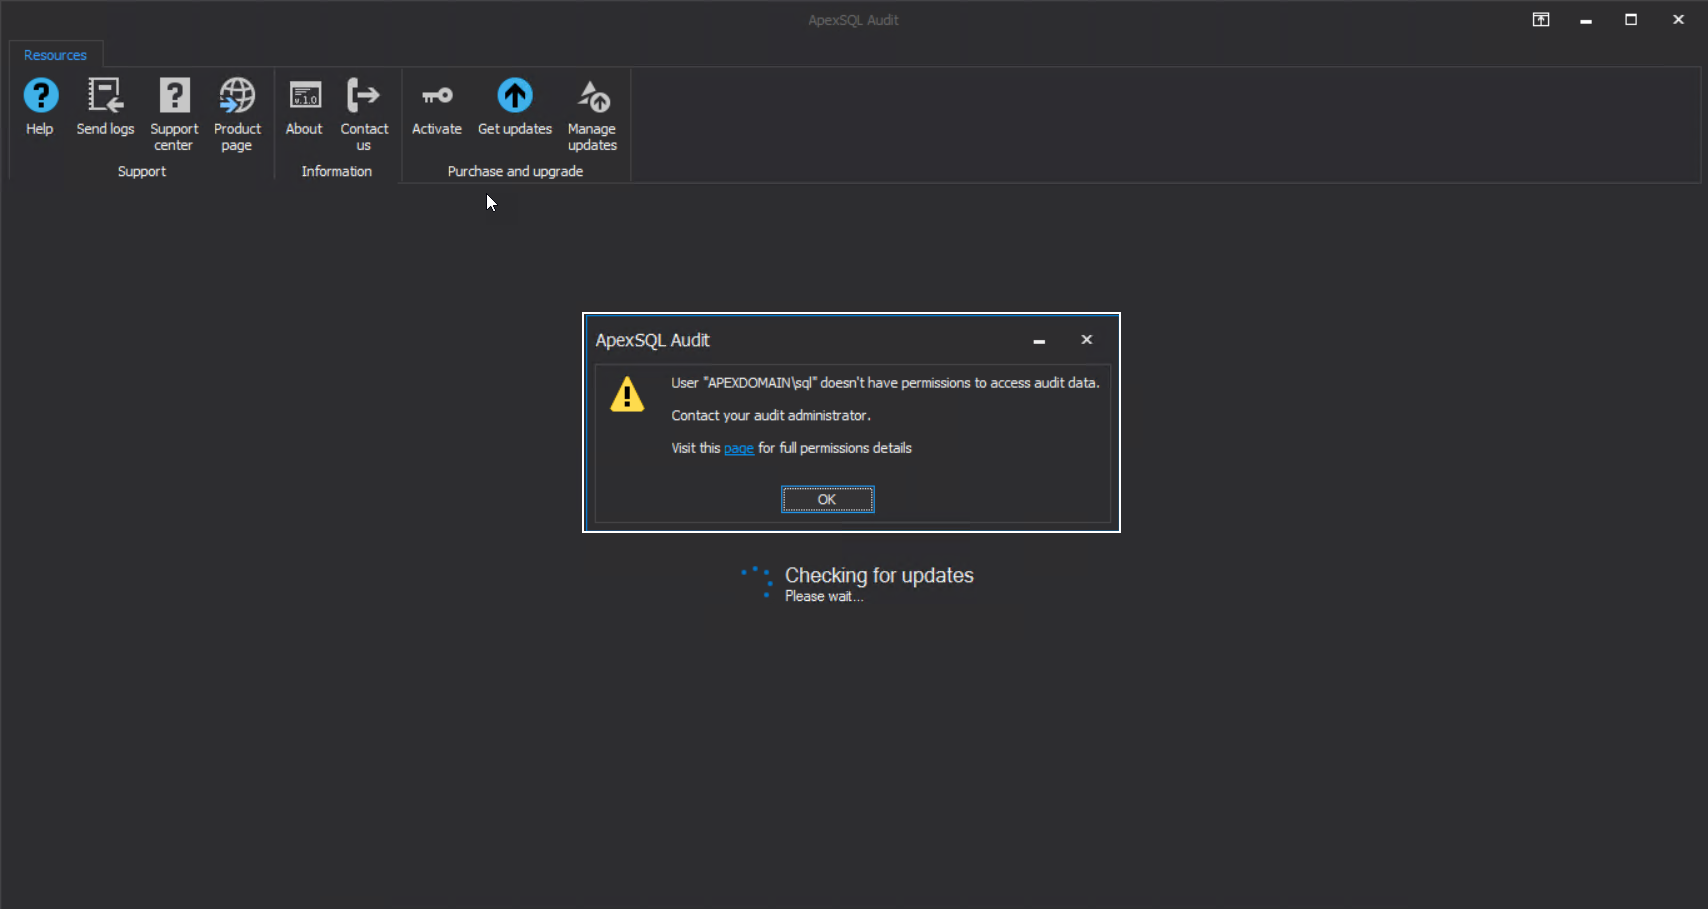
Now we will explain the differentiation between account authorized to use SQL Server for central repository and account authorized to use the application GUI. During the installation process, we authorized the “SQL Audit” account to use the SQL Server (in the further text we will refer to it as the “master” account), but we used option #3 to resolve installation startup and after the installation is finished we are still logged on the Windows session with the APEXDOMAIN\SQL account. Starting the application GUI will result in the following error:
This could possibly mean one of three things for the APEXDOMAIN\SQL account:
- The account is not part of the local “Administrators” group – If this is the case, repeat the procedure explained for the master account to add a new account as the local administrator
- The account started the GUI or was logged on the Windows while Domain Controller, i.e. Active Directory was temporarily unreachable – in these cases, the easiest resolution is to reboot the system and log on to it again
- The account is not added as ApexSQL Audit user
If adding this account as a local administrator is not an option for organizational and security reasons, the resolution is to add this account as the application GUI user, enabling further operations.
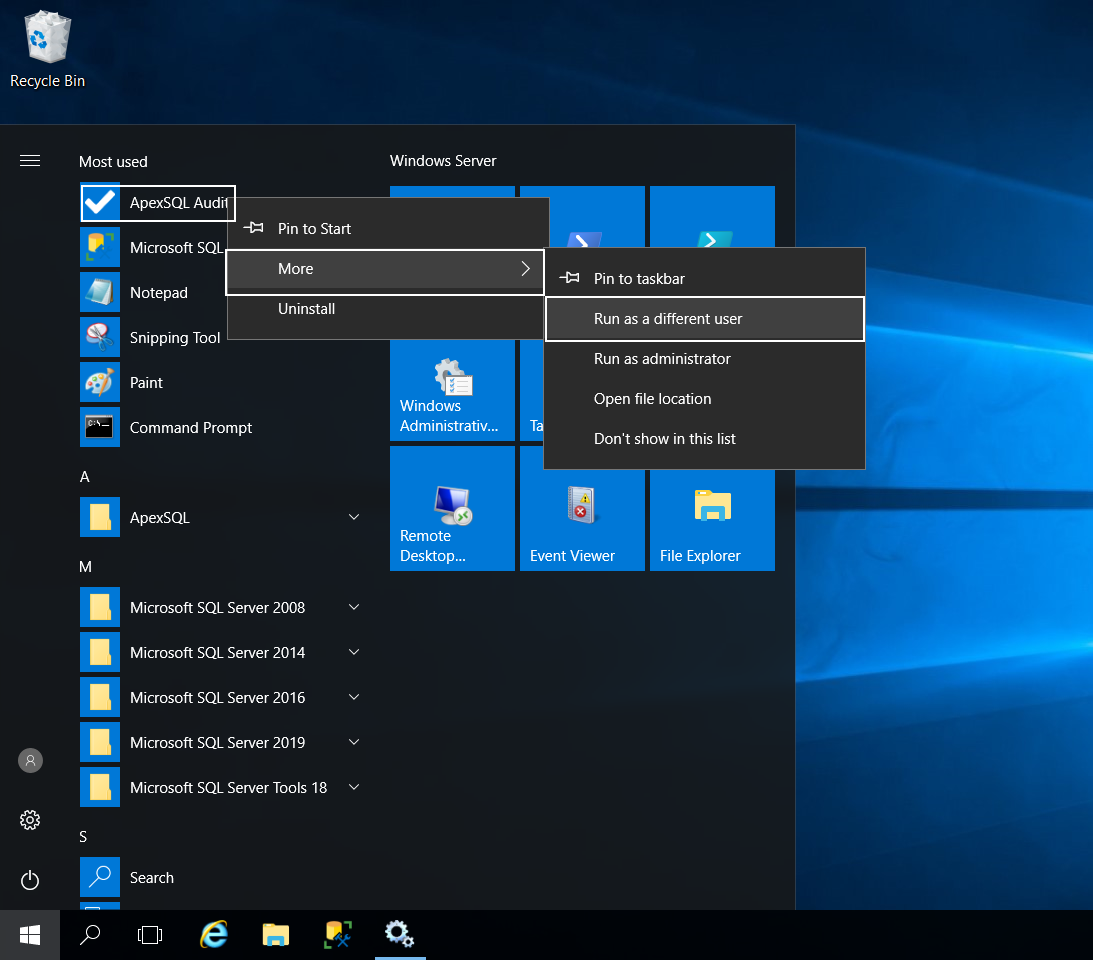
To do that we need to run the GUI using the master account first, from the Start menu, use the right-click on the ApexSQL Audit icon, then expand the More option and use the Run as different user option:
The credentials dialogue will pop up where the master credentials should be inserted:
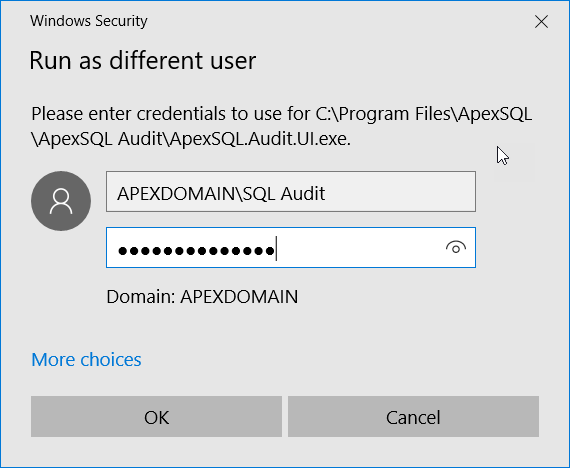
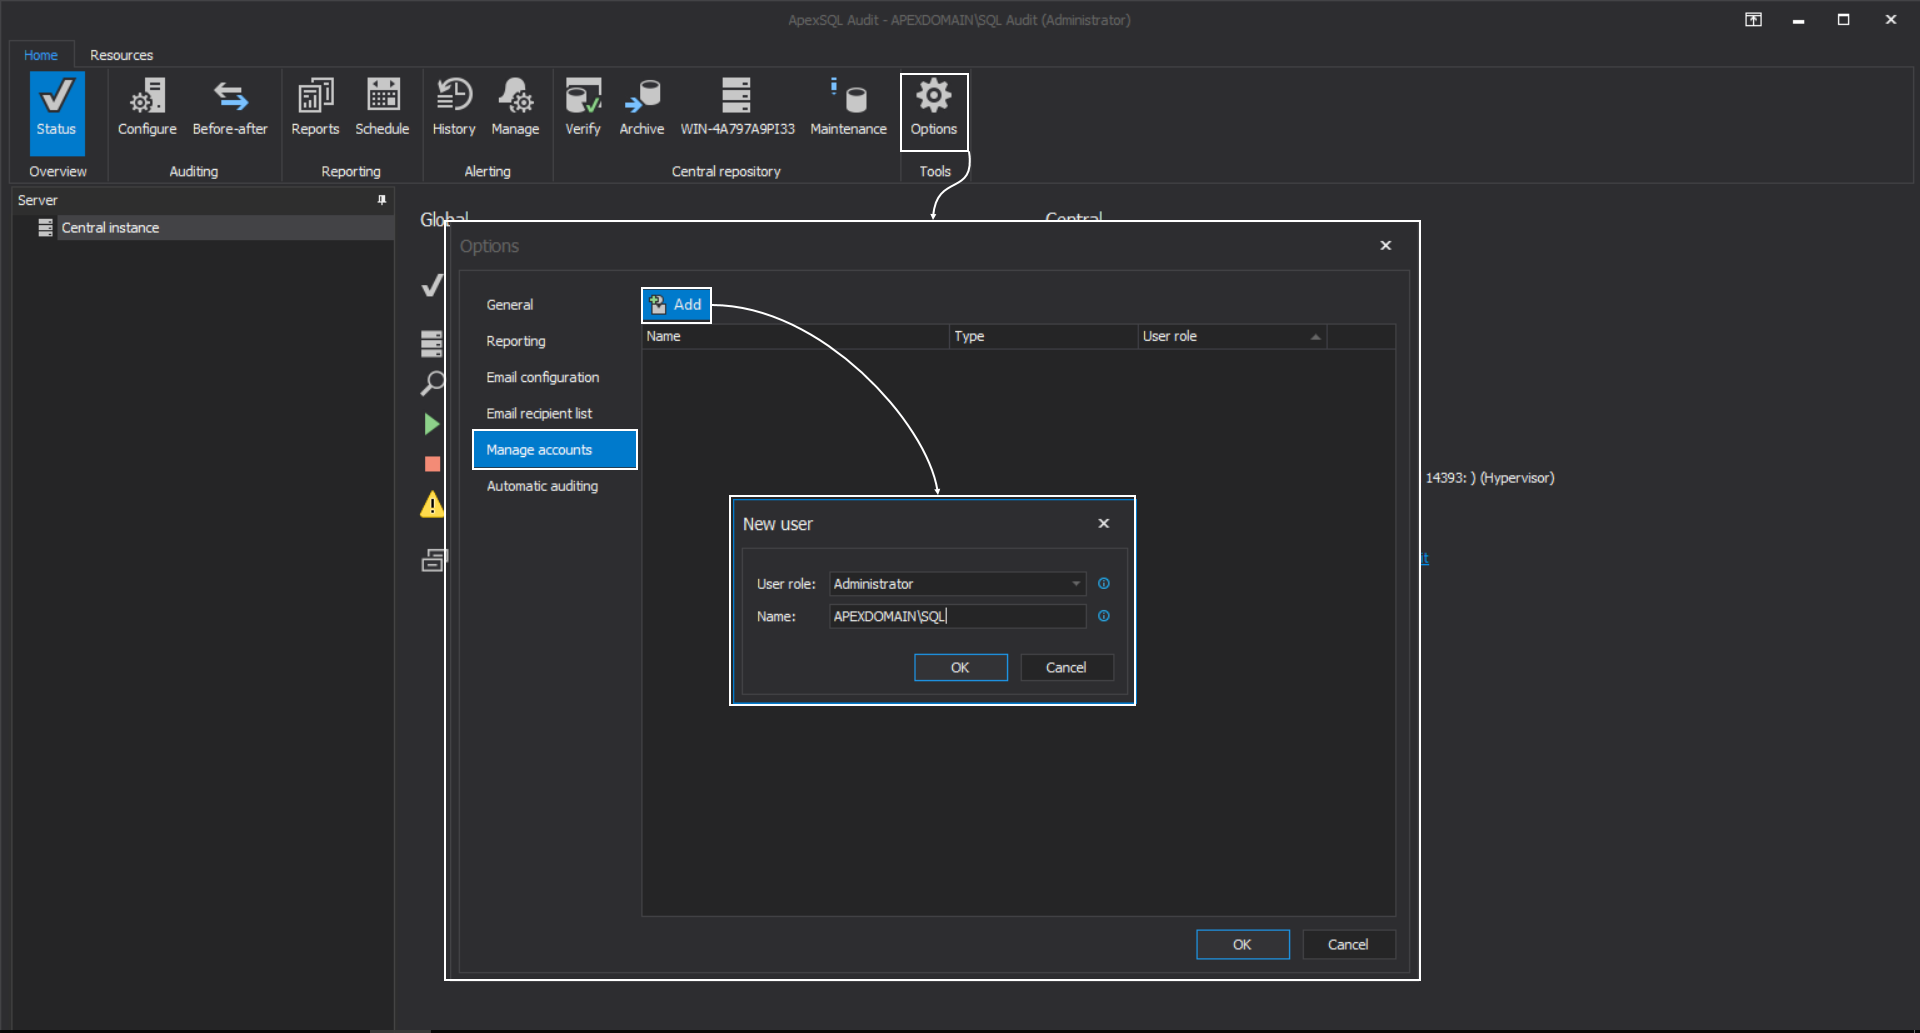
This will start the GUI and establish the connection with the central server. From the main menu, click the Options button and in the Options window, from the Manage accounts tab, click the Add button to introduce new user. In the shown dialogue, enter the account name (use the domain prefix) and choose the role for this account:
Three types of roles are available:
- Administrator – enables full access to auditing administration
- Power-user – restricts adding additional users
- Reader – enables only creation of audit reports
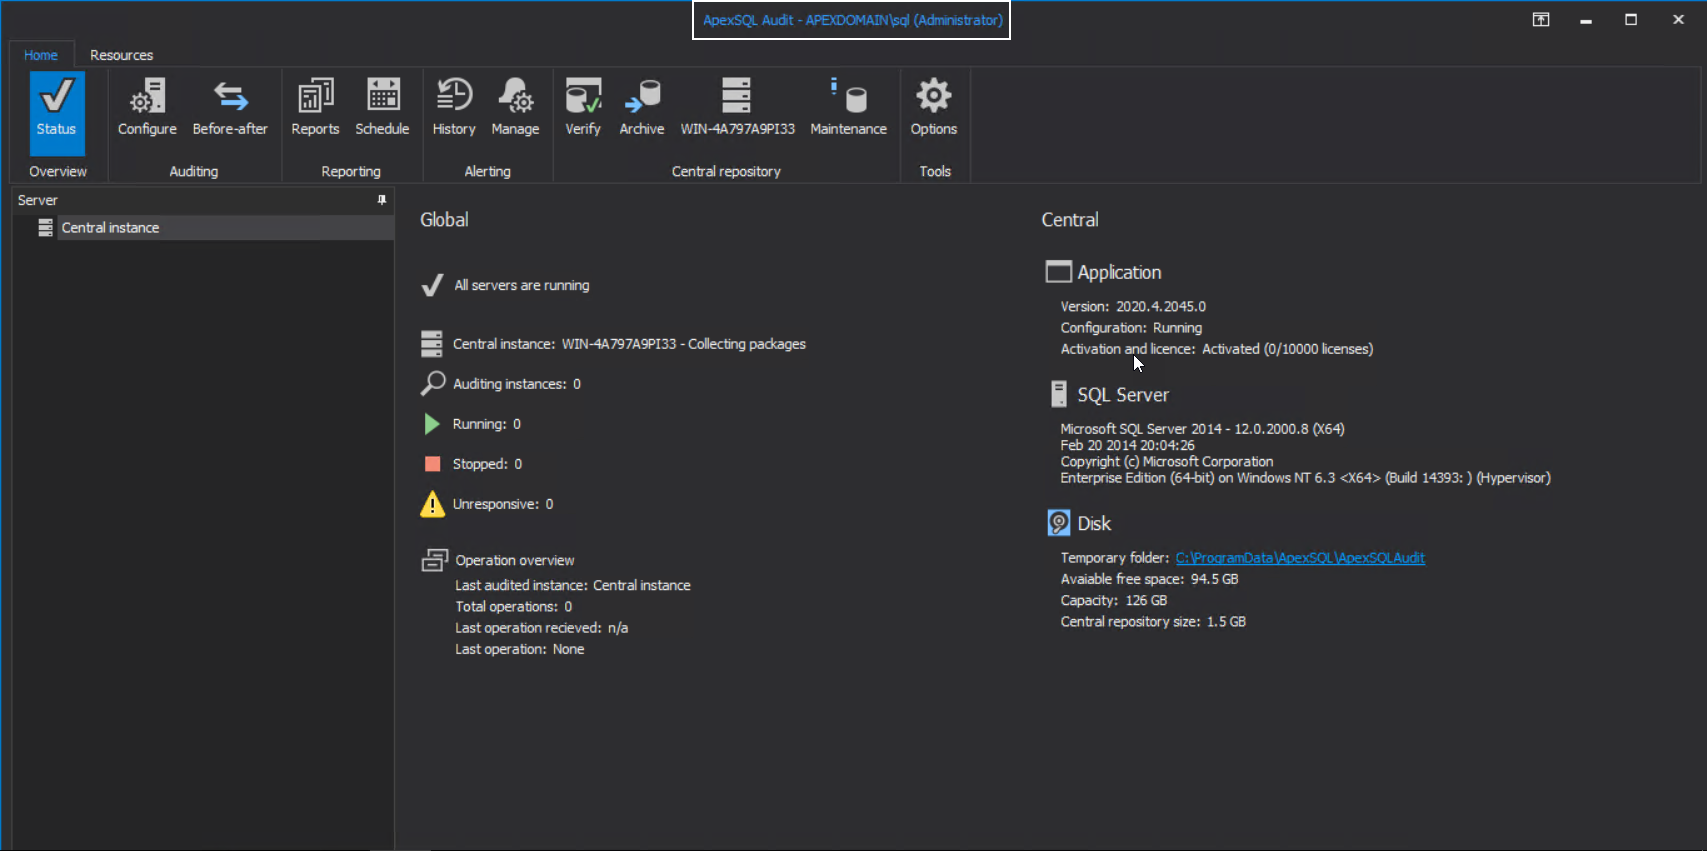
Now the APEXDOMAIN\SQL account can start the GUI even if it is not one of the local administrators:
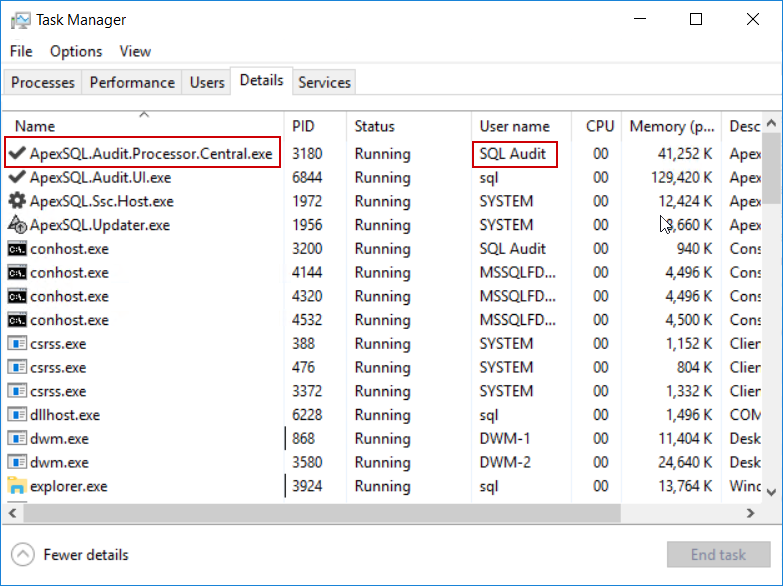
This will not produce additional permissions issues as the access to local and SQL Server resources is done via the Central process which is run under the master account:
Adding SQL Server instances for auditing
With the application GUI started, we can start with adding SQL Servers for auditing.
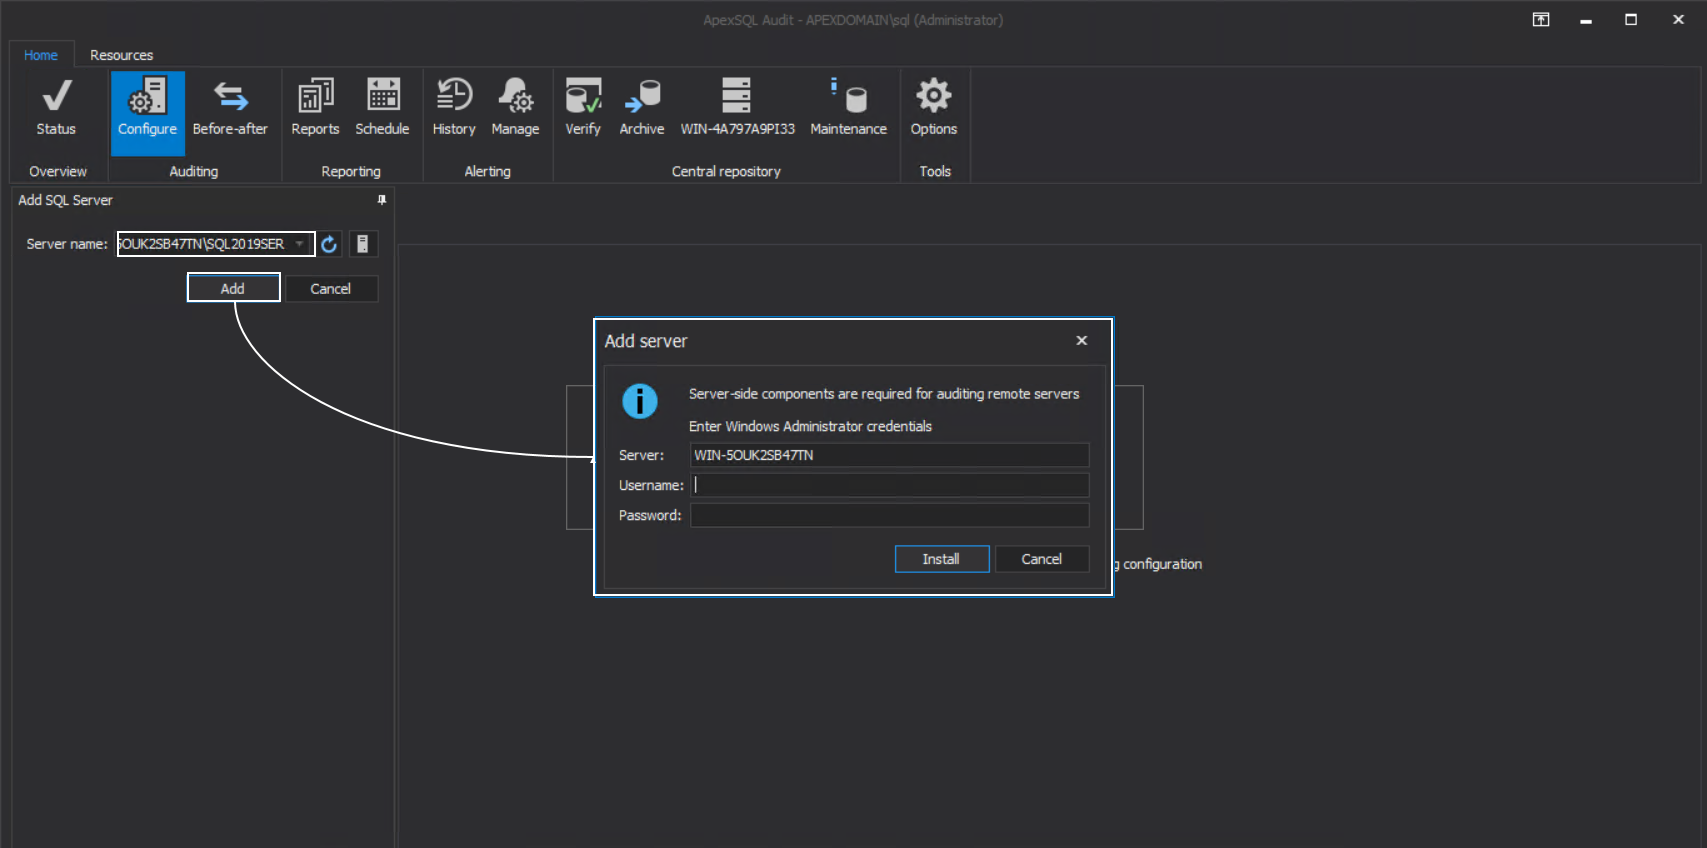
Go to the Configure tab and browse or enter the full SQL Server name in the Server name field and click the Add button. The Windows connection dialogue will appear:
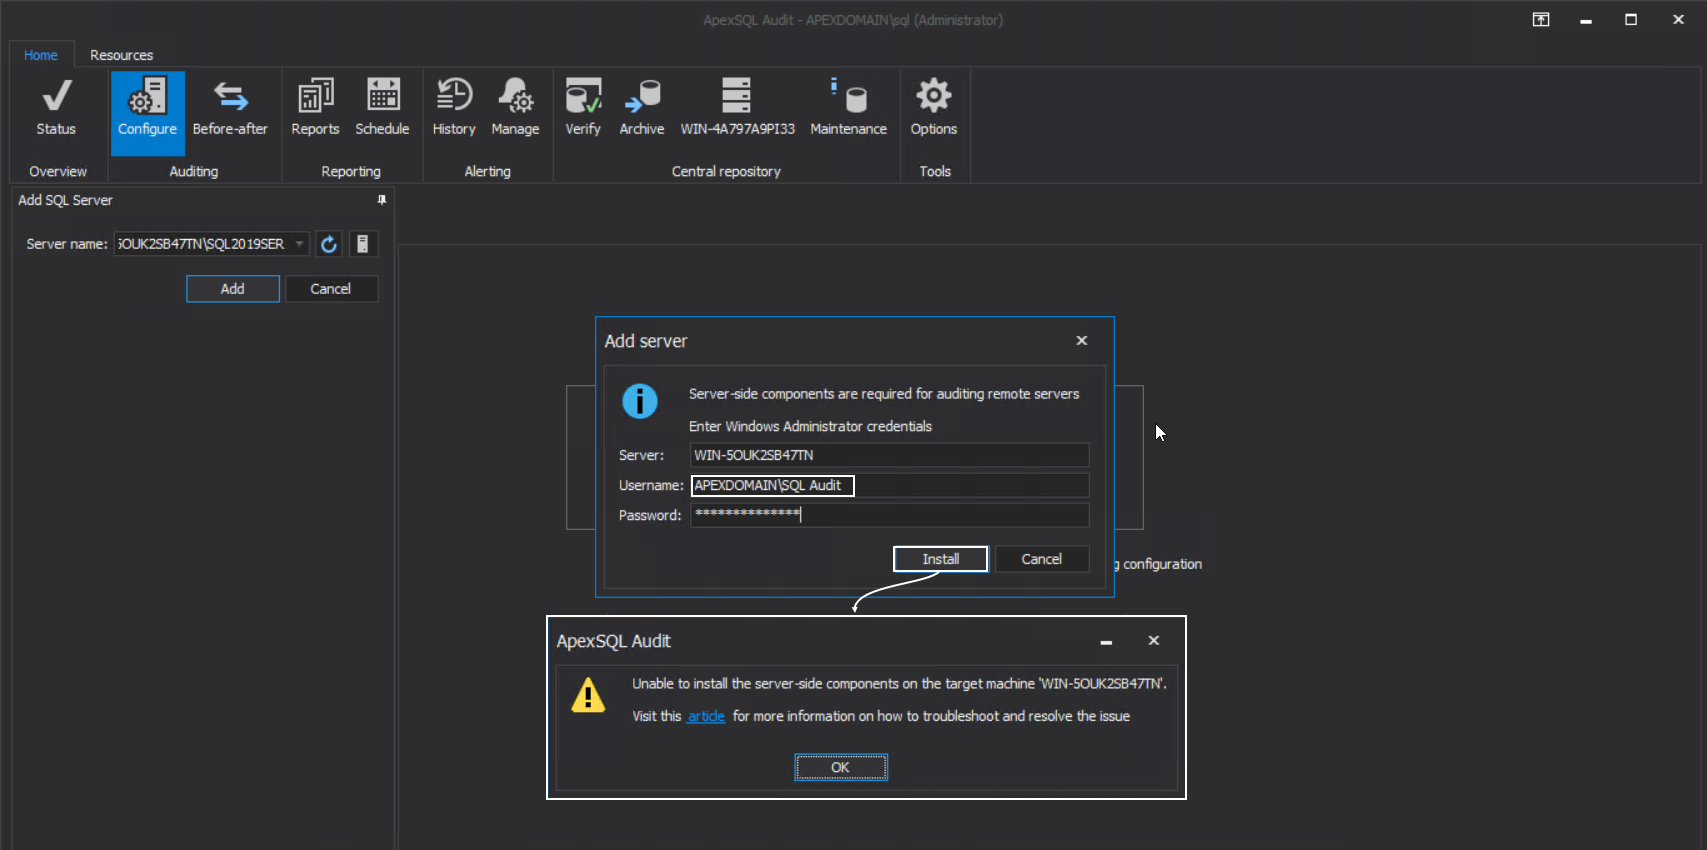
The credentials required here will enable inter-machine authorization for resources access, in this case, to automatically install the ApexSQL server-side components service that will manage auditing agent on remote instances. So, if we enter some user credentials or even master audit credentials the following message will appear:
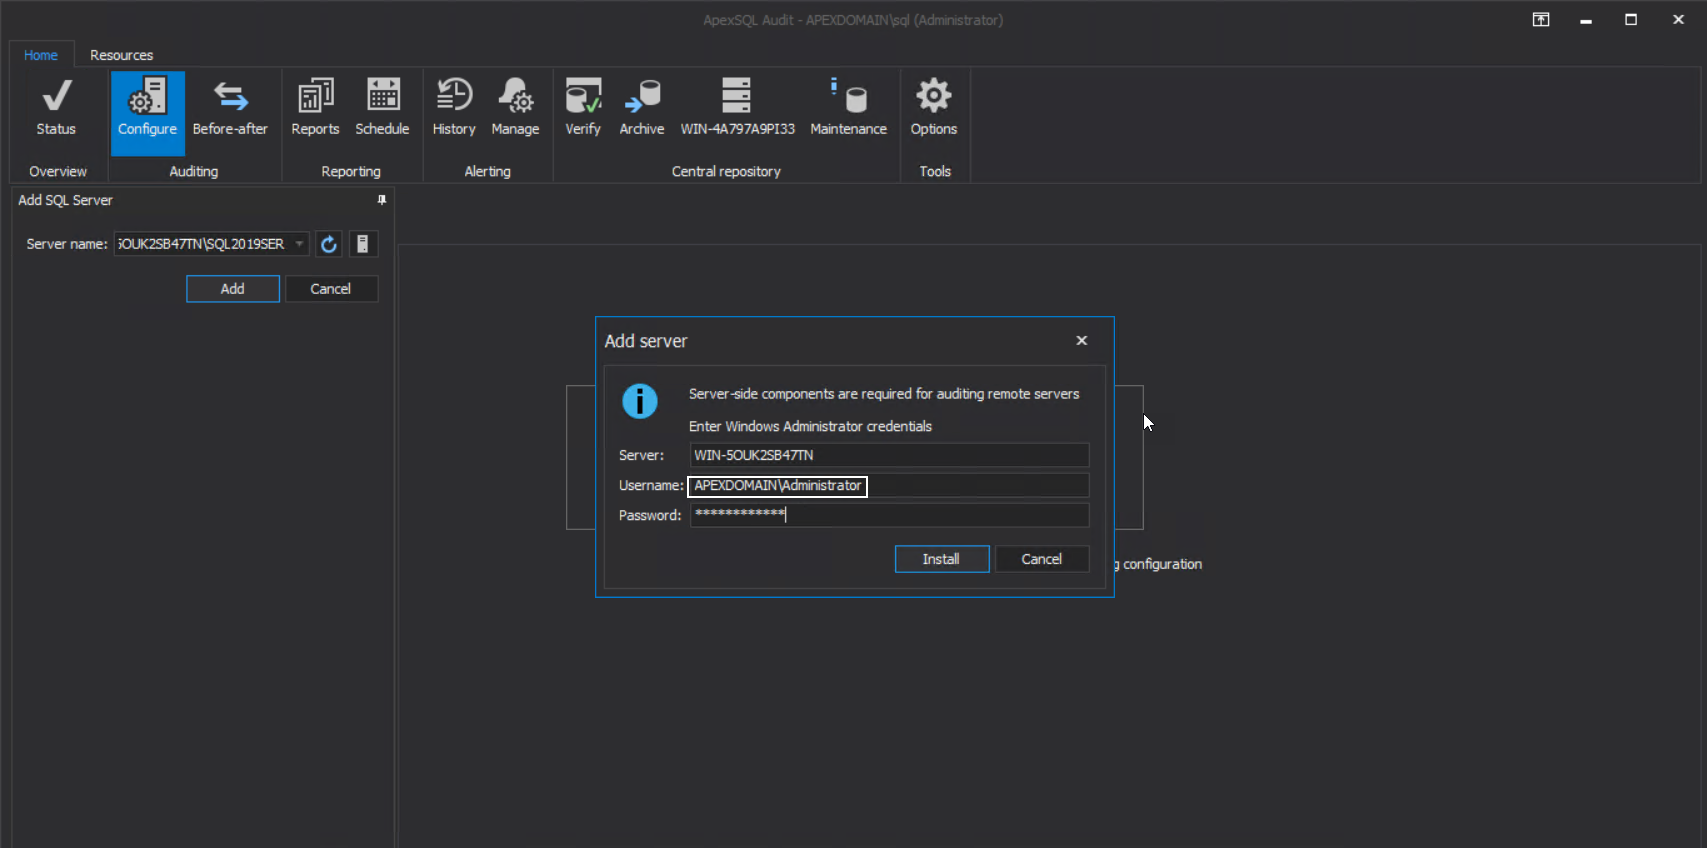
This means that the most elevated account should be used to enable such authorization across the network to perform such installation. By default, this is the main domain administrator account:
It is expected now that the installation will be successful and as a result, the auditing agent configuration window will be shown:
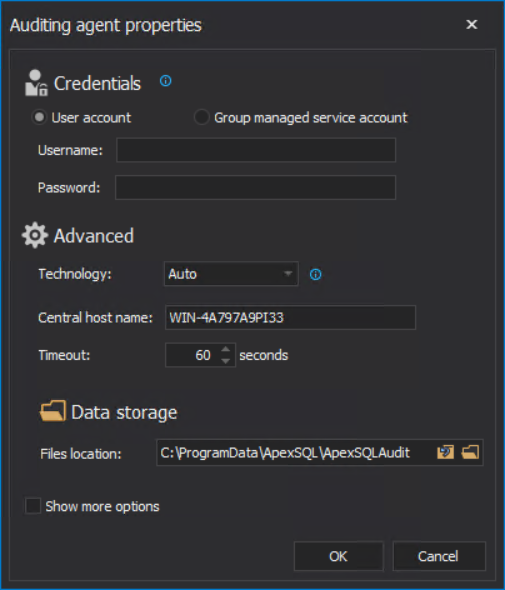
If the main domain administrator account is not available, as a workaround a manual installation of server-side components service can be performed.
- The instructions for this operation can be found in the article: ApexSQL Audit – How to audit remote SQL Server instances
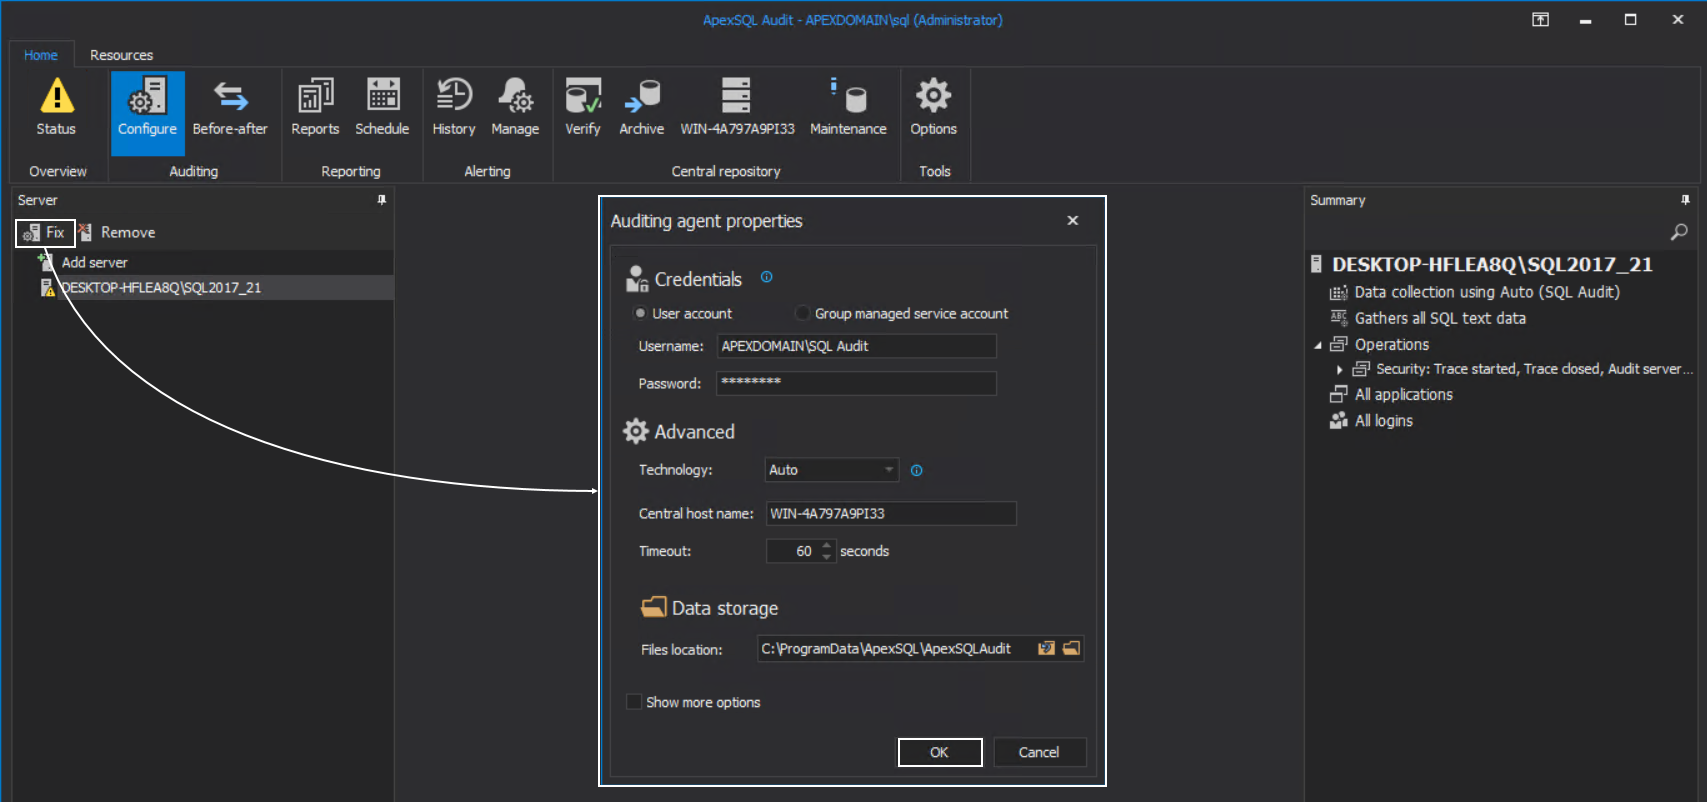
With the successful installation of server-side components, the next part is to configure the auditing agent and assign it to the SQL Server that was added for auditing. This is done in the configuration window shown in the previous screenshot. The main condition for this configuration is to enter credentials that will be used to access the selected SQL Server and the temporary files location. This does not have to be the same as the master audit account, but it is recommended to use it again for easier administration.
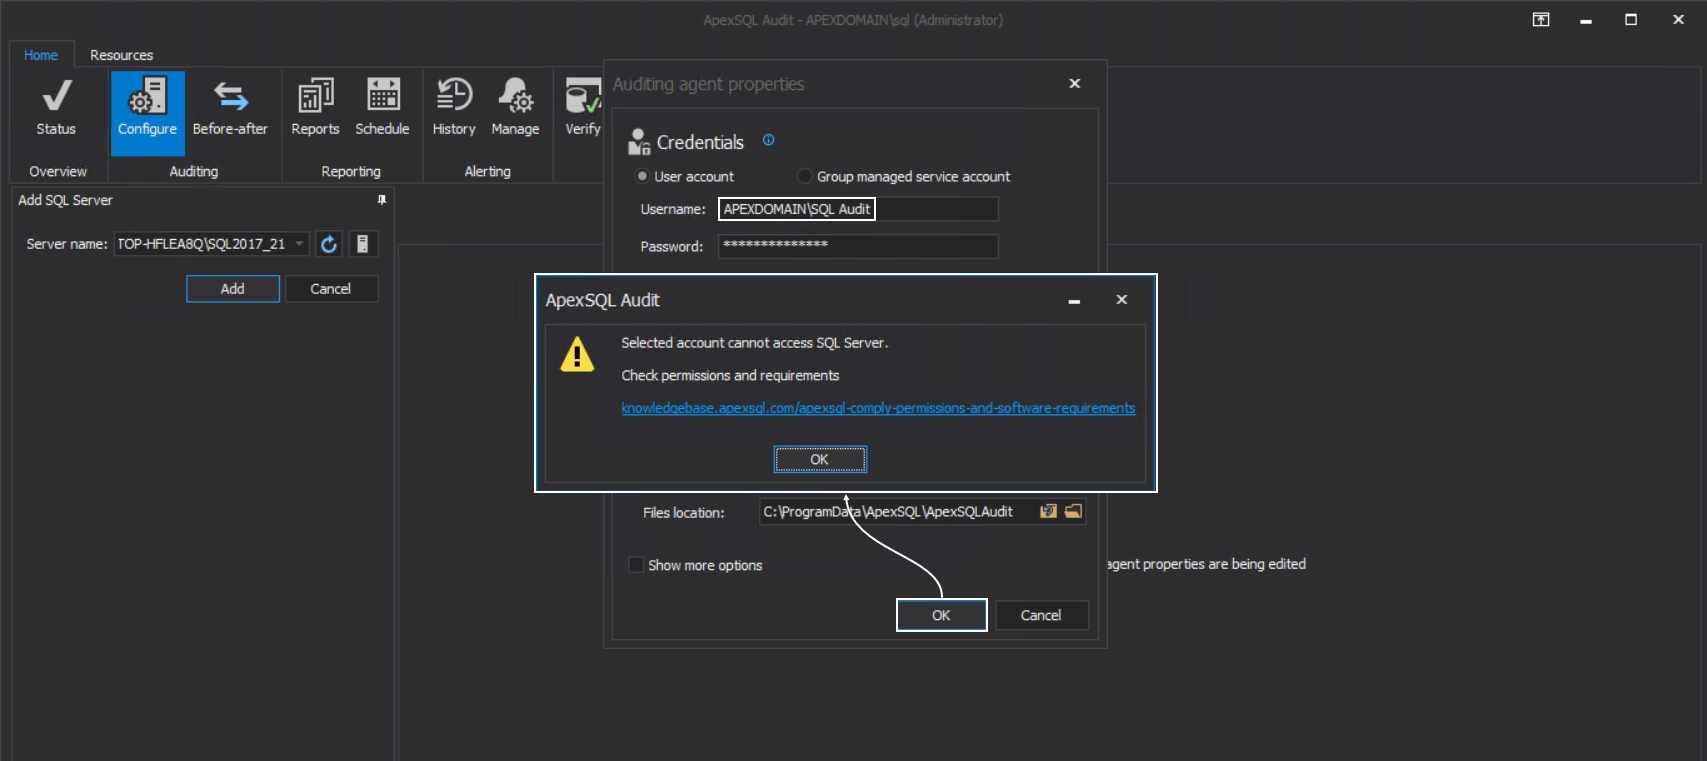
For this configuration to work some requirements will also have to be met. If not, confirming the configuration will result in the following message:
As the message states, the account cannot access the targeted SQL Server. This part is resolved by adding the account in SQL Server logins as Sysadmin and the procedure for that was explained earlier in the article for the central repository installation.
If the account is added in SQL Server logins, but the message appears again, we should check for one more symptom.
In the configuration window, the Technology dropdown box will show the supported data collection technologies on the targeted SQL Server. If this box shows only the ”Auto” value, it means that the SQL Server version was not read to provide this information. The main reason for this behavior is that SQL Server is very busy with the current transaction load and did not make itself available for reading.
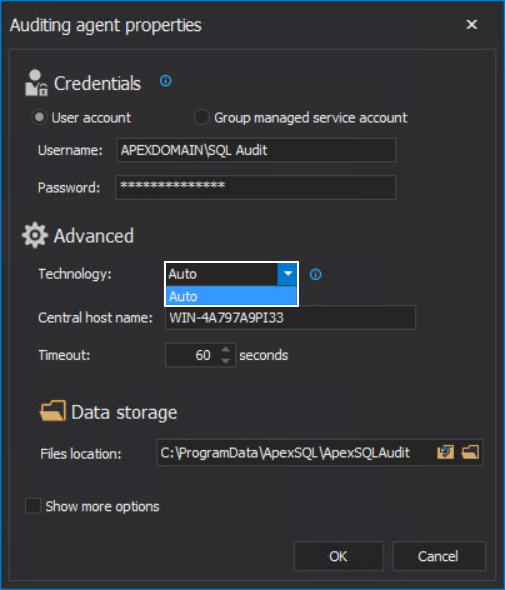
In that case, we should try forcing access to the target SQL Server by invoking the configuration window several consecutive times. If this fails, then we need to explore the possibility that the SQL Server is not available for other reasons, e.g. it is stopped or in some maintenance mode, which should be checked with the dedicated SQL Server administrator.
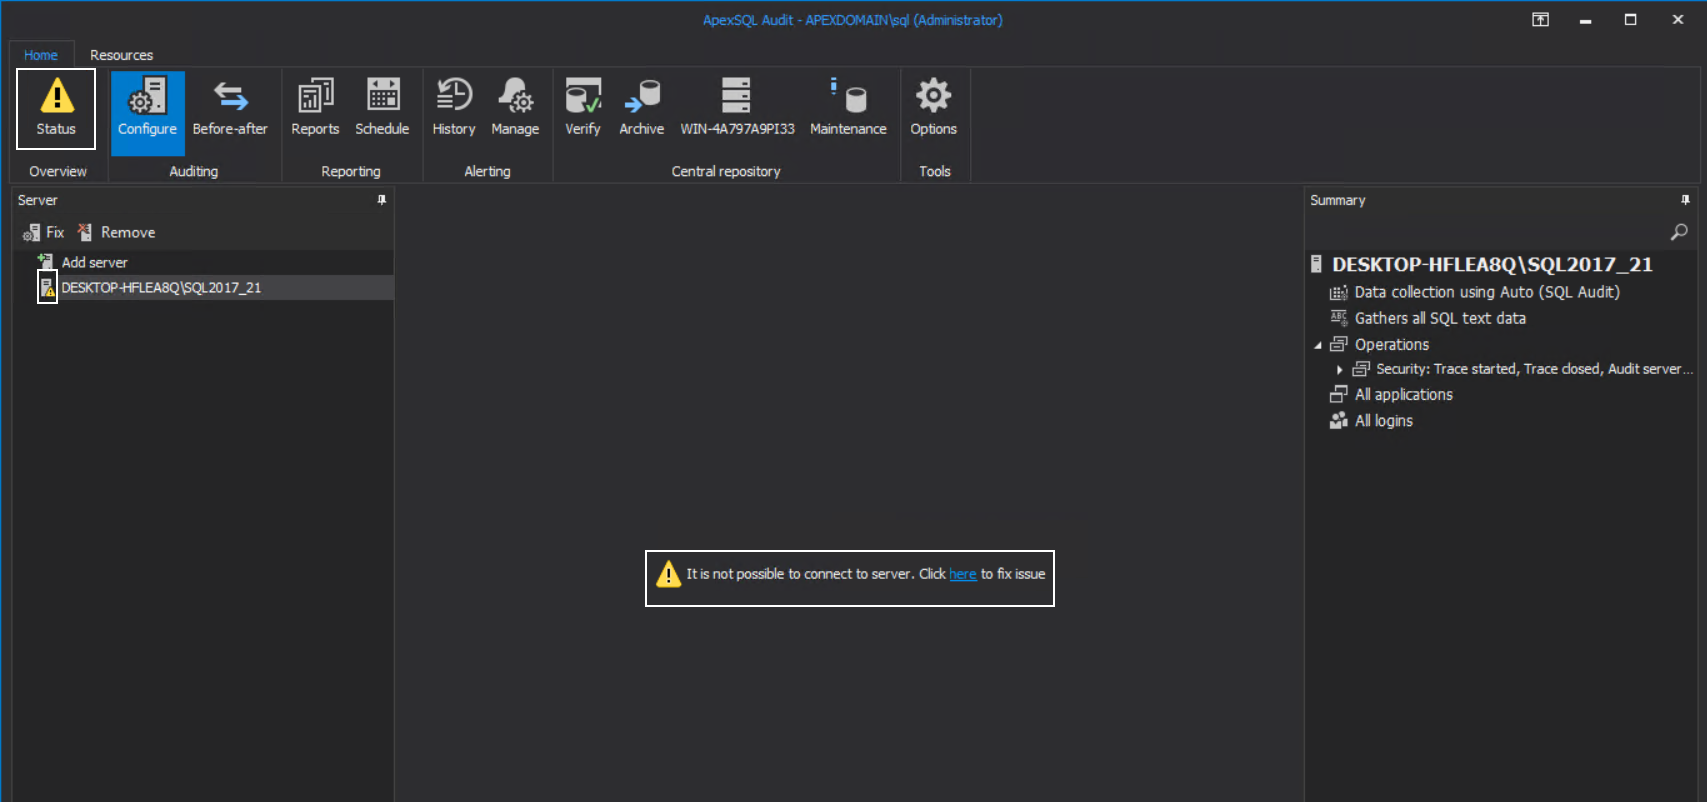
Note that, if SQL auditing is established on the target SQL Server, and the instance has periods of high loads with heavy queries, its readability may be intermittent in the future and cause symptoms in the application GUI like this:
Forcing the refresh by invoking the agent configuration using the Fix button and just confirming with OK should resolve the view in the GUI:
This behavior could be the signal that the hardware for this particular SQL Server is not optimized as could be the case with the query executed against it (note: storage drive speed can be an important factor).
SQL auditing session access
After the connection issues were resolved with the previous explanation, we should be expecting that the SQL auditing works, and we should be able to see some events collected in the reports. But there is one more prerequisite that needs to be fulfilled.
When auditing agent properties were configured, the temporary files location was set. This is the location where the SQL Server will write the auditing session files and will log the audited events in them:
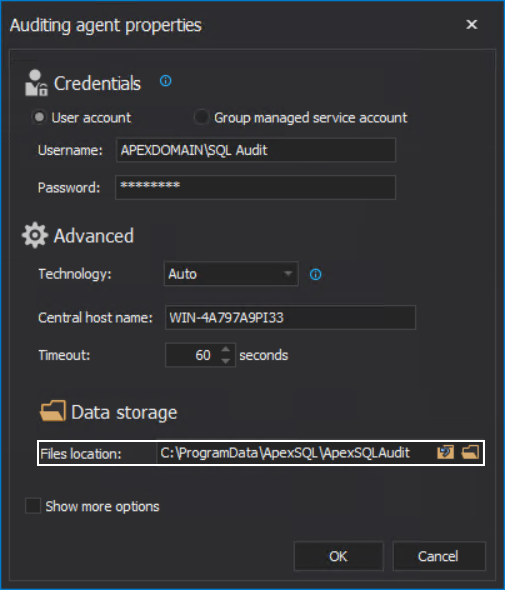
The account that was used to access the SQL Server via the auditing agent will need permissions to read and write to this location, and more specifically, to modify the session files.
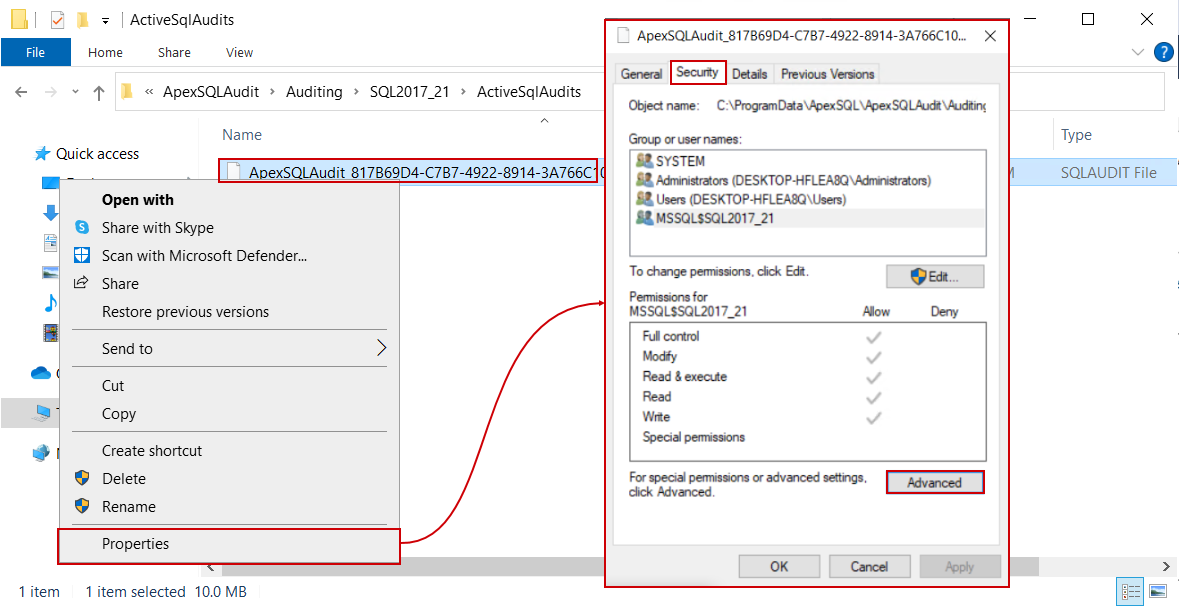
To check the permission settings for the session files, open the Properties for one of the files, and from the Security tab click the Advanced button:
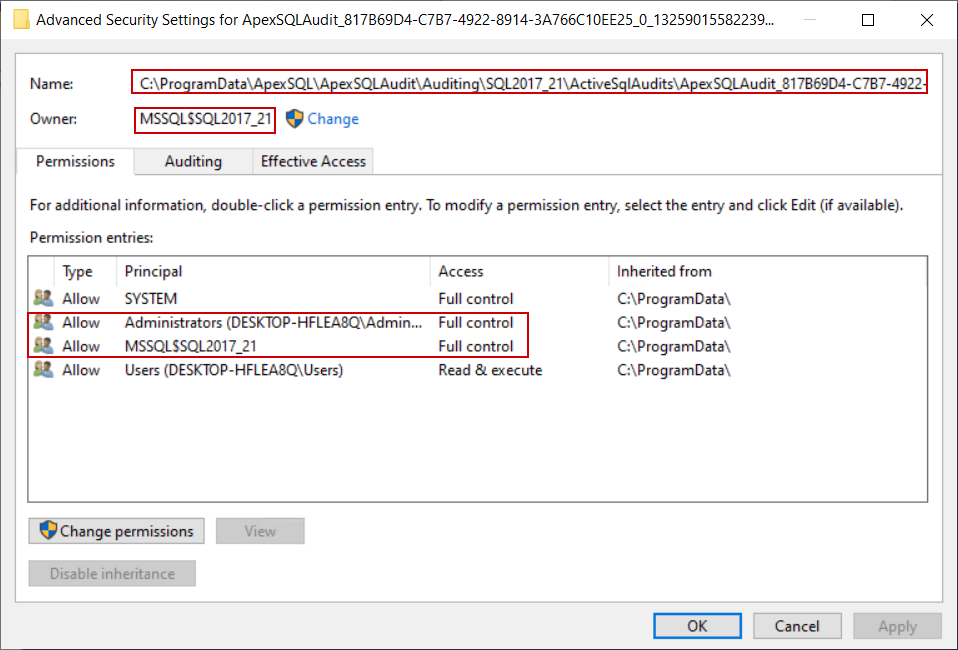
In the Advanced window we can see that the ownership for these files is set to the account running the SQL Server and by default full permissions are allowed to that account and local administrators:
Since this file is dynamically managed by the SQL Server, it does not inherit permissions from the parenting folder. As a result, those files will remain there indefinitely due to the inability to be deleted by the auditing agent when they expire, which will result in a pileup and large storage space occupation.
Resolving the access to these files for the auditing gent account cannot be resolved by setting permissions for it on the temporary files location but should be done by adding this account to local administrators on the system hosting the SQL Server. The procedure was explained previously for the central instance account.
Alternatively, instead of adding the auditing agent account, it is possible to use it as the SQL Server Log On account. However, it is necessary to mention that this method will have to be repeated for every SQL Server on this system that requires auditing in comparison to the previous method which resolves the issue for the entire system.
- Warning: The following method will require SQL Server restart
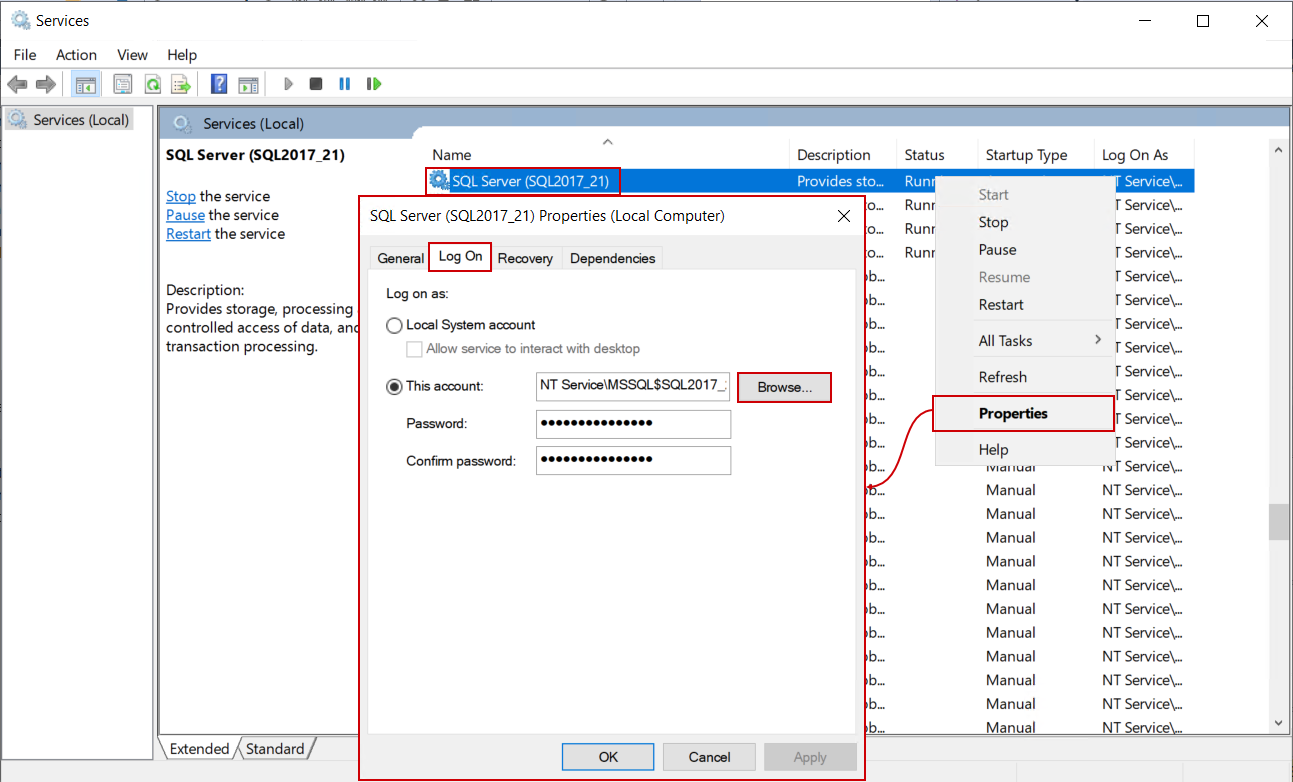
To do that, open the Services window, find the service for the desired SQL Server by its name and open the Properties window for it. When opened, switch to the Log On tab and click the Browse button:
Similar to the earlier explanation, when browsing for the SQL Server login, in this dialogue the domain account used for auditing agent can be found and used (again, make sure that the correct location is chosen):
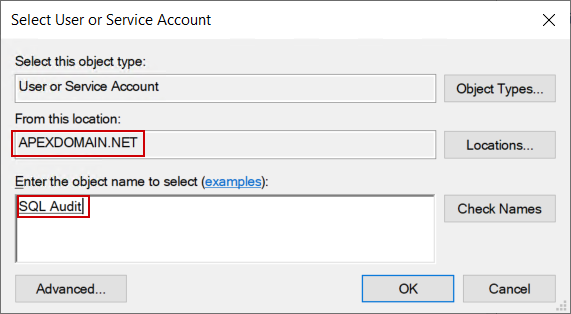
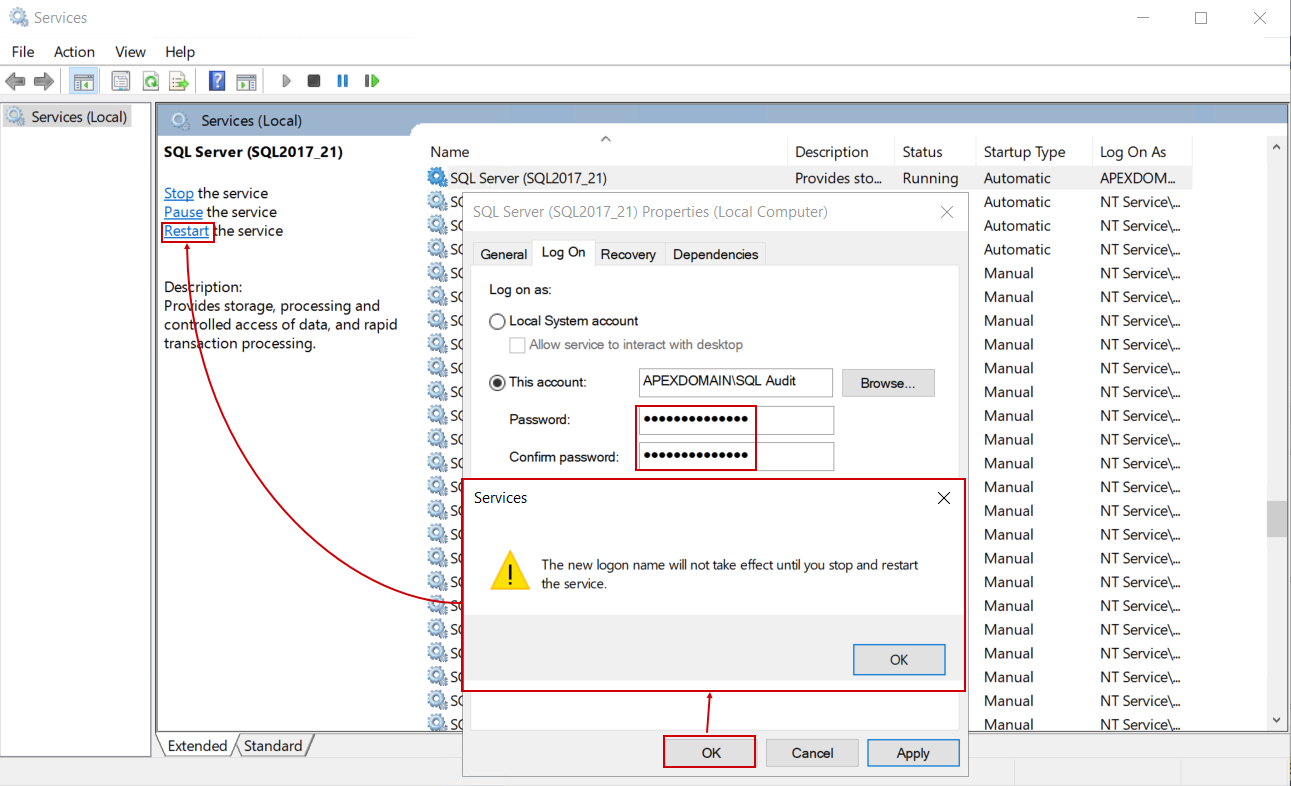
The OK button will return to the Log On properties where the password for this account should be entered and click on the OK button from here will show a message indicating that the service has to be restarted to apply this change:
With these final settings, SQL auditing will work without further issues. Note that the procedure for auditing agent permissions will have to be applied for every SQL Server when concerning logins and for every system when concerning file system access.


