


Applies to
ApexSQL Source Control
Summary
This article describes how to split a column in SQL table and commit such change to a source control repository along with a migration script. It is assumed that a database is already linked to a repository using ApexSQL Source Control and all objects are at least initially committed.
Description
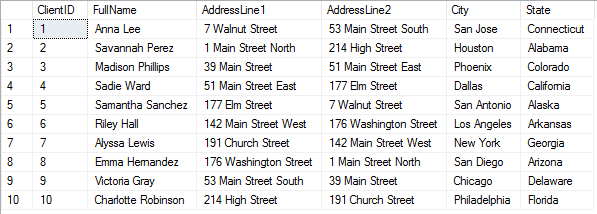
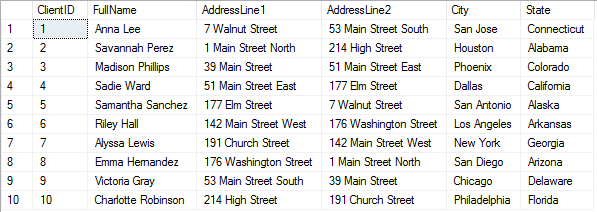
In this case, a Clients table will be used as an example. The SQL script of the Clients table is as follows:
CREATE TABLE [dbo].Clients (
	[ClientID] [int] IDENTITY(1, 1) PRIMARY KEY NOT NULL
	,[FullName] [nvarchar](50) NULL
	,[AddressLine1] [nvarchar](50) NULL
	,[AddressLine2] [nvarchar](50) NULL
	,[City] [nvarchar](50) NULL
	,[State] [nvarchar](50) NULL
	)
GO
After inserting sample data and querying the Clients table, the result is as follows:
Making a change
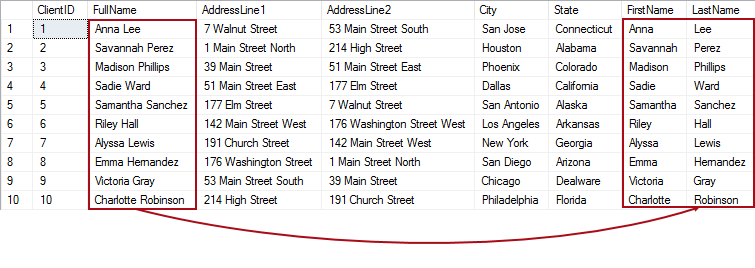
The goal is to “split” the FullName column into two new columns FirstName and LastName, pull the data from the FullName column, and insert it into newly the created columns, respectively, without data loss. When this change is made by one developer and committed to source control, the rest of the team should be able to apply that change without the data loss on their sides, or making additional changes after applying this one.
Creating new columns
The first step is to create new columns where the data will be moved from the original column. To add the required columns, execute the following SQL script:
ALTER TABLE [dbo].[Clients] ADD FirstName NVARCHAR(20) NULL
	,LastName NVARCHAR(20) NULL;
GO
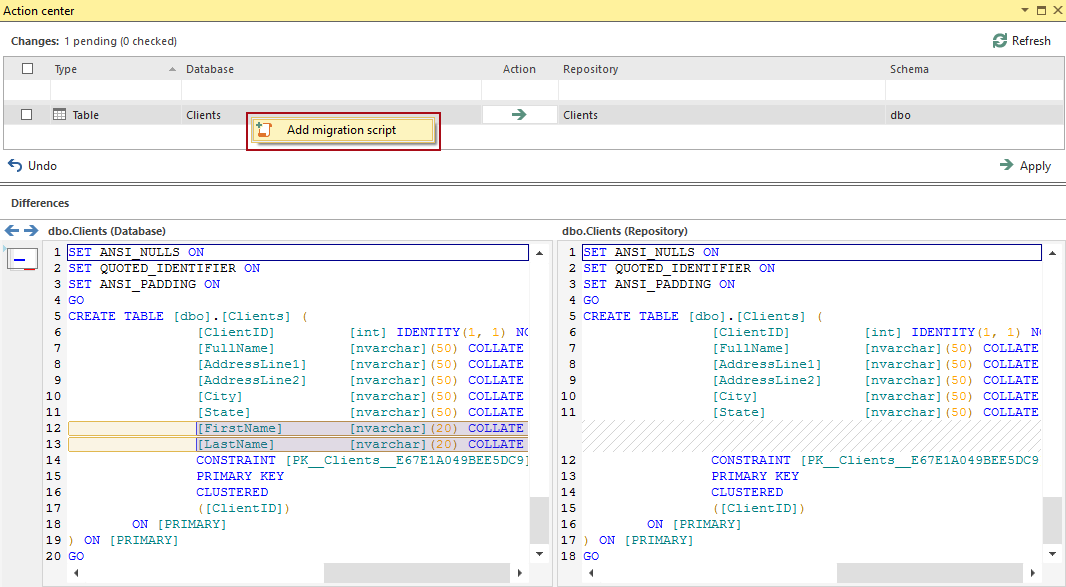
As a result, a change related to the Clients table appears in the Action center tab, upon refreshing/initiating it.
Adding a migration script
The migration script that will move the data from the FullName column to the Name and Surname columns and that will be executed when any other developer applies this change on a local copy of a database, must be added at this point. To add a migration script, right click the Clients table from the Action center tab, and select the Add migration script option:
|
Quick tip: In this particular case, the script which will move the data can be manually executed against the original database, before committing it along with the appropriate object change as a migration script. |
This will open the new query where the migration script needs to be specified:
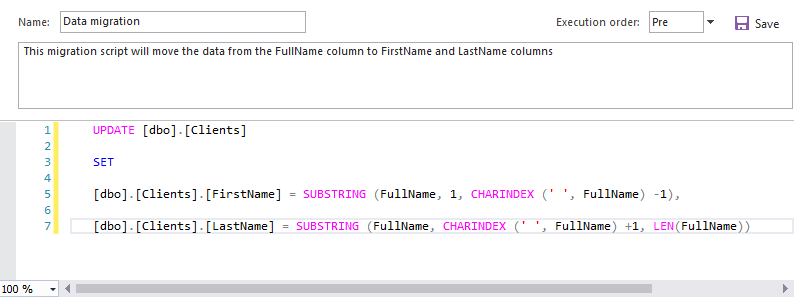
The above script will “cut” names and surnames from the FullName column and move them to the newly created columns.
Committing changes
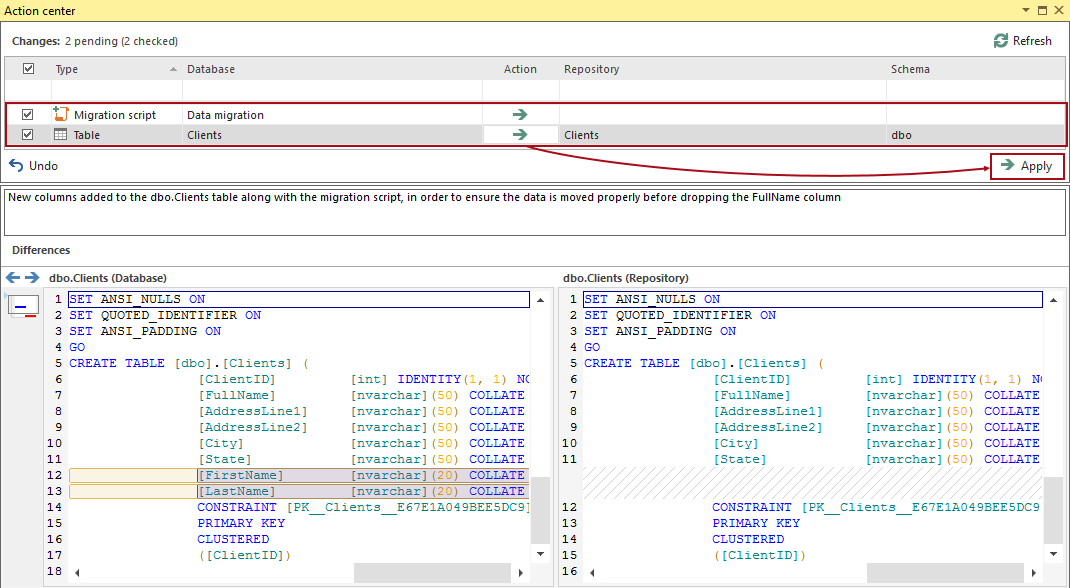
After the migration script is prepared, clicking the Save button, and refreshing the Action center tab will bring it to the list of changes to be committed. To commit the migration script properly, make sure that both items (Clients table and the migration script) are selected, optionally provide a commit comment, and click the Apply button:
|
Quick tip: It is necessary to select both items (migration script and its related change). Otherwise, a warning message will appear as a reminder for this. |
Applying changes
Another developer who is working on his/her own copy of a database, linked to the same repository will still have the FullName column, prior to applying a change related to the Clients table. Querying the Clients table will give the following result:
Upon refreshing the Action center tab, previously committed changes by the first developer will appear, with the Get action (blue arrow) set by default:

If both items are selected (migration script and the Clients table change), after clicking the Apply button, the Apply changes from the repository wizard will be initiated. A complete script (change + migration script) will be shown in the Script tab:

As marked in the above image, the migration script will be executed after the required columns are created in the destination table.
Results
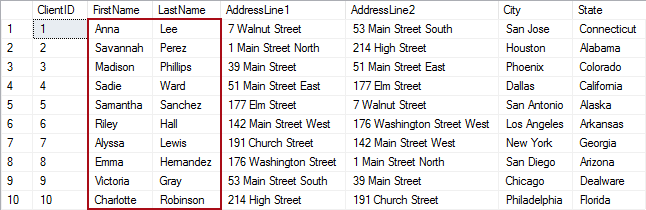
After the changes are applied, querying the Clients table in the destination database will give the following results:
After applying a change, it is safe to drop the FullName column as it is redundant. When the FullName column is dropped, querying the table again will give the following result:
A change is properly applied and the data migration from the original column to the newly created ones is completed successfully without data loss.
Q: Is there a way to set the order of the execution when applying a change that contains a migration script?
A: Yes, using the Execution order drop-down list. In this particular case, the migration script will be executed after the exact object change:

Q: Can I set the SQL Server instance where the temporary database will be created when applying changes?
A: No, the temporary database will always be created on the current SQL Server instance where the target database (a database to apply changes to) is hosted.
Q: Can I add a drop statement for the initial column in the migration script?
A: Yes, additional scripts can be added, but it is necessary that the DROP statement is specified after the UPDATE statement, that will migrate the data from the original column to the new ones.


