The Octopus Deploy server is very convenient solution to deploy changes through a DevOps infrastructure on to multiple targets at the same time. In addition to application deployments ApexSQL DevOps toolkit Octopus Deploy template steps can provide the means to deploy database changes along the way.
In a situation where a database package containing updates was created with any continuous integration server (Bamboo, TeamCity, Jenkins, Web dashboard…) using ApexSQL DevOps toolkit continuous integration solution the ApexSQL Octopus Deploy steps will provide easy way to move finished continuous integration projects to deployment projects of Octopus Deploy server.
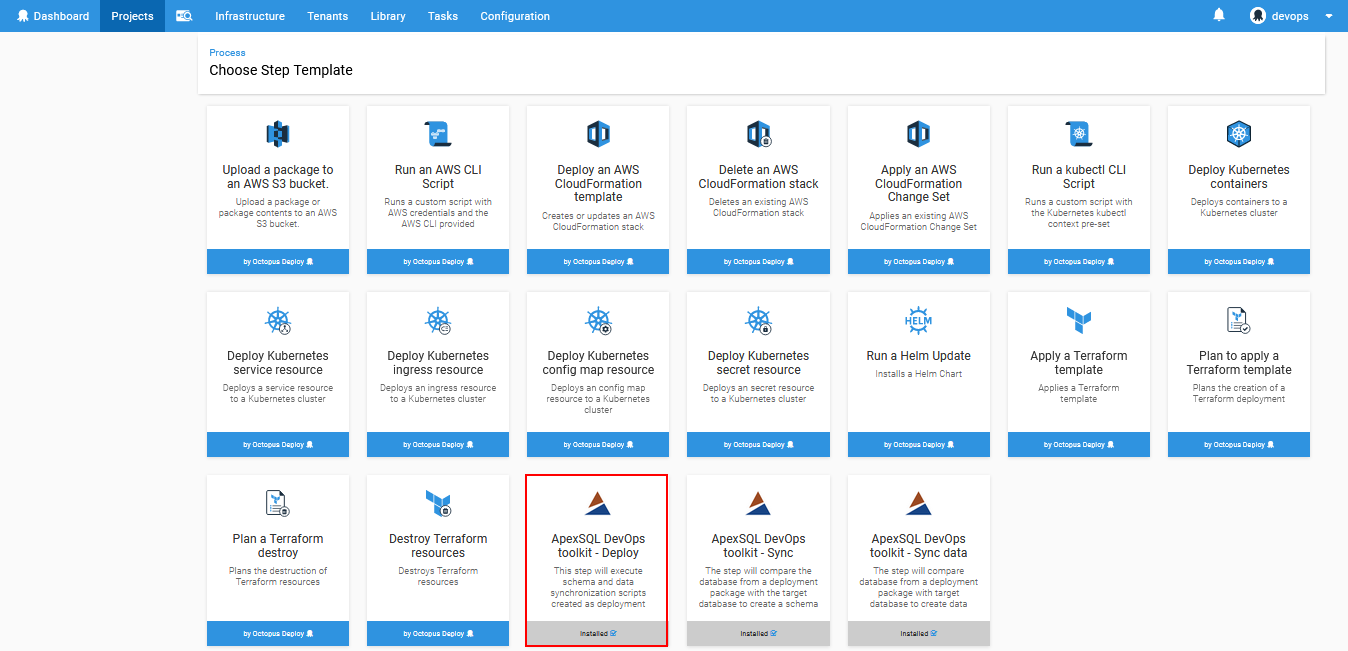
Installing ApexSQL DevOps toolkit step templates
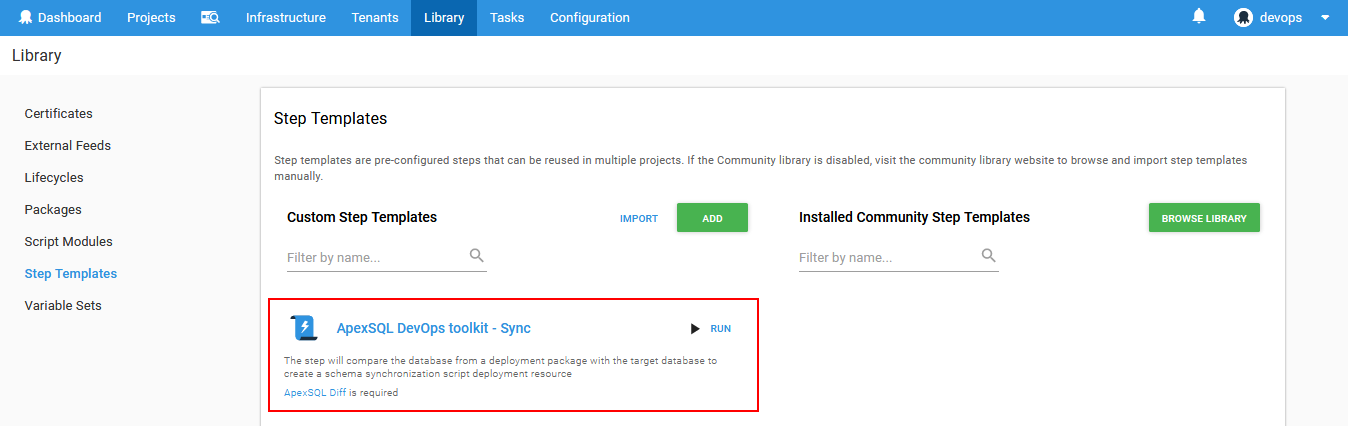
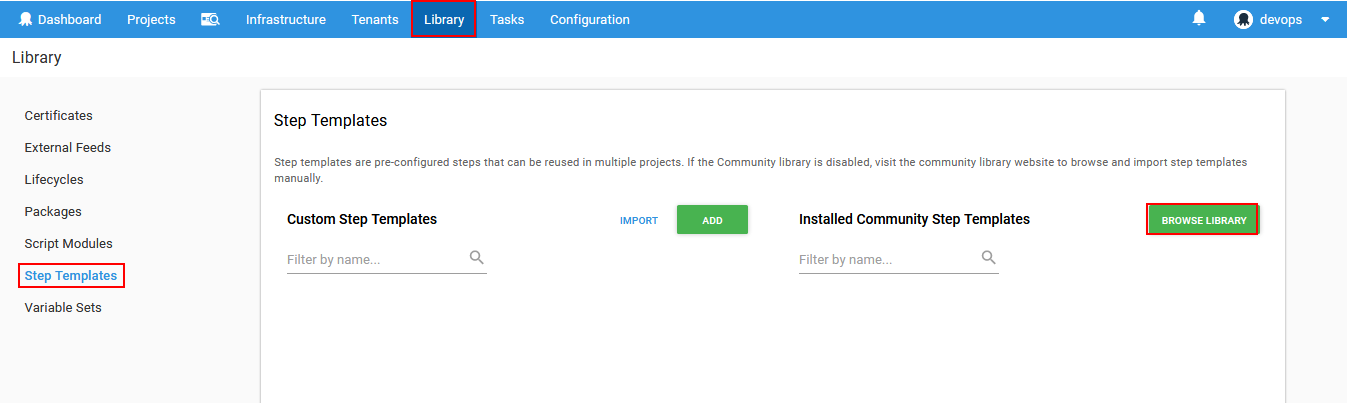
Installation of the Octopus step templates provided by ApexSQL can be done in two ways. One way is to import JSON files obtained from ApexSQL Download page. To do that go to the Library page from the main Octopus menu then choose the Step Templates option. This will show the view with listed external templates.

Click on the Import button and the window with the text editor will appear. Copy the JSON code from one of the obtained template files and paste it in the editor.
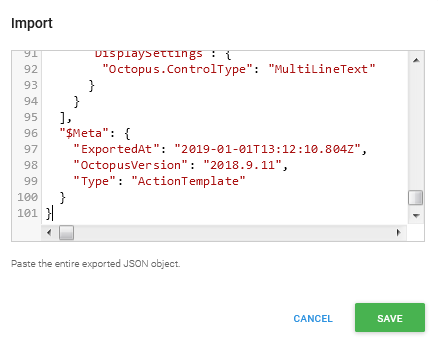
Confirm with Save and new step template will appear on the template list which is ready to be used for deployment projects.
Repeat the procedure for the rest of the templates to finish installation of the ApexSQL DevOps toolkit.
Another way to install new steps is from the Octopus Community library. To do that from the same view click on Browse library button and the list of available community templates will appear.
From the list pick ApexSQL DevOps toolkit group of templates to list them all.
Finally pick the steps one by one and install them.
Setting up deployment targets
One of Octopus Deploy major features is ability to create a deployment infrastructure where all environments and deployment targets surrounded by them can be defined once and then used for every deployment process configured and activated later.
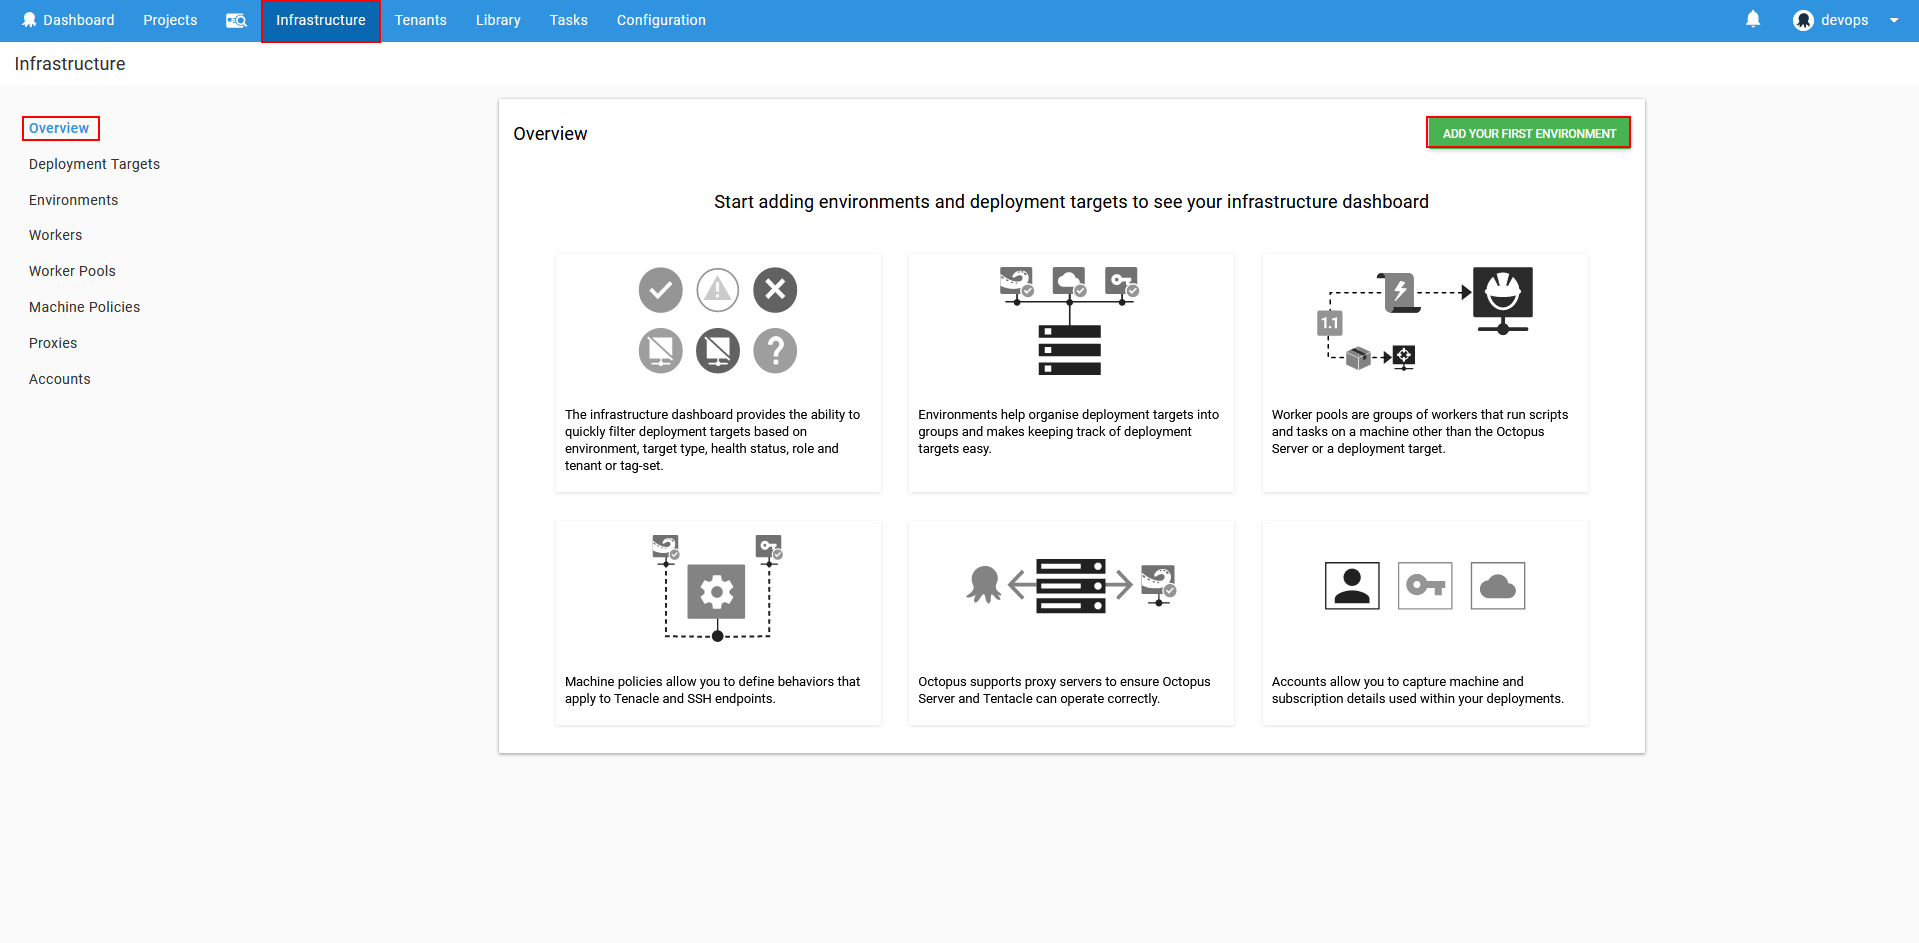
In case of database deployment, it is necessary to define target machines with SQL instances and databases. To start with definition creation in the Overview view of the Infrastructure page accessed from the Octopus Deploy main menu use Add your first environment button and the console will start guiding through the setup.
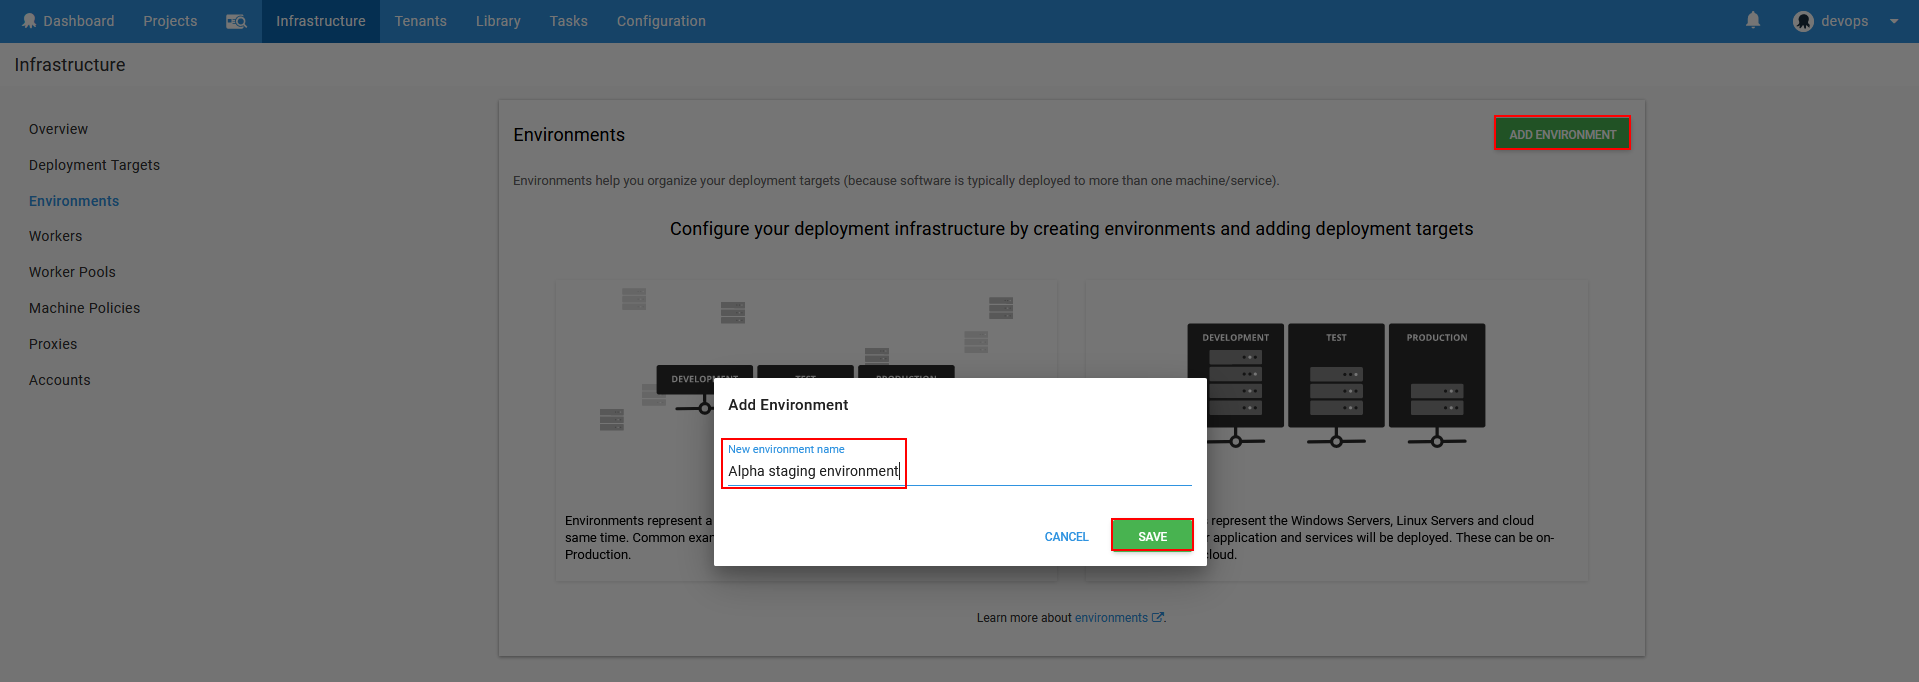
What is displayed next is the view to create environment which requires clicking on Add environment button and the environment naming dialogue will appear. Enter a name that will help easily recognize deployment environment and click Save.
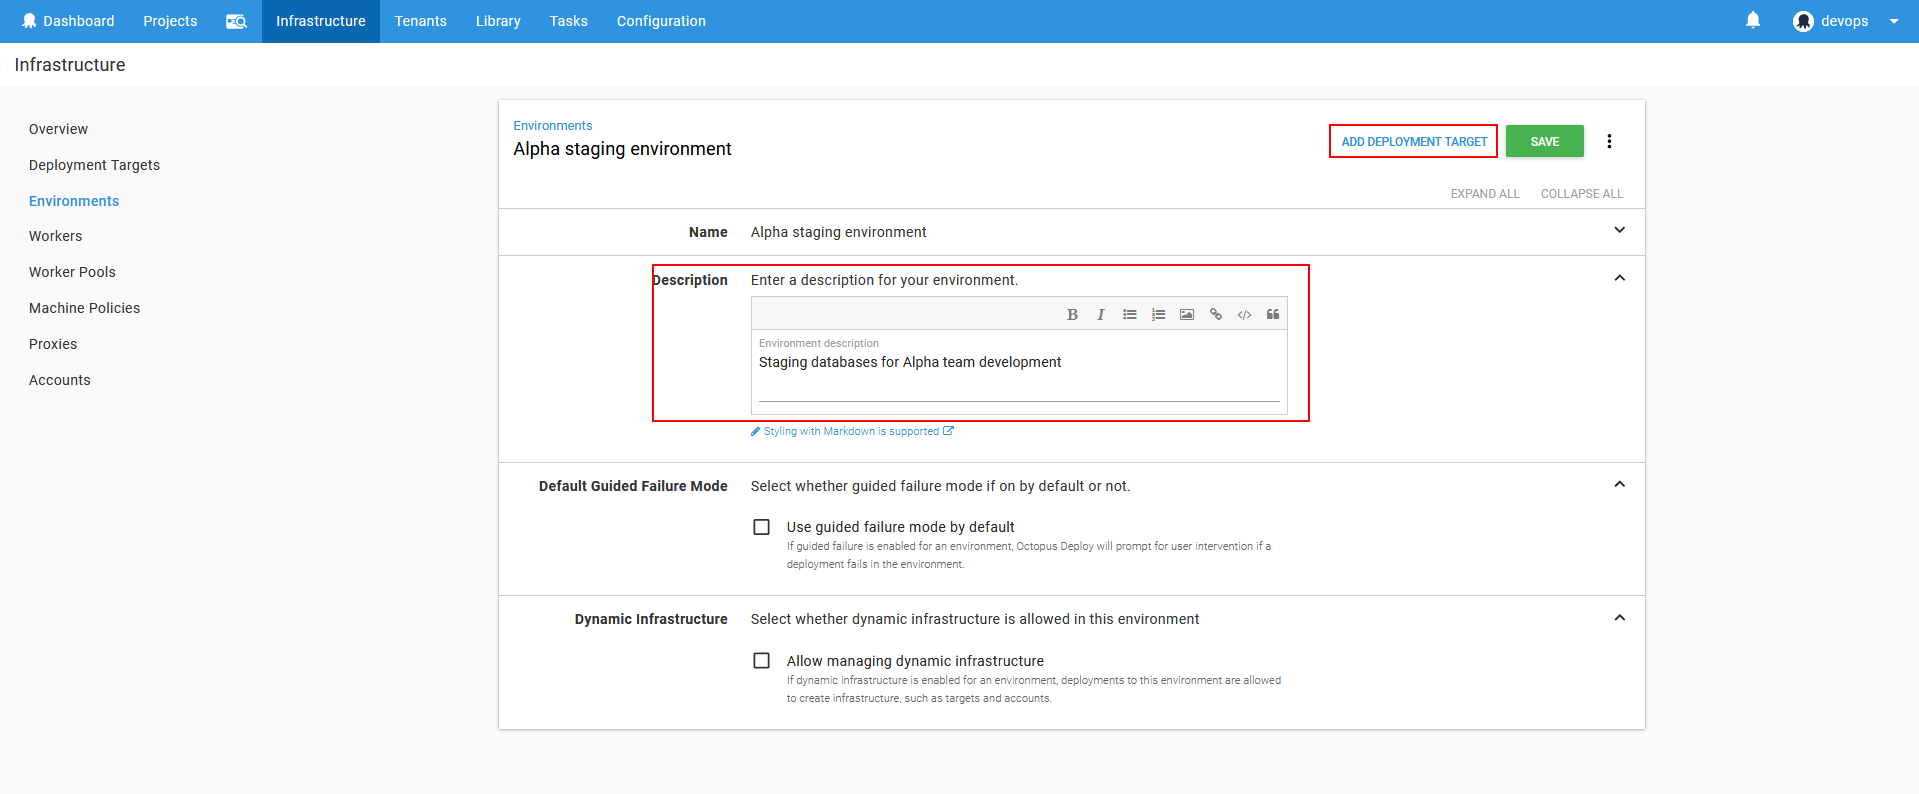
After the naming confirmation, the view for additional environment settings will appear. In this view the environment description can be entered and some deployment behavior options with their explanation can be set as defaults. Also, the option to define deployment targets and bind them to this environment will be there.
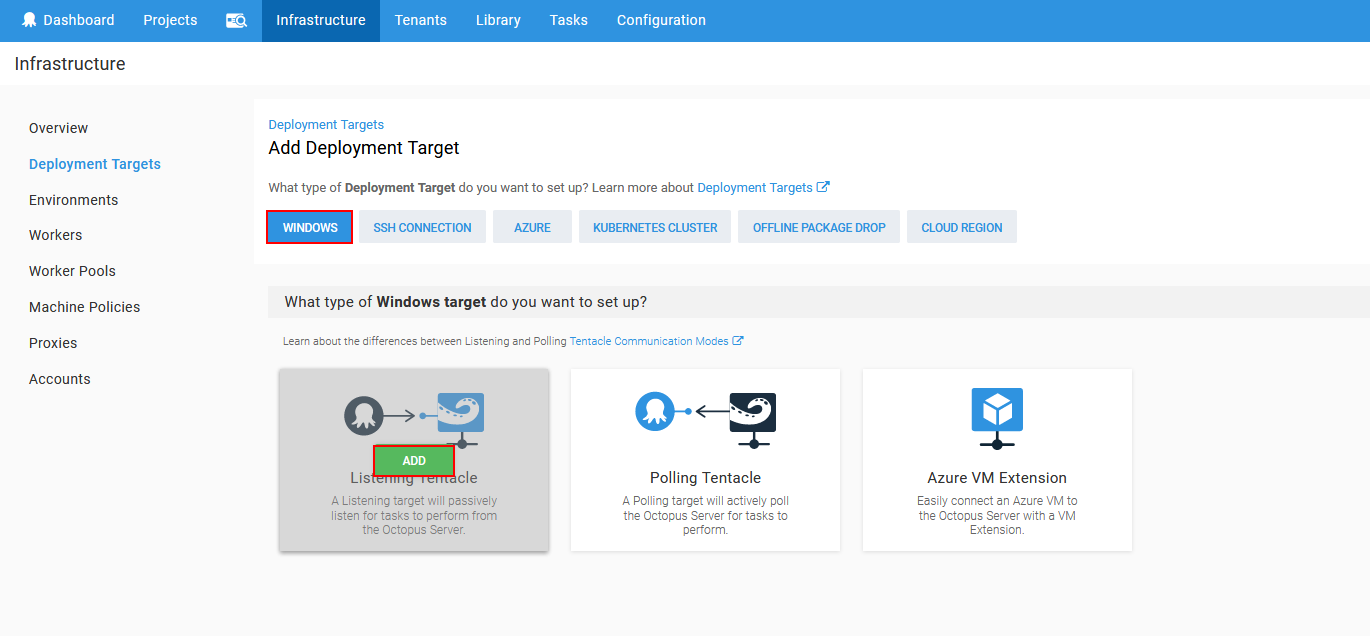
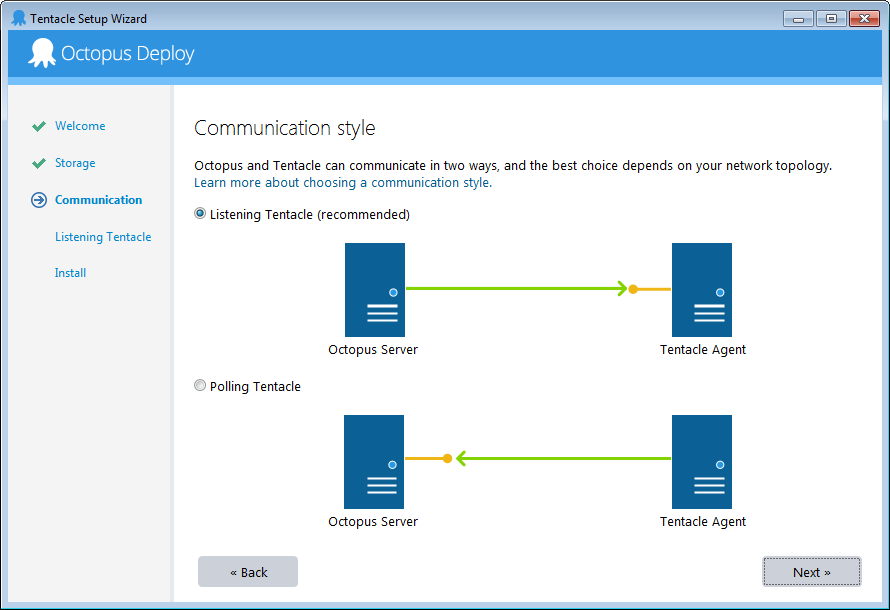
Click on the Add deployment target to proceed to target definition. In the new view which appeared will be set of options to define what kind of technology is present in the target. In this case the Windows type target should be selected and the options to set deployment request behavior will show up. There are three possible setups:
- Listening tentacle – this setup will configure target instance to listen for Octopus Server deployment requests and accept them when activated
- Polling tentacle – this setup will configure target instance to send deployment requests to Octopus Deploy server which will wait for them and execute deployment upon received request
- Azure VM extension – this setup will provide instructions how to set the Octopus Deploy extension to Azure instance and bind it with the server as target
For ApexSQL DevOps toolkit deployment steps the listening tentacle should be chosen.
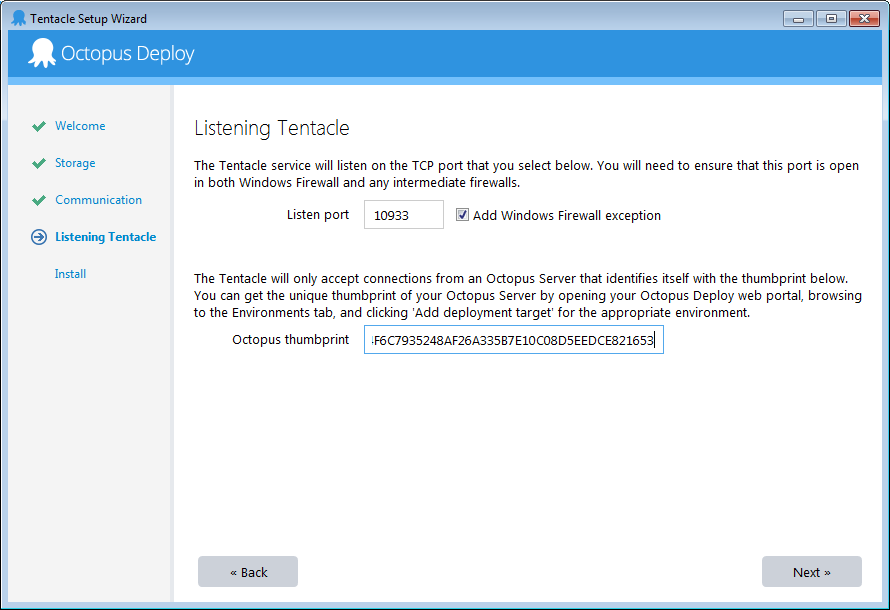
Next step will require to define target host. This is usually a remote machine and if Octopus tentacle service is installed there it will listen to port 10933 by default.
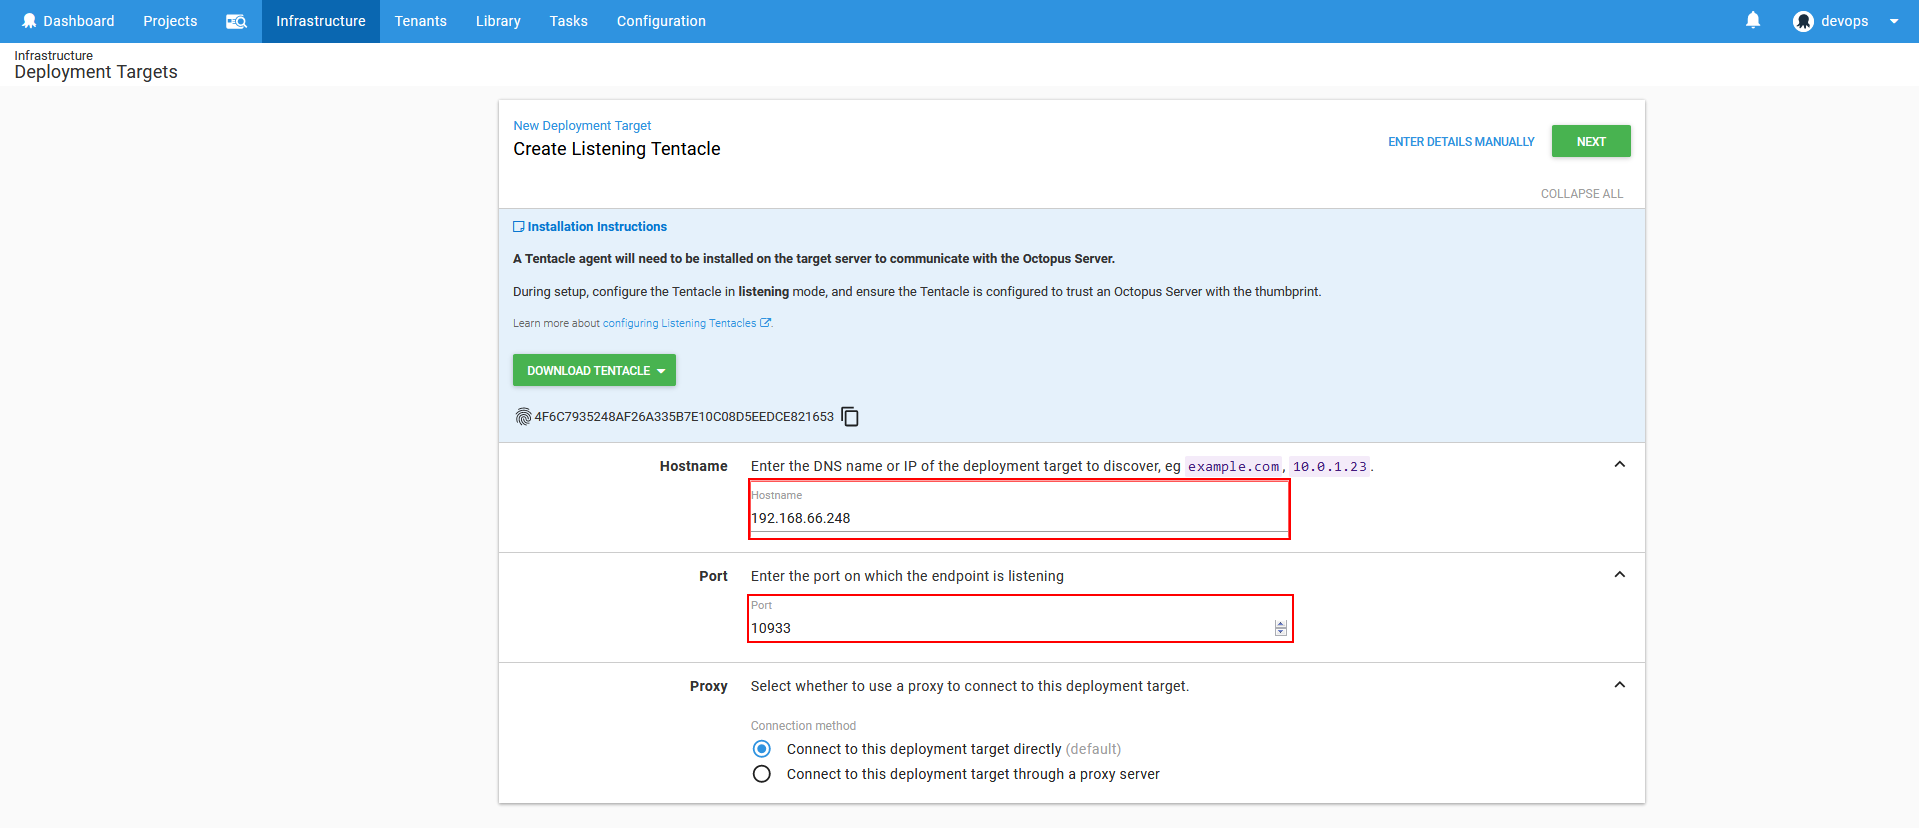
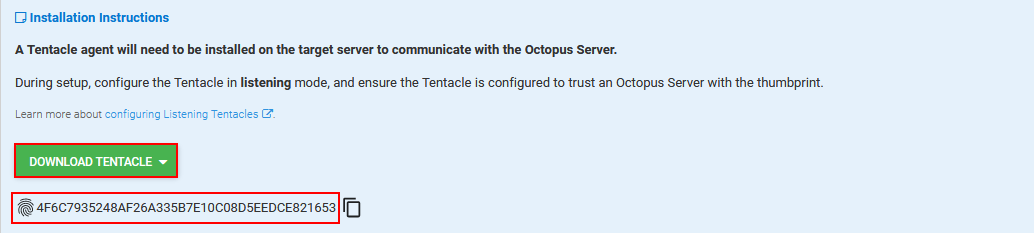
In case there is no Octopus tentacle service installed on the target machine there is option present to download the service installer and install it to the target machine. During the installation process the Octopus tentacle service has to be paired with the server using generated thumbprint code.
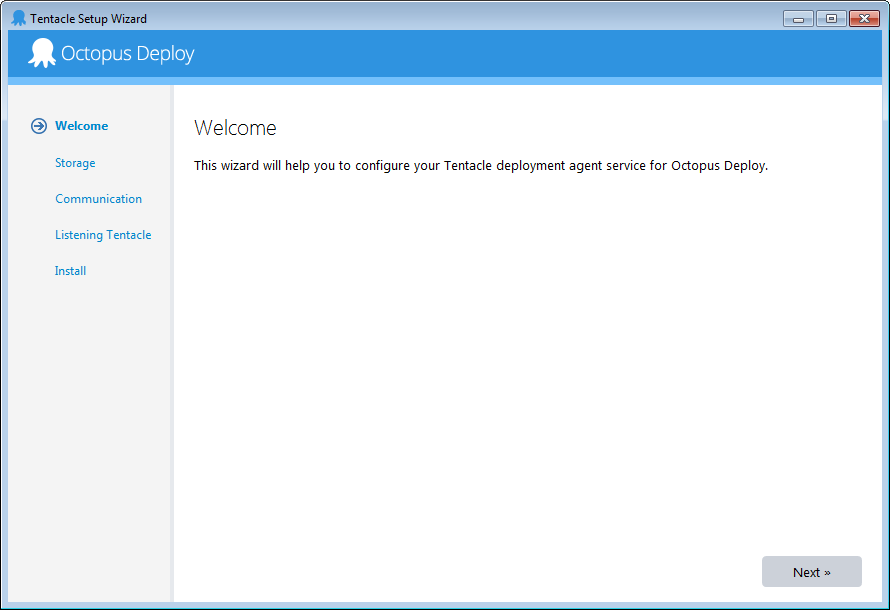
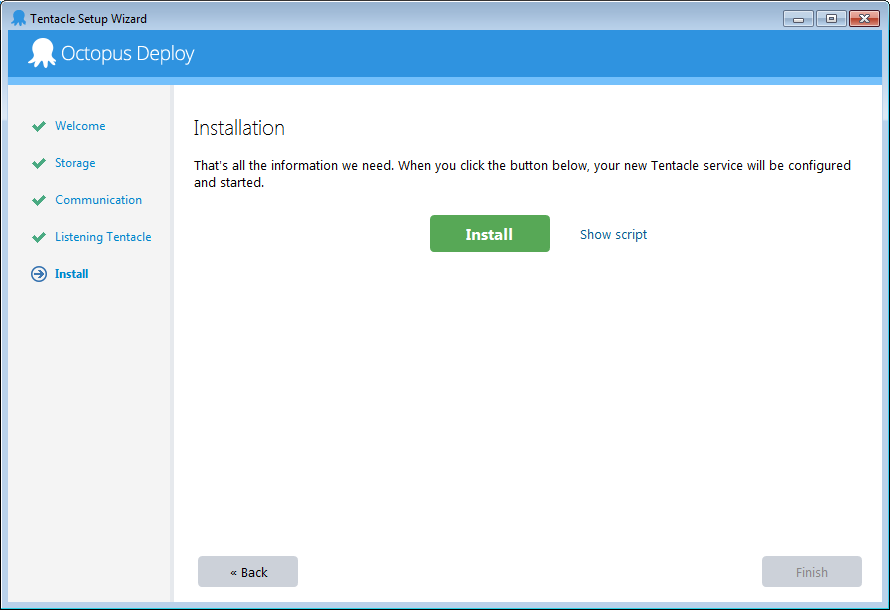
The Octopus tentacle service installation is very simple and require few easy steps through installation wizard to complete:
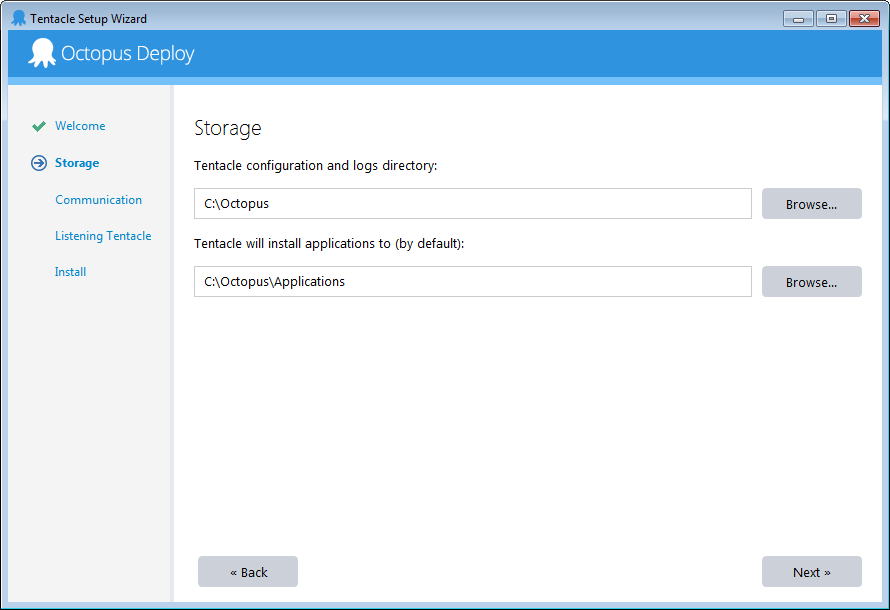
Define the deployment execution working folder paths. These paths will be used to extract content from a retrieved package:
Setup the tentacle service communication type:
Configure listening port and enter thumbprint code to pair with Octopus Deploy server:
And confirm installation:
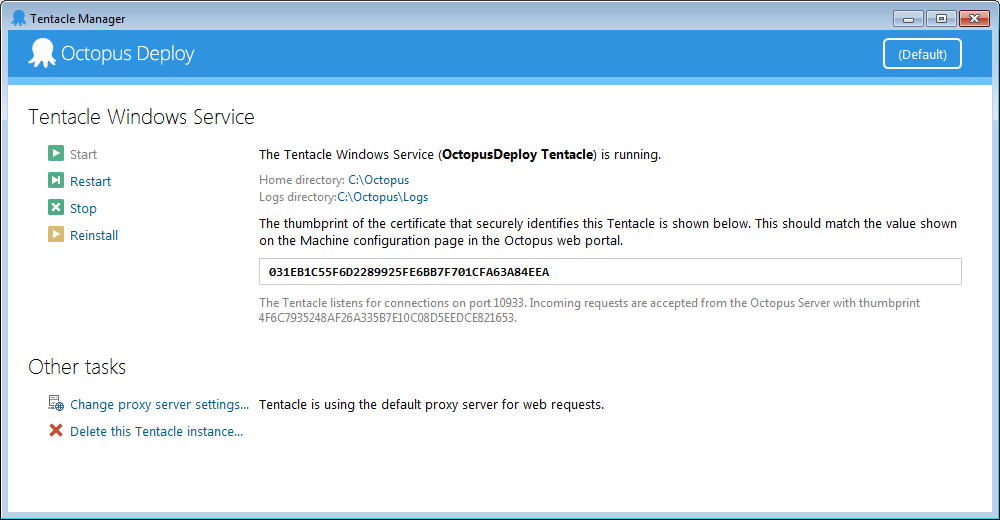
After the successful installation the Octopus tentacle service management will be available:
When target configuration is done click on the Next button to confirm it.
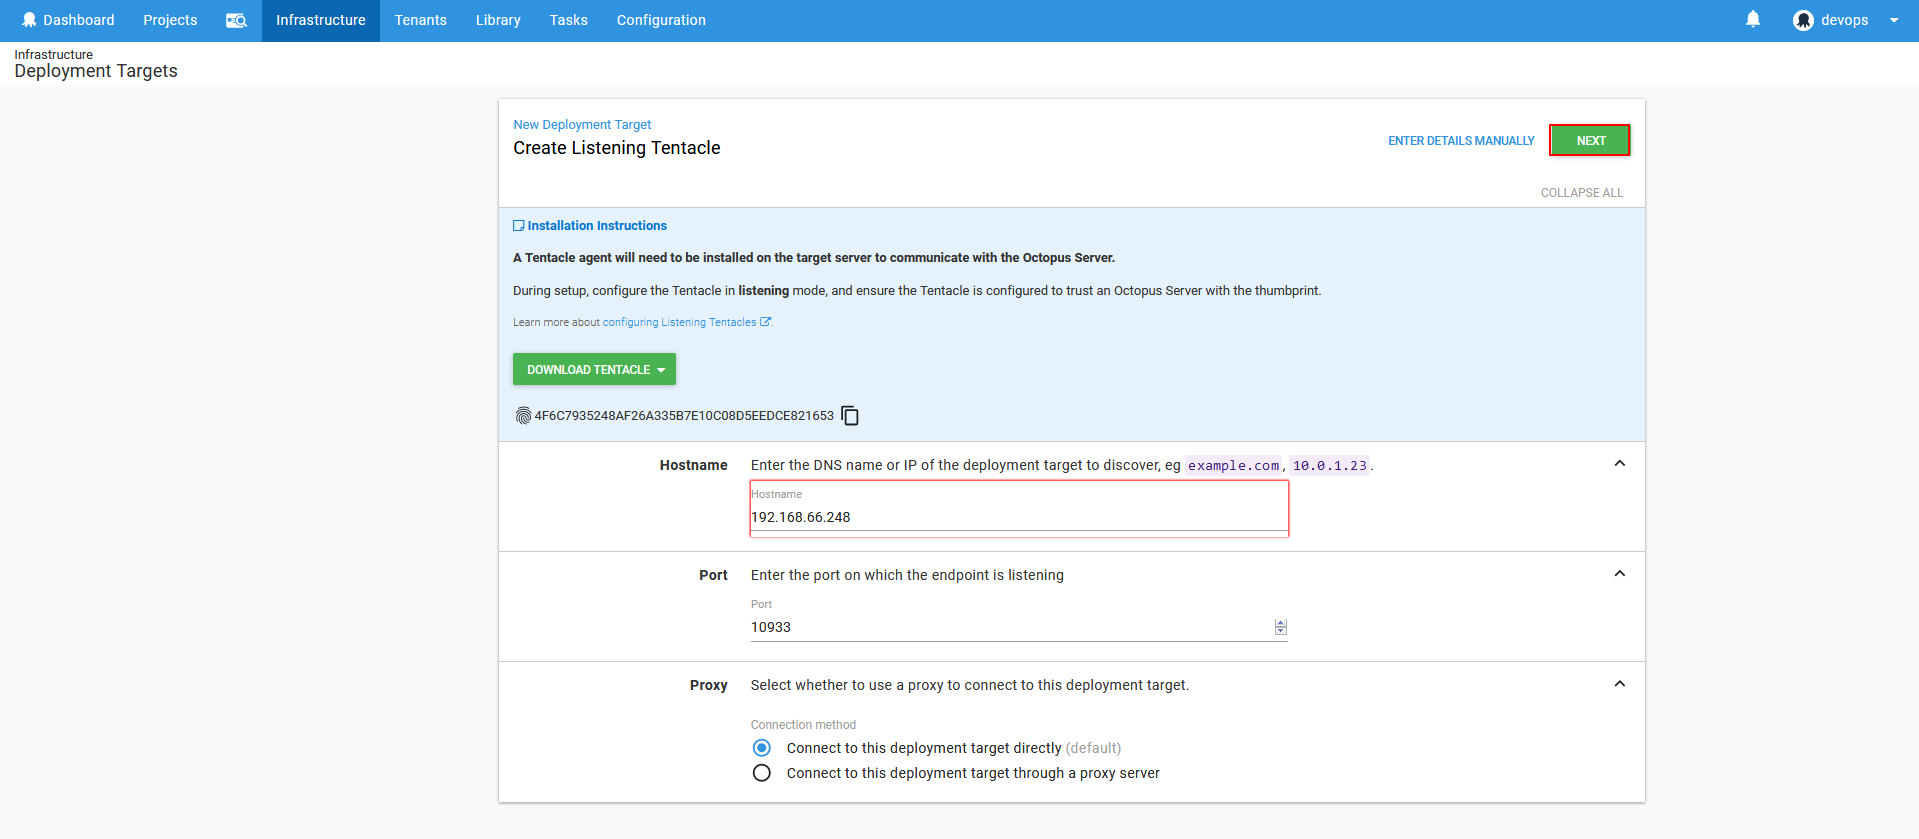
Further on we can find additional options for listening or target tentacle which should be configured. The recognizable name for the target machine should be set and after that the role which this machine provides.
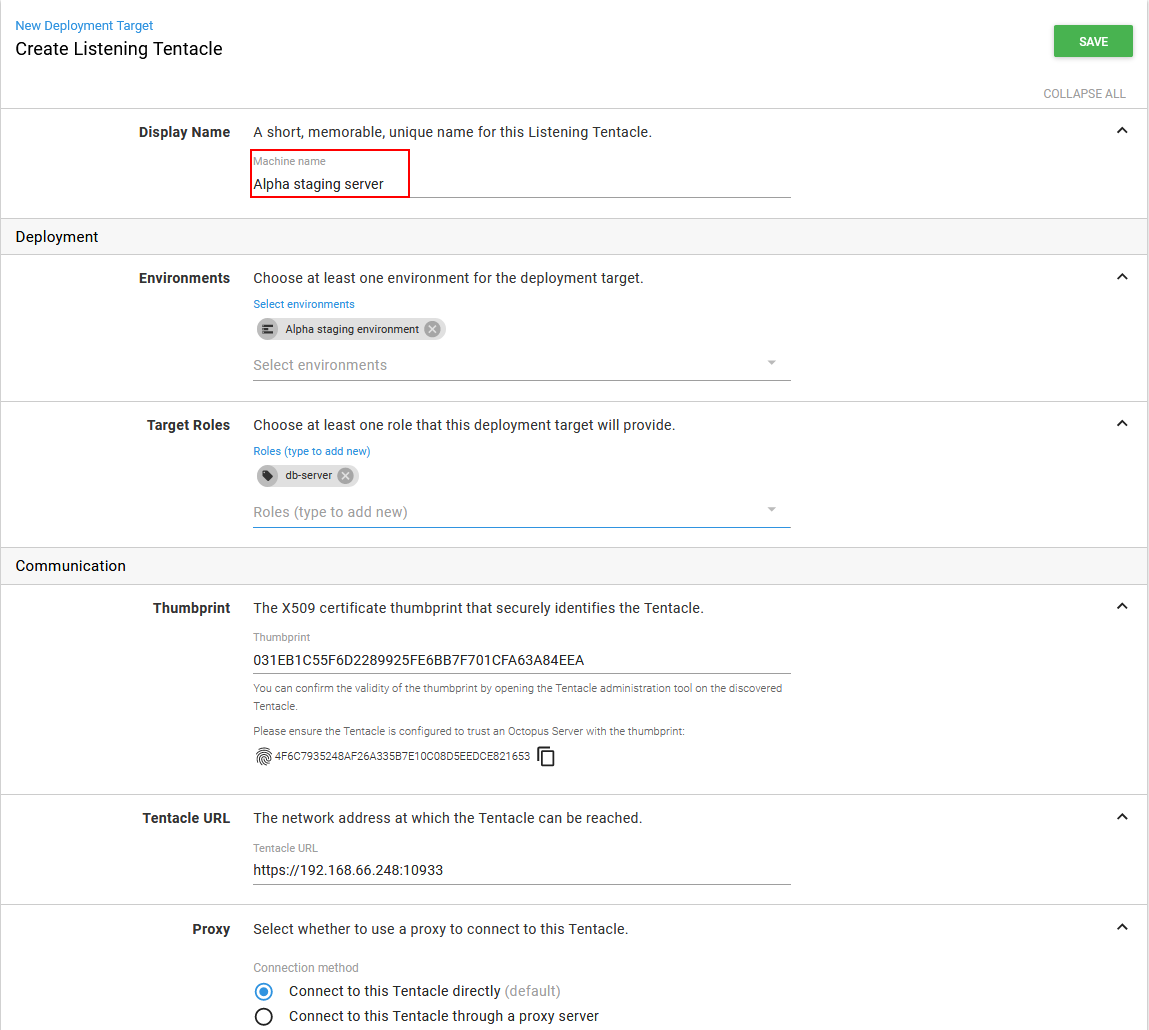
Defining role tags will provide additional deployment configuration customization. In case there are multiple machines which have several roles like web server and database server at the same time, using the role tag in deployment steps will define a scope of target machines that have assigned roles with the selected tag and exclude the ones that are not tagged with used role.

One thing that can be seen in the current view is the binding of the target machine to an Octopus Deploy configured environment. If the creation of target is started from the environment configuration view, the binding will be set automatically to the configured environment.

Saving this setup will open the target’s management view where settings can be reviewed and changed.
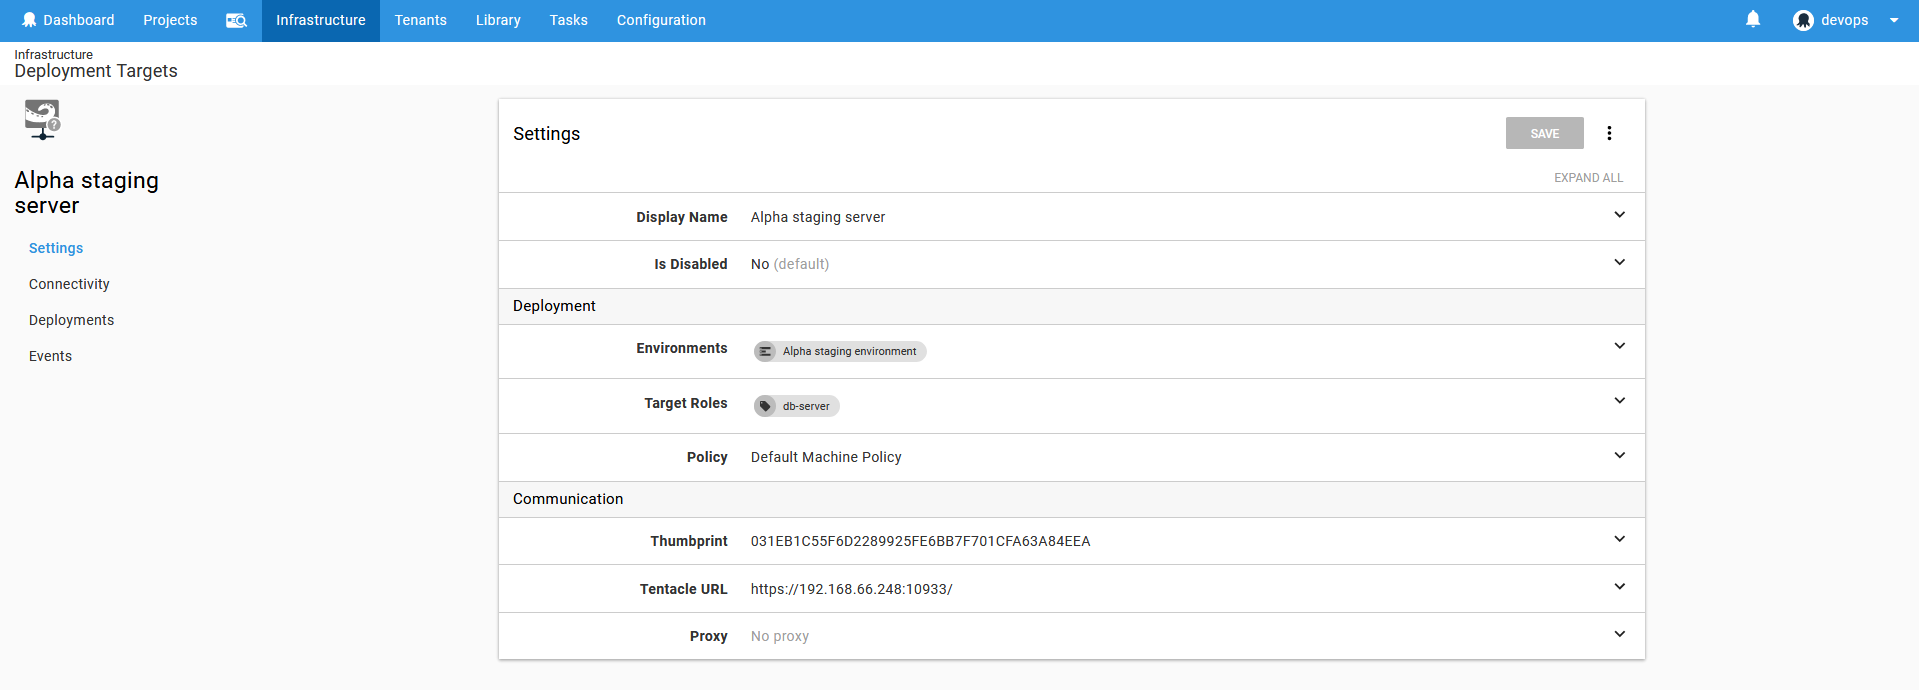
From here use the Connectivity option to check if the target can be seen on the network and examine the target’s status with the Check health button.
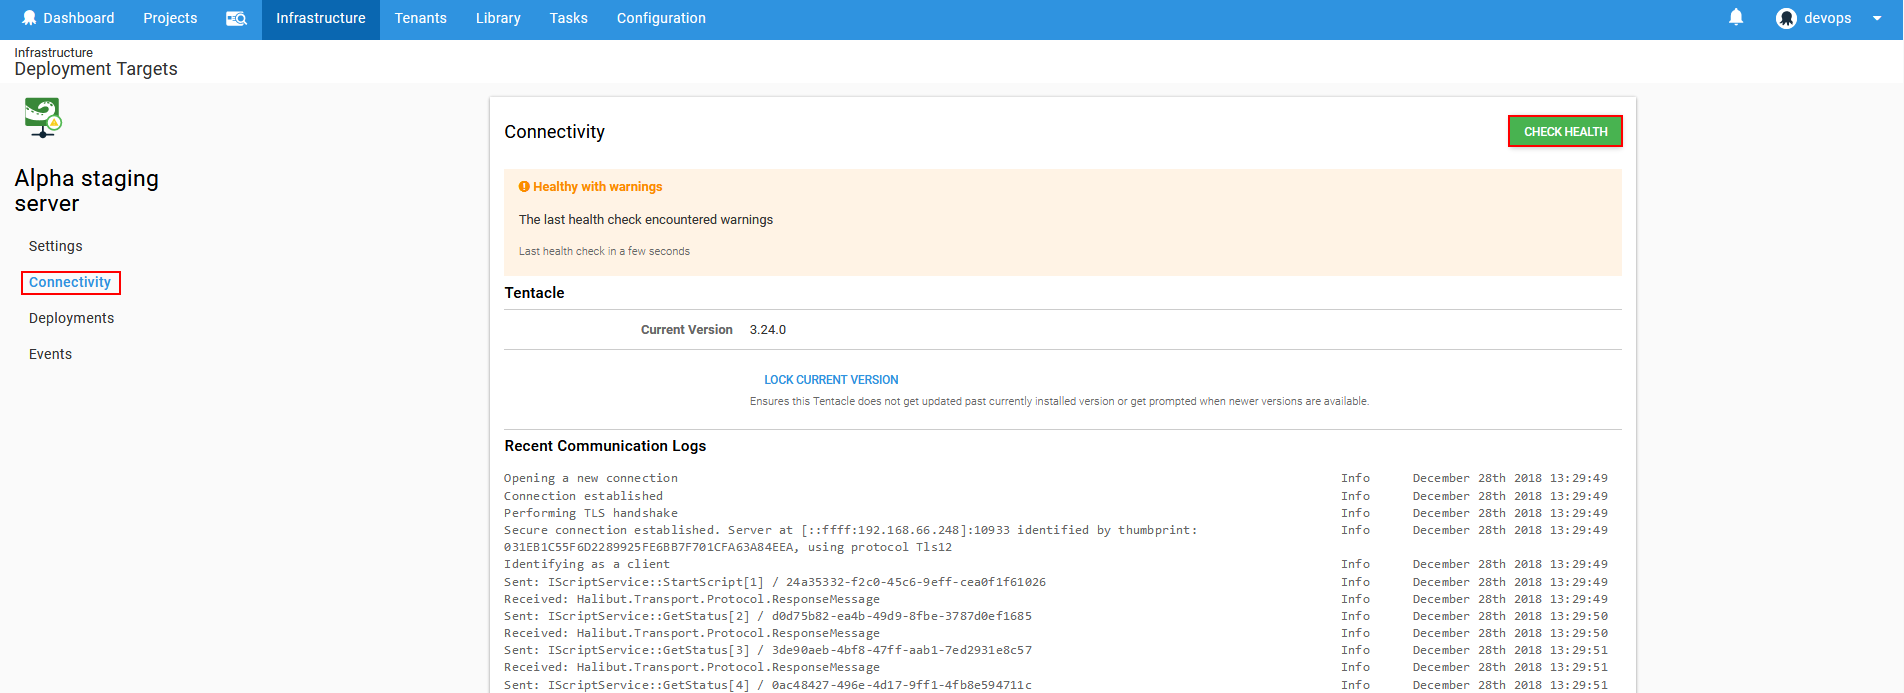
Health checkup is useful option to find issues on target machine before deployment directly from Octopus Deploy console.

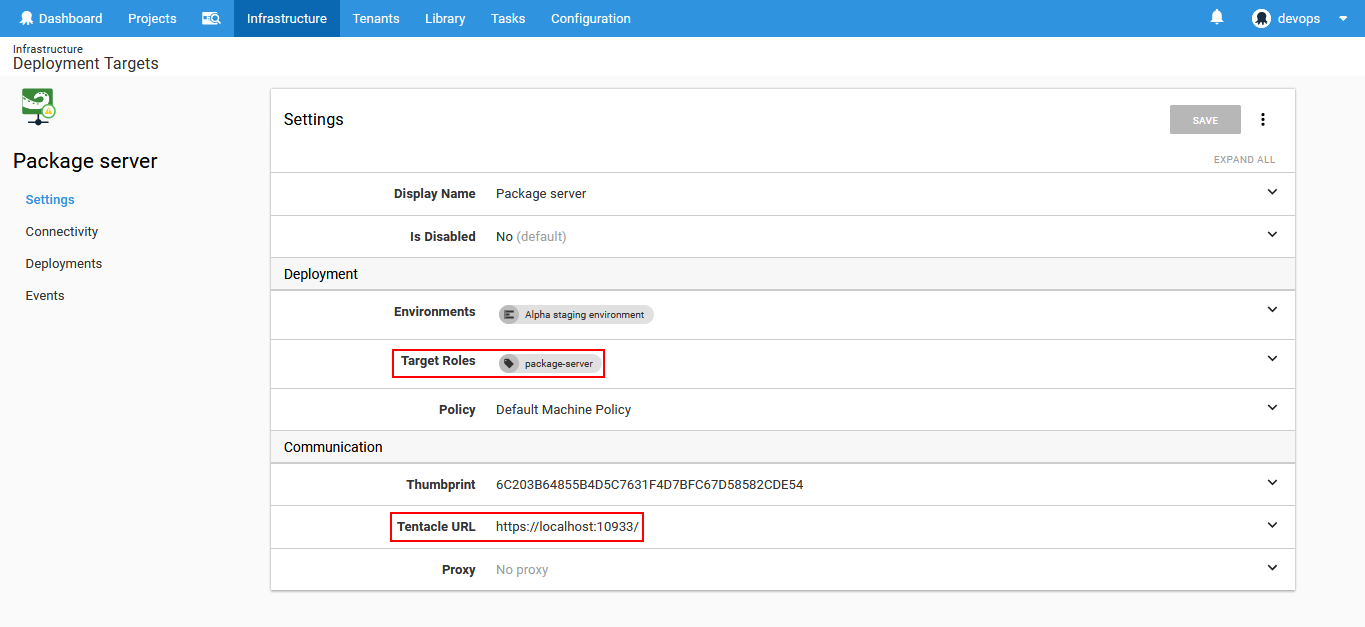
This procedure should be repeated at least once more in order to create centralized repository for the deployment resources, in this case database synchronization scripts. This repository should be on the Octopus Deploy server machine. The main benefit is that database comparison and synchronization can be done from one location where ApexSQL tools are installed. This means that there is no need to setup ApexSQL tools on every target machine which would be the case if deployment resources were created on target machines.
Use one specific name for the role for this target like “package-server” and provide the information that the listening tentacle is on the localhost address with the default port number 10933.
With the deployment environment and target configured the configuration of database deployment project can proceed.
Creating a deployment configuration
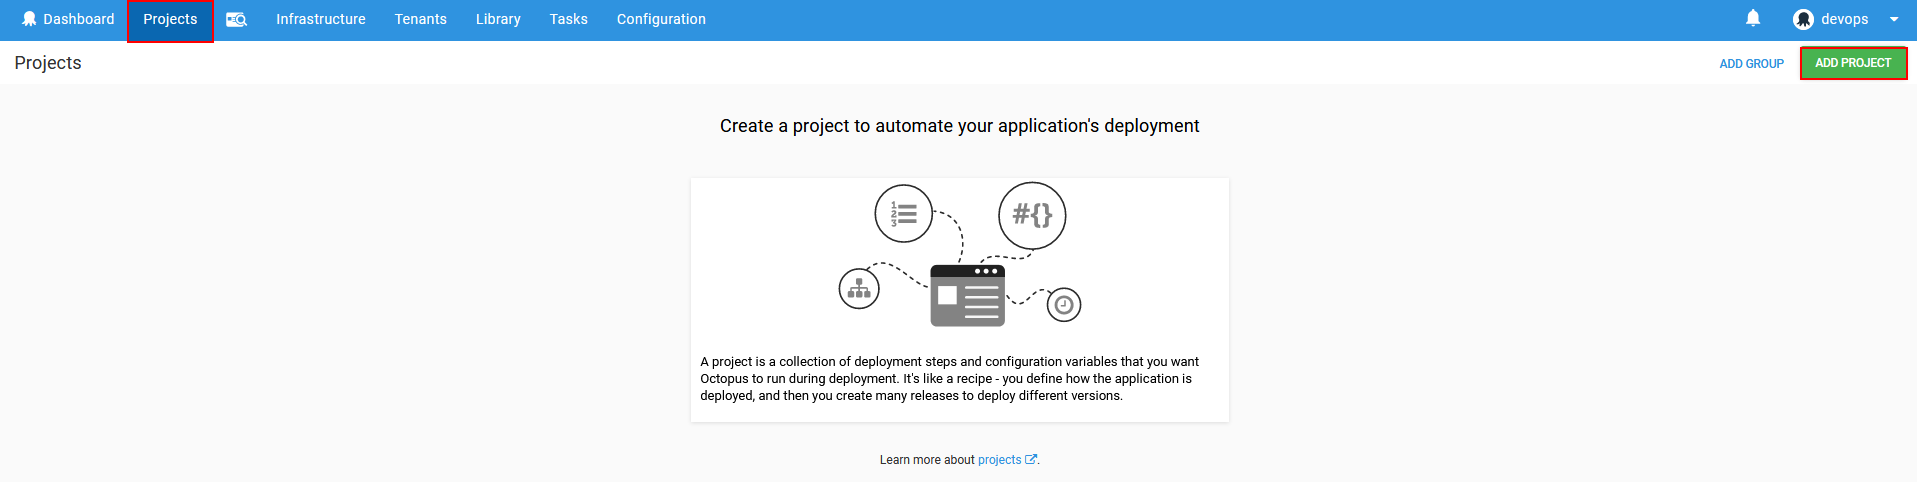
From the Projects option of the main Octopus Deploy main menu click on Add project button
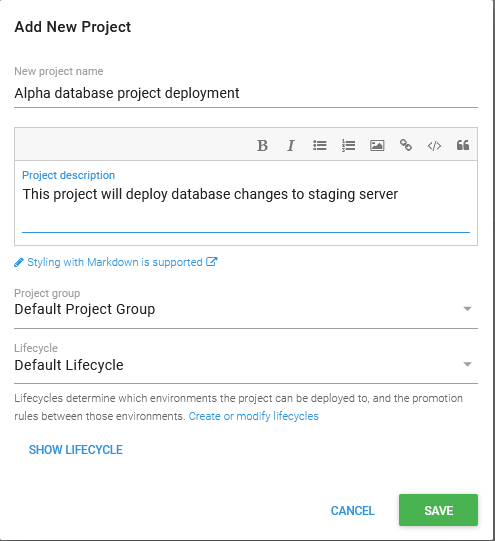
In the initial project configuration the project name and description will be required.
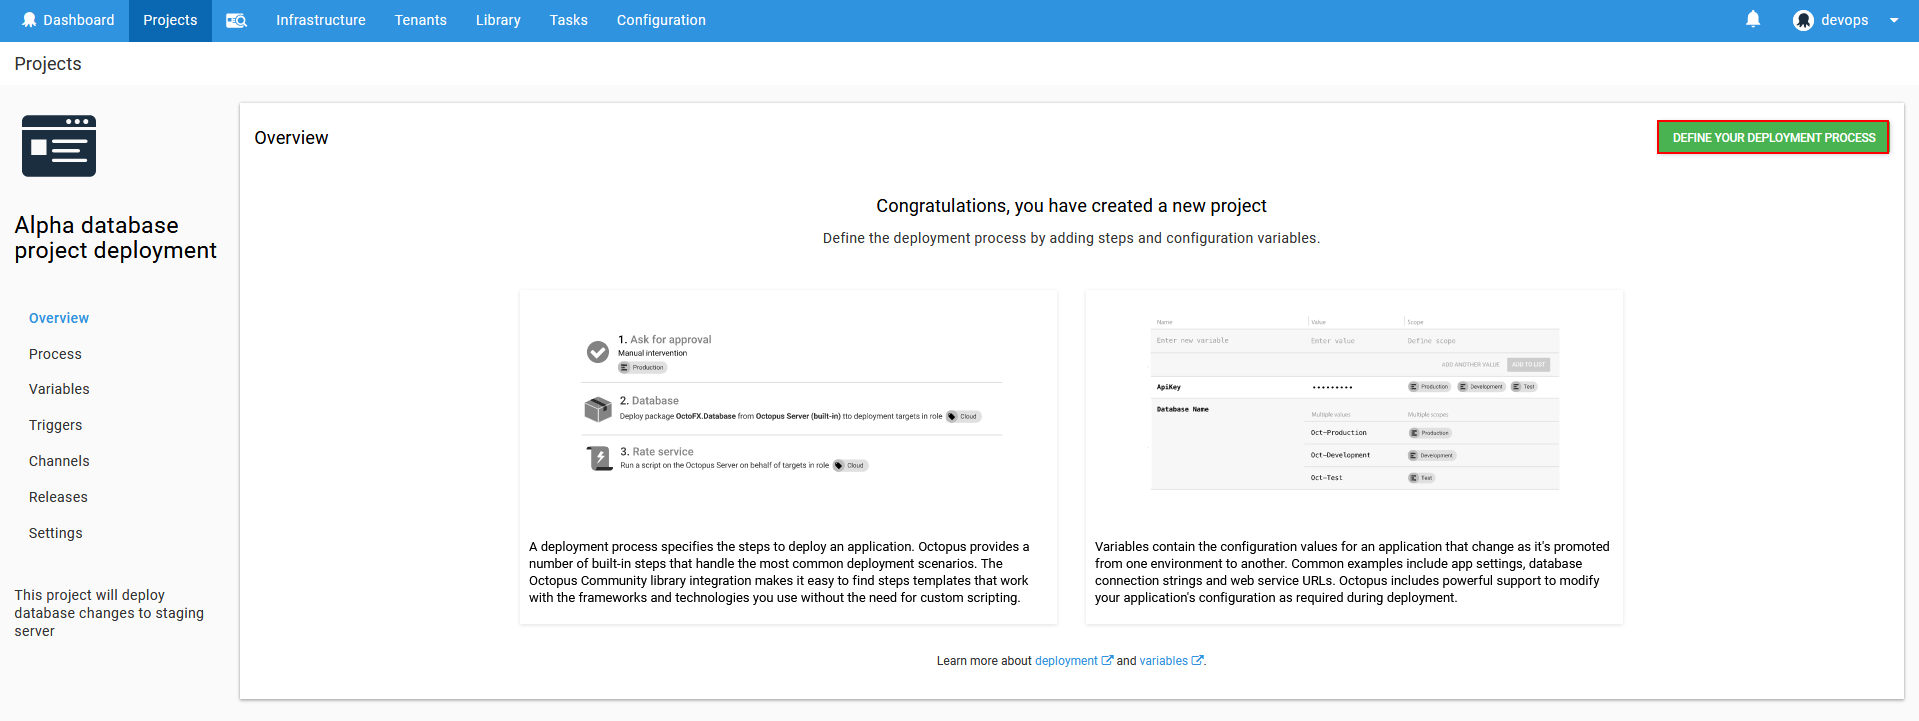
After confirmation the project overview will be displayed where the deployment process configuration can start with Define your deployment process button.
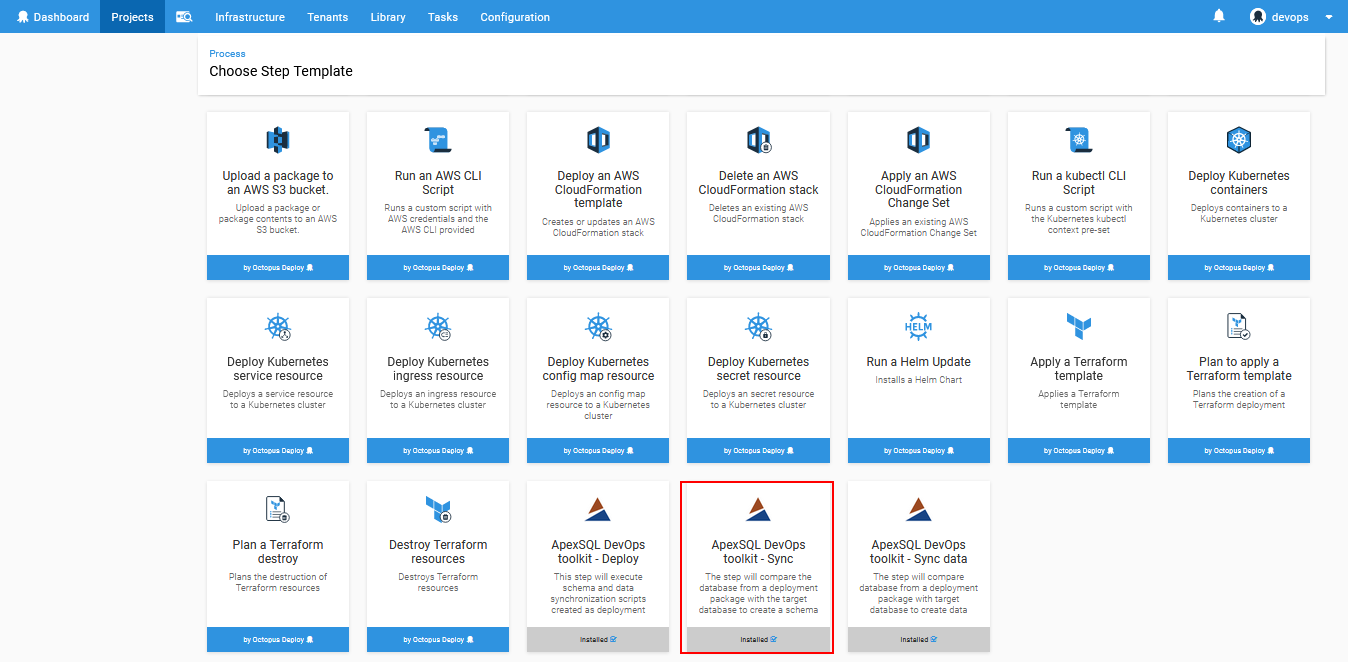
The process configuration view will show up from where the deployment steps can be added. Use Add step button to open the selection of available steps to add.

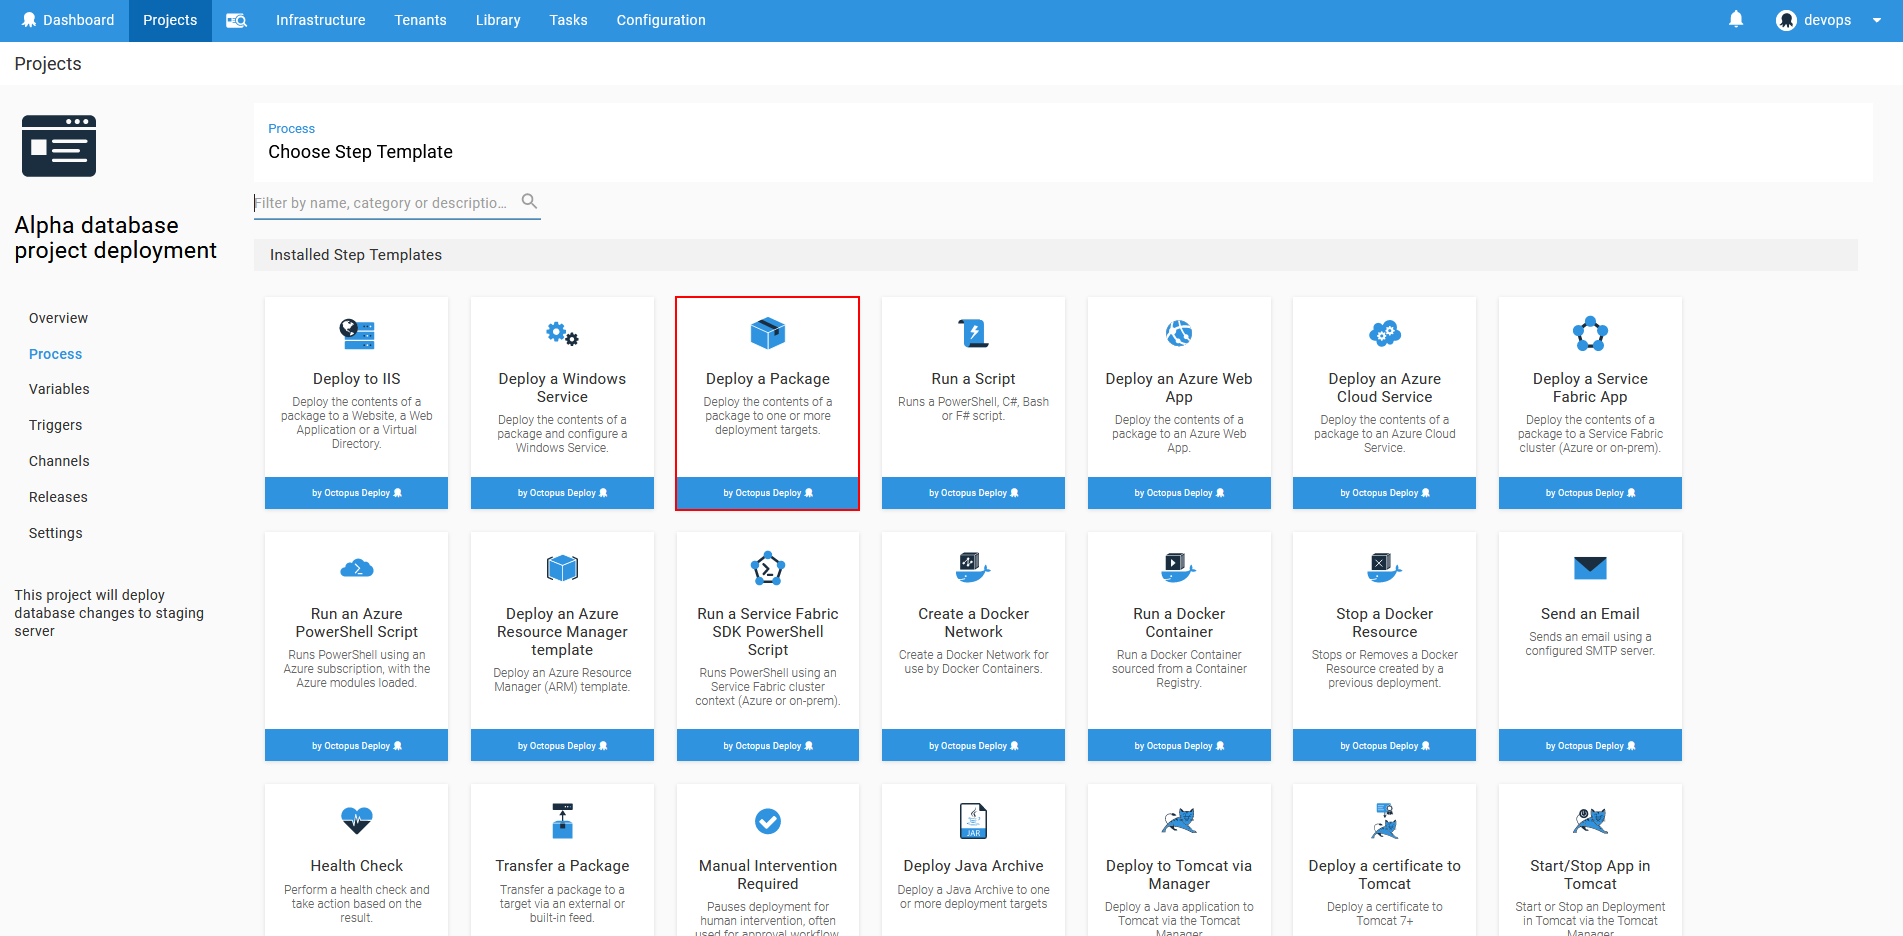
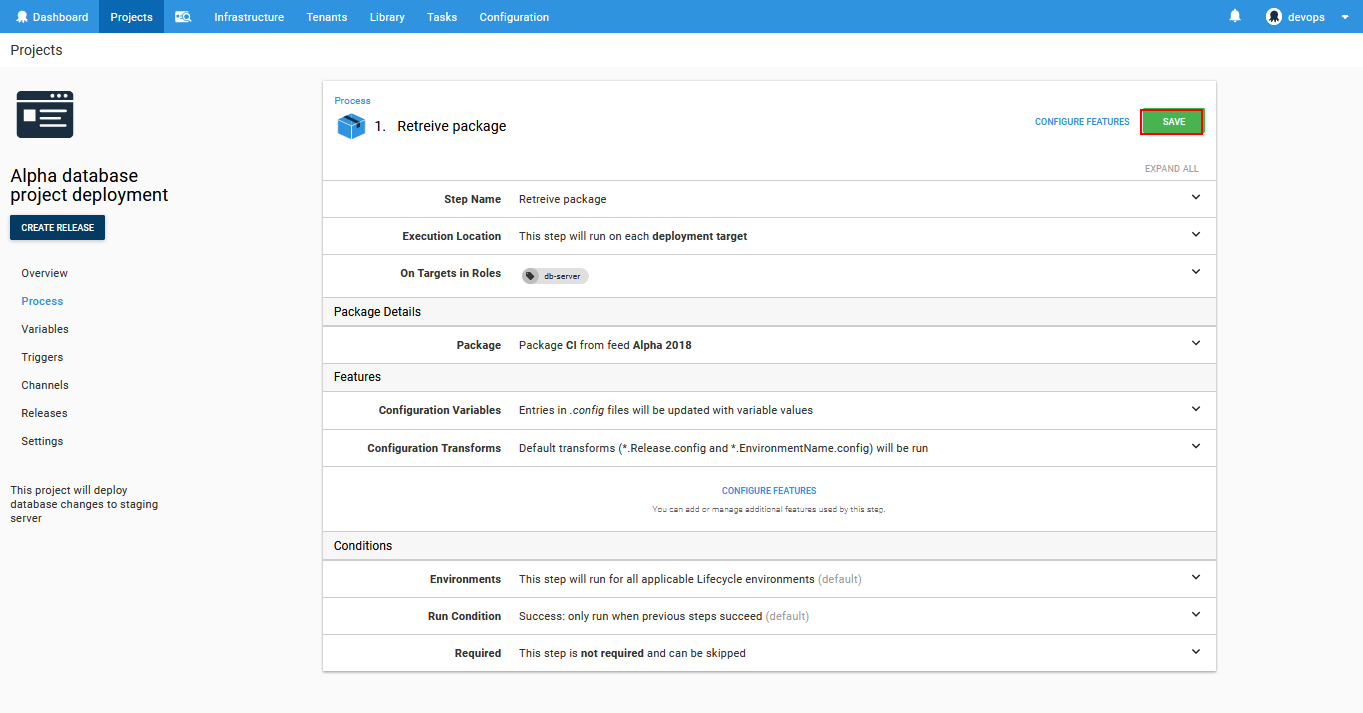
First thing that needs to be done is to retrieve a package from a feed. This can be achieved with the Octopus Deploy built-in step. Choose for the first step the Deploy a package from the step template list
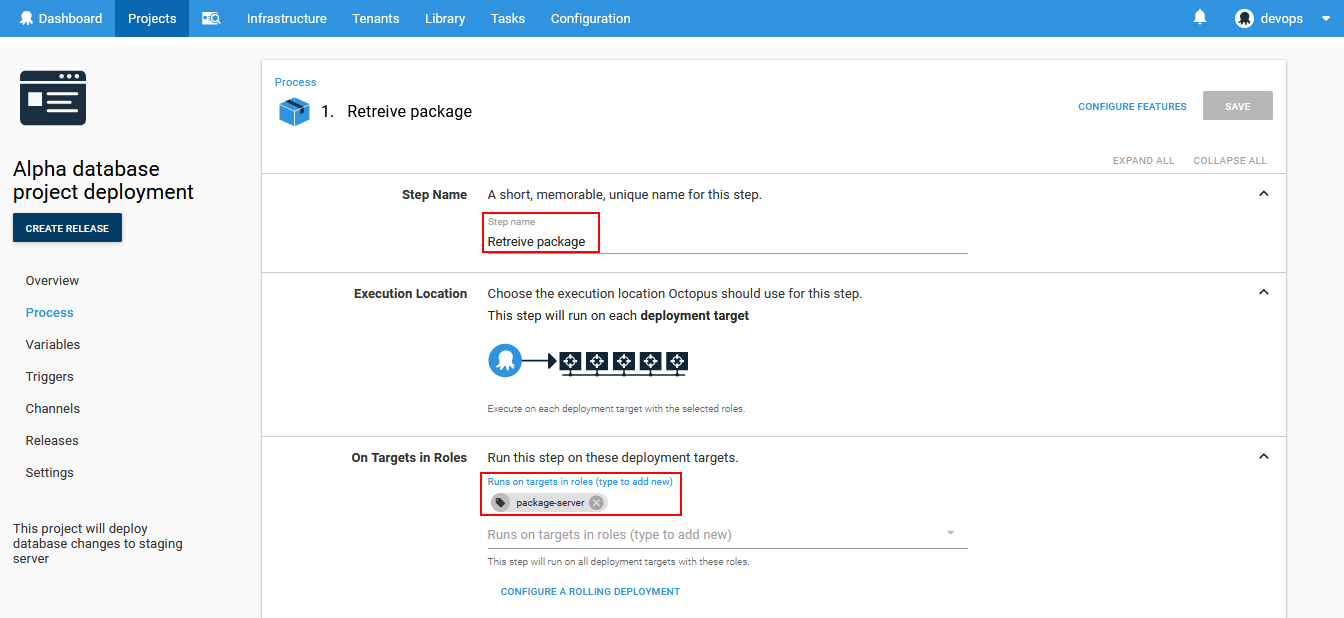
After adding the step, the configuration view for the step will show up. In this view the step name has to be assigned. This name will be later listed in the ApexSQL DevOps toolkit steps as the step which sources the database package. Next option to configure is On Targets in Roles for the deployment scope. This is where “package-server” role should be chosen in order to centralize deployment resources.
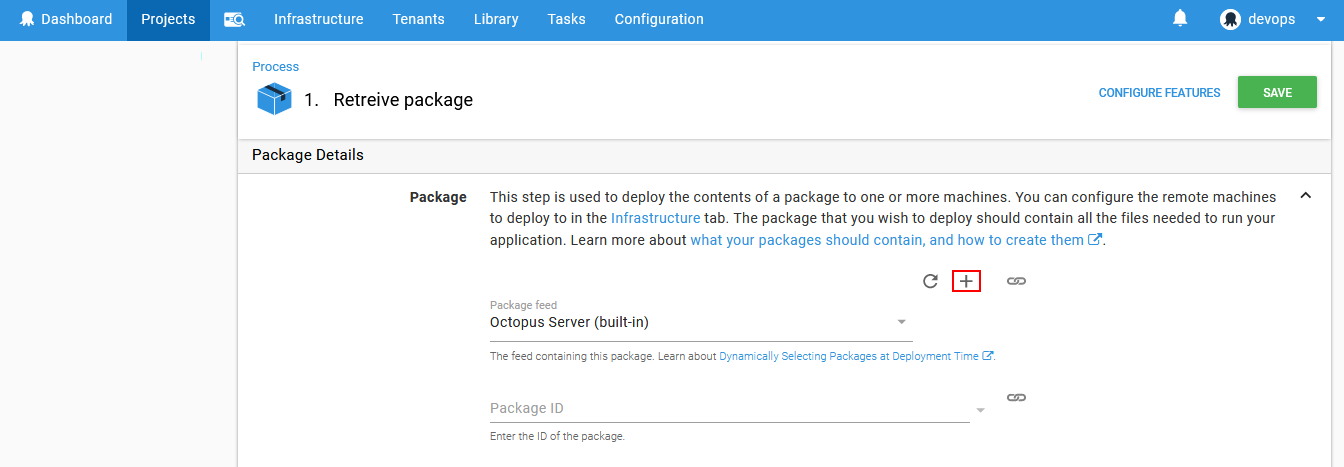
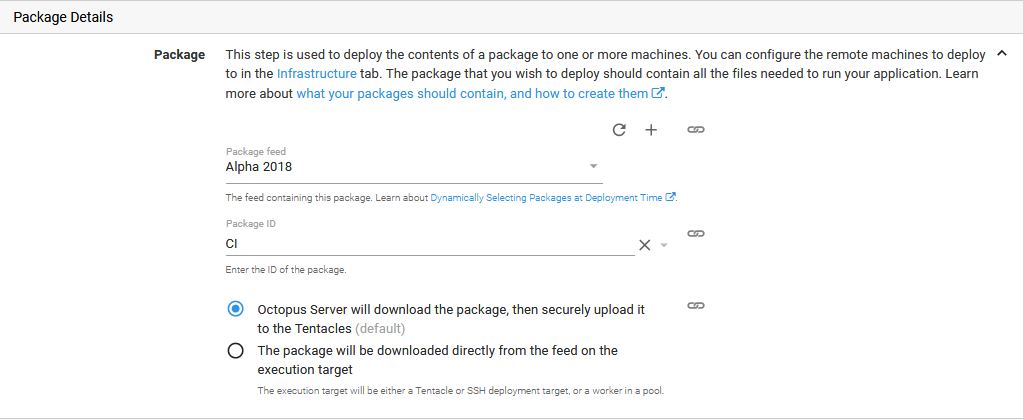
Final configuration section for the first step is the Package section. Here is where the location of the prepared deployment package can be chosen. In case the location is not yet defined, there is the option labeled as + that opens the package location setup
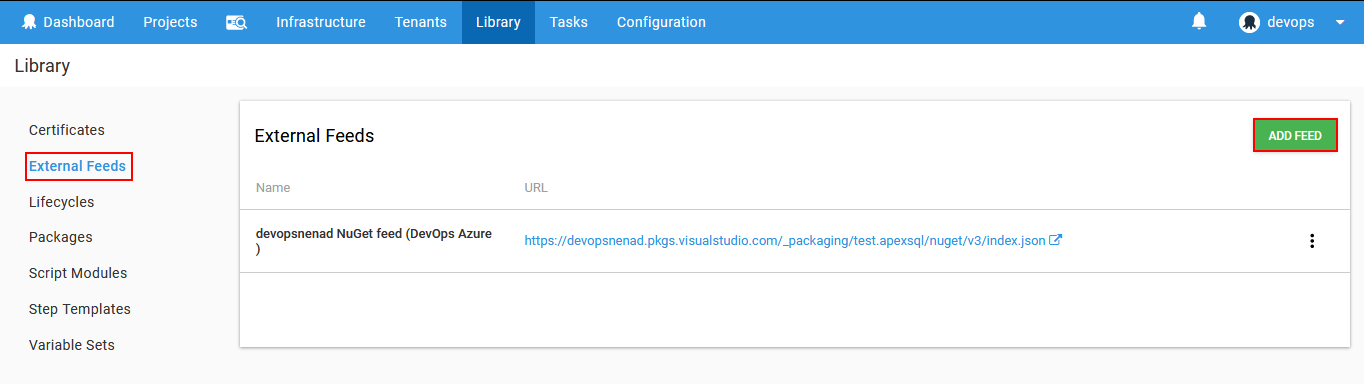
Since a database package was prepared with ApexSQL DevOps toolkit continuous integration steps using a continuous integration server (Bamboo, Jenkins, Web dashboard…) it is implied that it will be located on some external feed and not Octopus Deploy built-in feed. In order to proceed the feed location has to be defined from the opened External Feeds view. Click on the Add feed button to open the feed configuration options.
In the opened Create feed view a type of feed has to be chosen. In this case it is a NuGet feed. Next the unique feed name has to be entered. This name will be listed later in the package retrieval step. Finally, the feed location has to be entered. This can be some online or local feed. In this case a local feed is used which doesn’t require login credentials but in case some online feed is chosen there are options listed further to enter login credentials if needed.
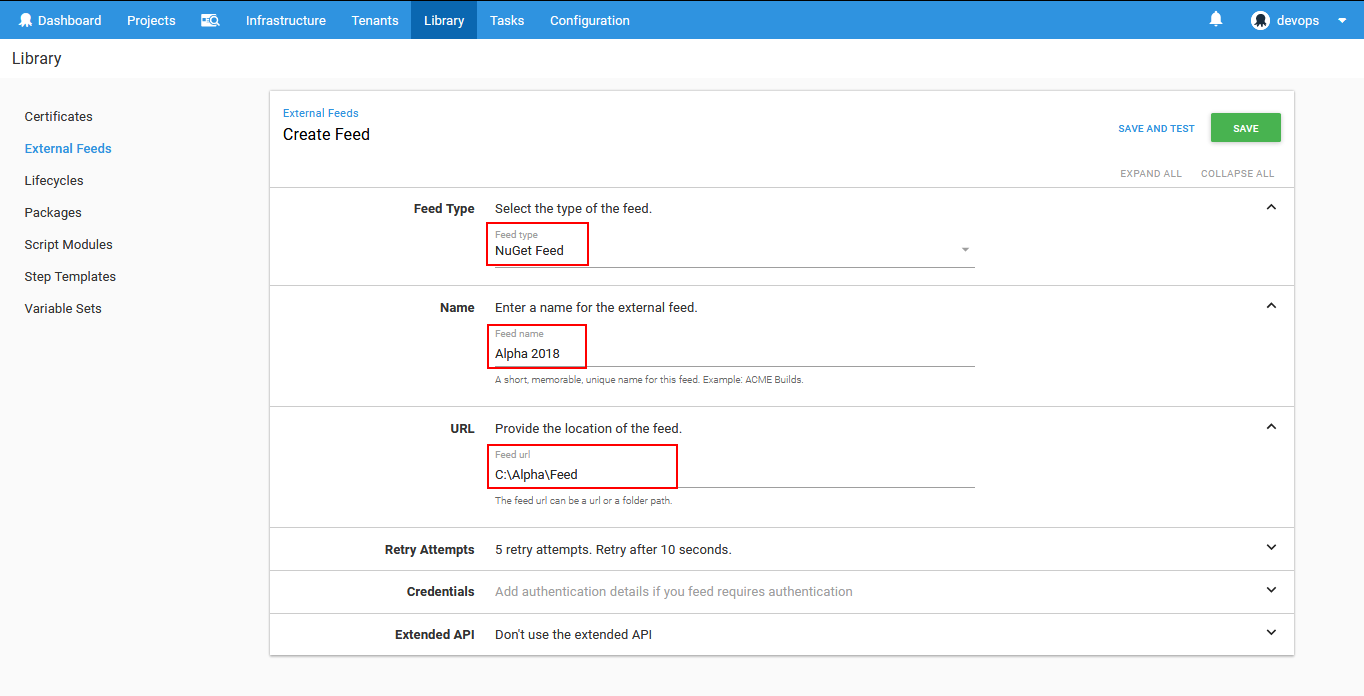
With the Save button the package location is defined and can be used for the package retrieval step.
With this last information provided the step configuration can be finished and saved.
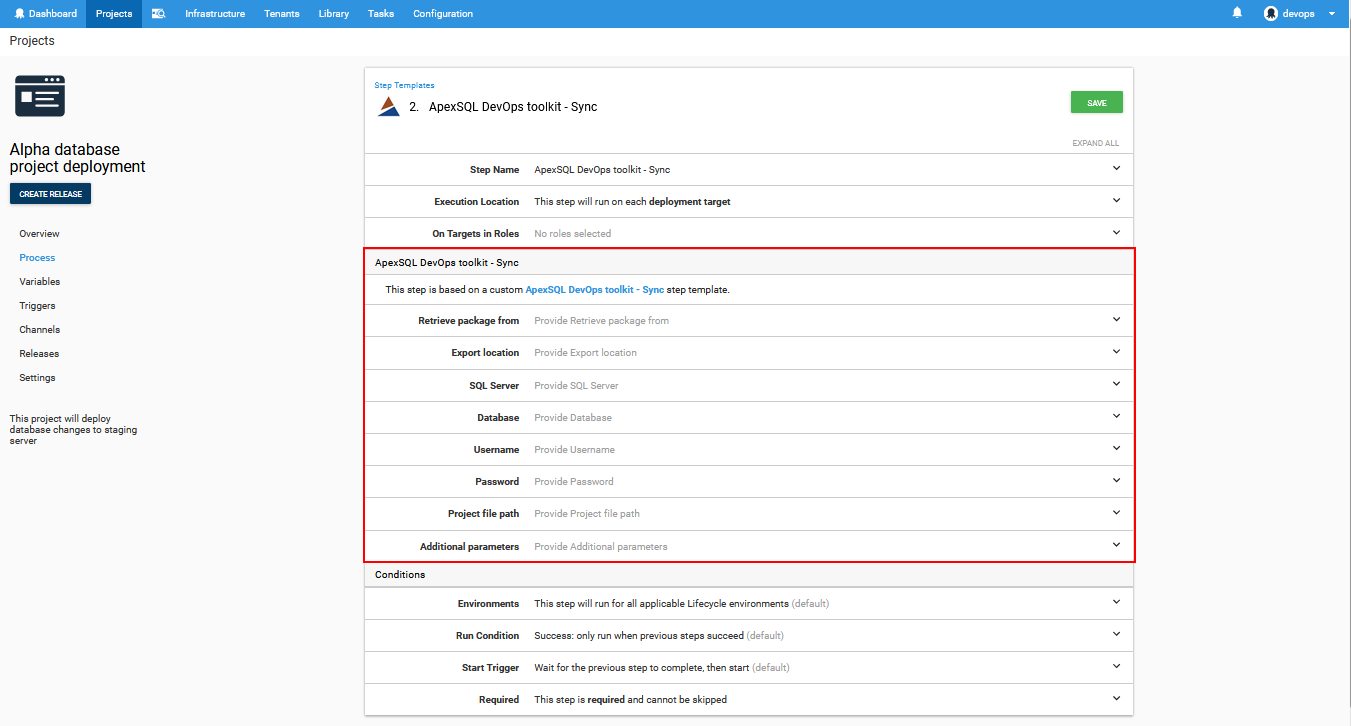
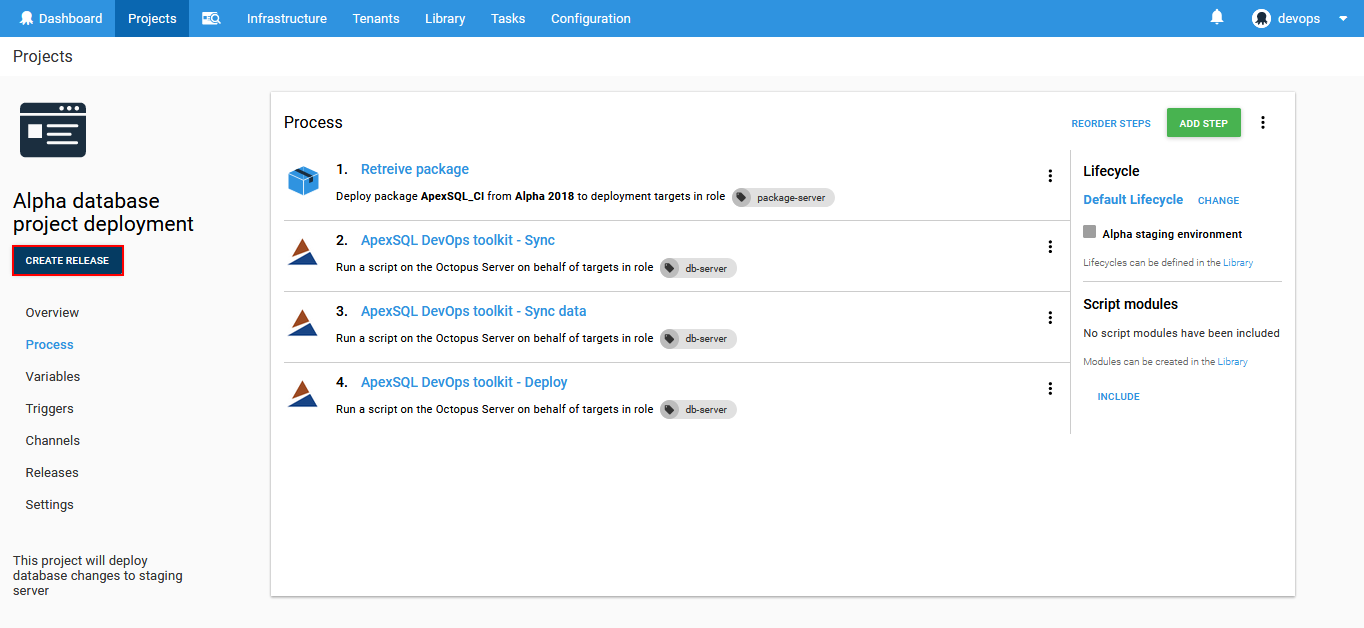
Next step for the deployment process is the ApexSQL DevOps toolkit – Sync step. This step will perform schema comparison between database in the package and a chosen target database. When differences are found the schema synchronization script will be created as output and prepared as deployment resource.
Adding this step will initiate it’s configuration through displayed view.
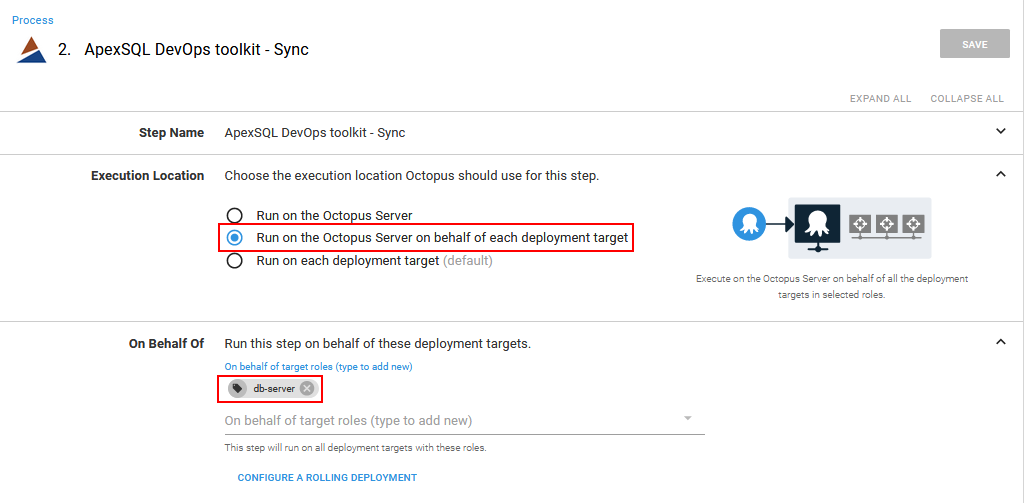
In respect to desired centralized synchronization execution the Execution Location option should be first set to Run on the Octopus Server on behalf of each deployment target and a valid target scope should be chosen by its role tag, in this case “db-server”.
Next option that is required to be set is labeled Retrieve package from. The list of all previously configured steps can be found here. From this list the step which retrieves the package from the feed and extracts it should be selected. In this case it is the step named “Retrieve package” which was configured previously. Retrieved package will be extracted on the “package-server” target machine and the ApexSQL DevOps toolkit – Sync step will be sourced from that location.

The Export location option will require the folder path where the deployment resources will be stored as output. In the case of the ApexSQL DevOps toolkit – Sync step, that would be schema synchronization script and comparison report. Note that with the setup explained above this location will be on the Octopus Server.

Next in line is the set of options to define SQL Server and target database connection. This database will be used as target for schema comparison with the database in the package. Now, since the main purpose of the octopus Deploy system is to deploy same package, in this case database changes, to multiple targets at once this specific database can be on any of the target machines. Only limitation in case of multiple deployments is that all target databases have to be identical in order for generated sync script to work on all of them.

The Project file path can be entered to import comparison and synchronization set of options created and saved with ApexSQL Diff.

Importing these options, via an ApexSQL Diff project file, is the best way to fine-tune the database comparison with possibility to ignore certain differences through comparison or filter out some objects for synchronization.

At the end there is the Additional parameters field where CLI option switches that correspond to ApexSQL Diff can be typed in. These options can override the settings imported with project file or provide additional behavior for example to synchronize new objects that are not included in project file with the bitwise set which defines the object types scope and to synchronize only different and missing objects on the target database thus preserving existing objects located only on the target.

With all options configured as explained above the step can be saved and the project process will include it in the workflow.

In case there is some static data included in the database project it can also be deployed using ApexSQL DevOps toolkit – Sync data step. This step will perform database data comparison between the database contained in the imported package and the target database and will create data synchronization script.
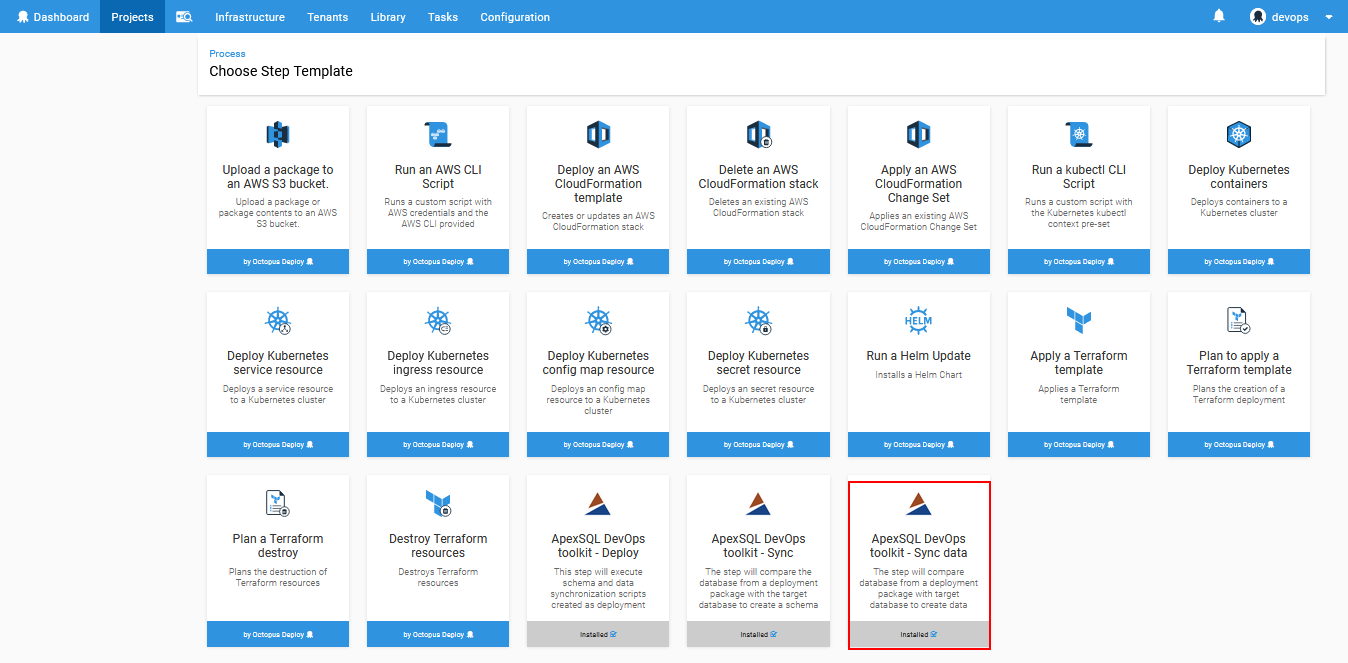
Adding this step from the Octopus Deploy step template list will open the configuration layout similar to the previous one.
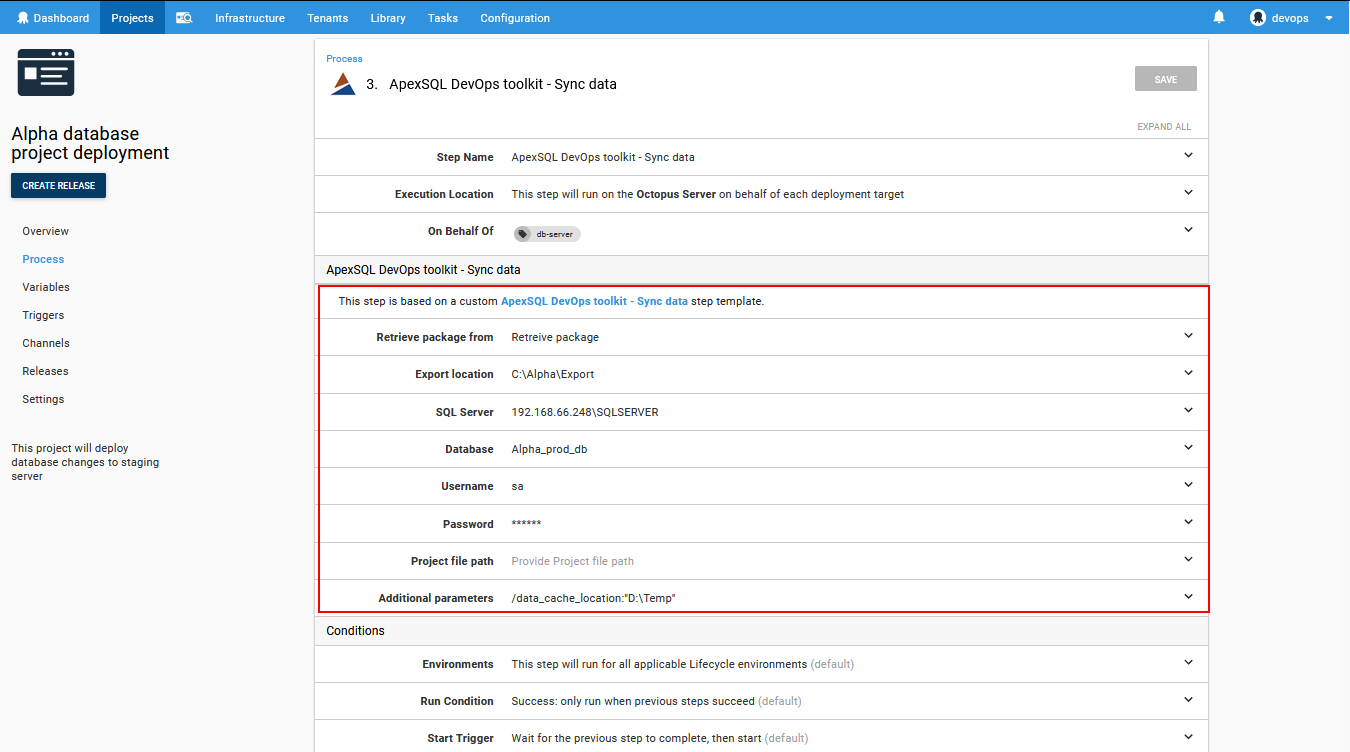
The main difference is with Project file path where the ApexSQL Data Diff project file can be imported and Additional parameters field where CLI options switches that correspond to this application can be typed in.
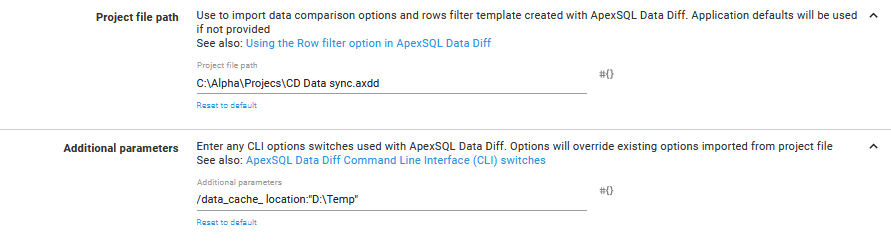
With project file included, a set of data row filtering and synchronization options can be included. And as additional parameters for example the destination for cashing data can be set in case it is some custom location.
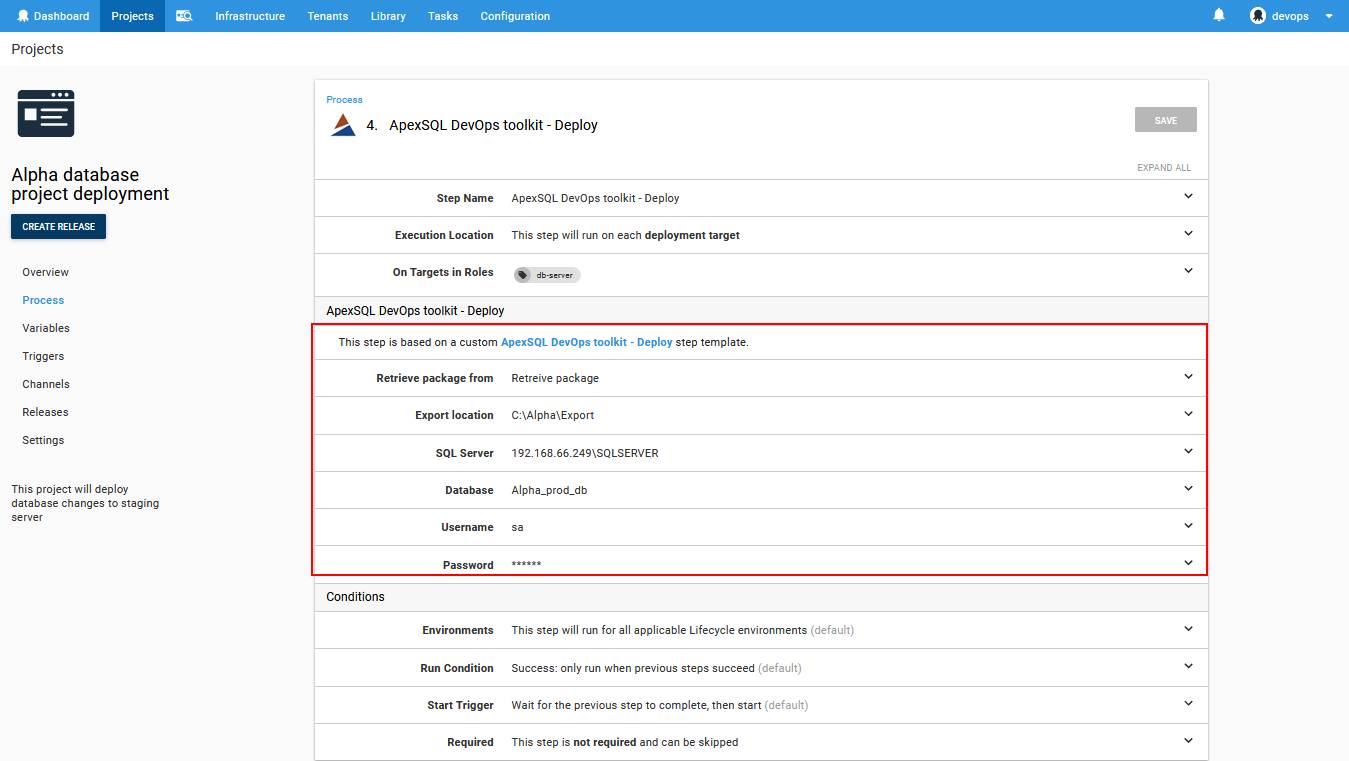
After configuring the sync steps finishing step for the project process is required. The ApexSQL DevOps toolkit – Deploy step will execute synchronization scripts created as deployment resources against the target database.
To configure this step, it is required to provide the Export location of the deployment resources, i.e. generated sync scripts and the connection details to the database that is waiting to be updated. The Export location should be with the same folder path as the one used in the sync steps.
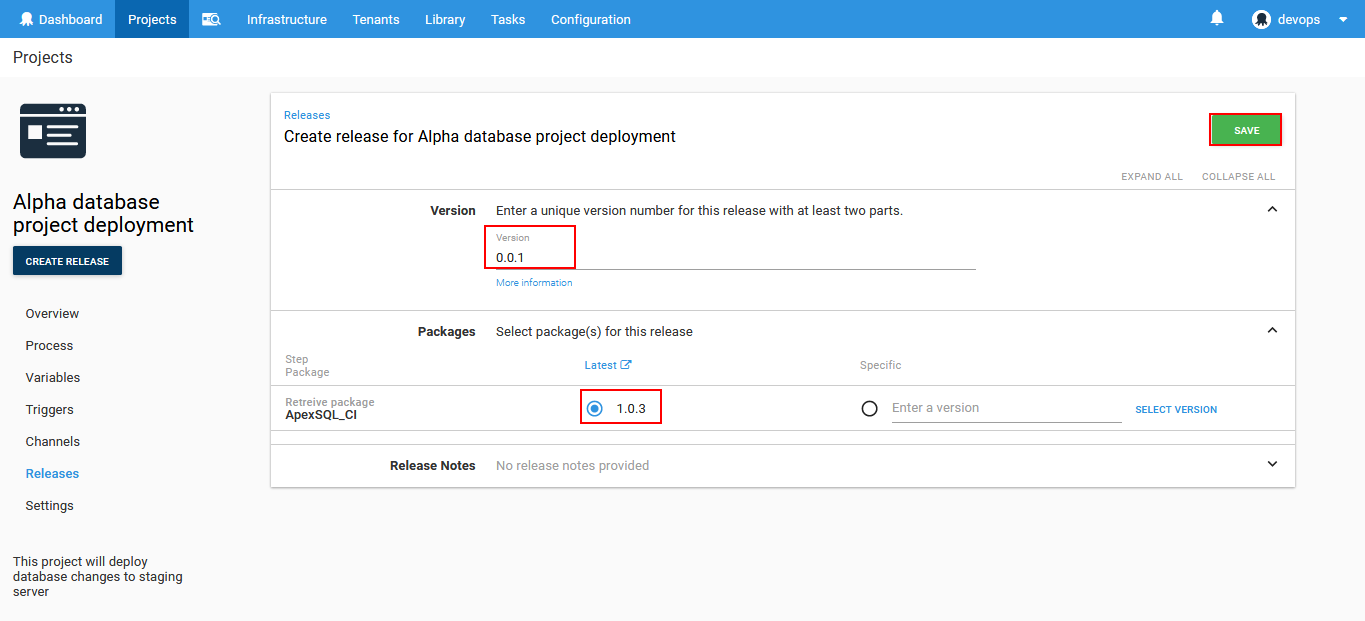
After the deployment process is configured it is time to execute it. First click on the Create release button.
This will open the options to enter the project release version and to select the package version from the defined feed. When this is set click on the Save button to finish preparation.
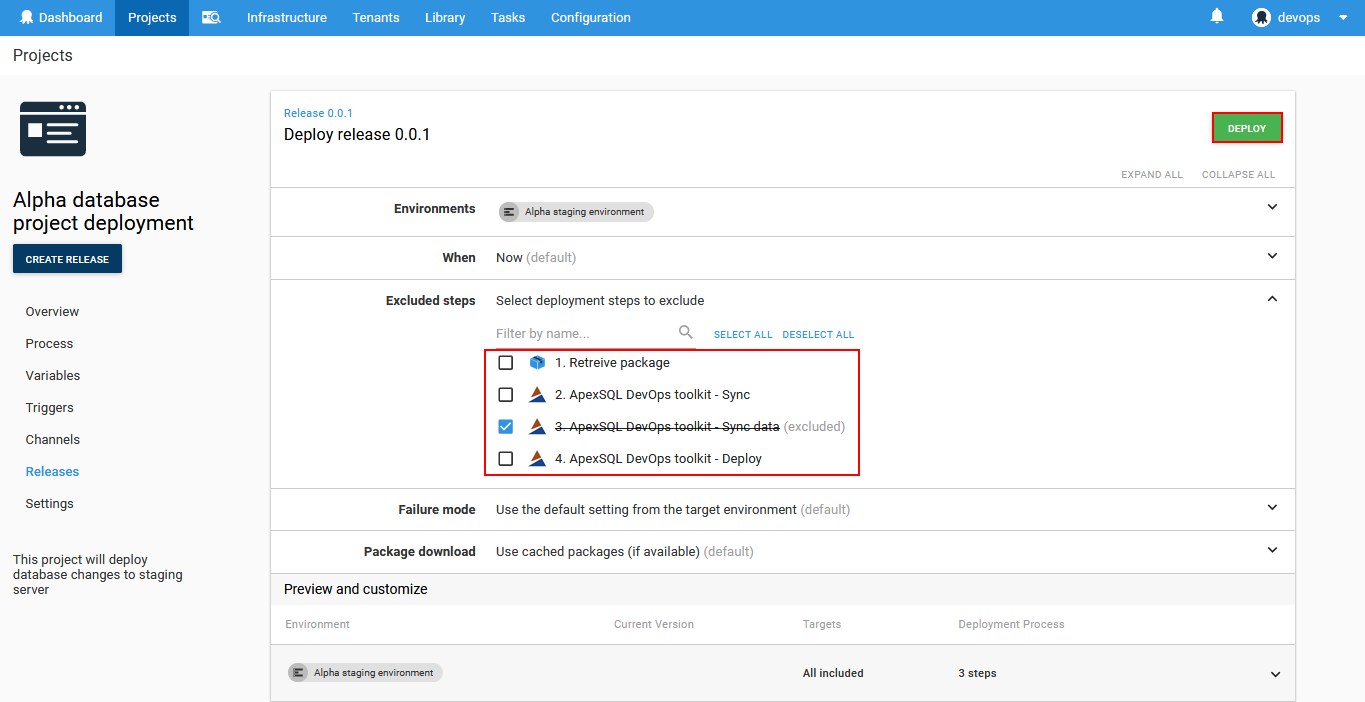
This action will present the overview of the deployment setup. Here will be the list of target environments selected for this project and the deployment can be executed on each environment automatically or one by one. Here will also be shown the exact content of the chosen source package. Click the Deploy… button in order to start the deployment execution.

Before deployment is executed one final view is shown where some deployment steps can be excluded in case there are not needed for this release. This can come in handy in case same release was deployed multiple times but for some instances for example static data should not be synced so the ApexSQL DevOps toolkit – Sync data step can be excluded from execution. To confirm deployment, click the Deploy button and wait for execution to complete.
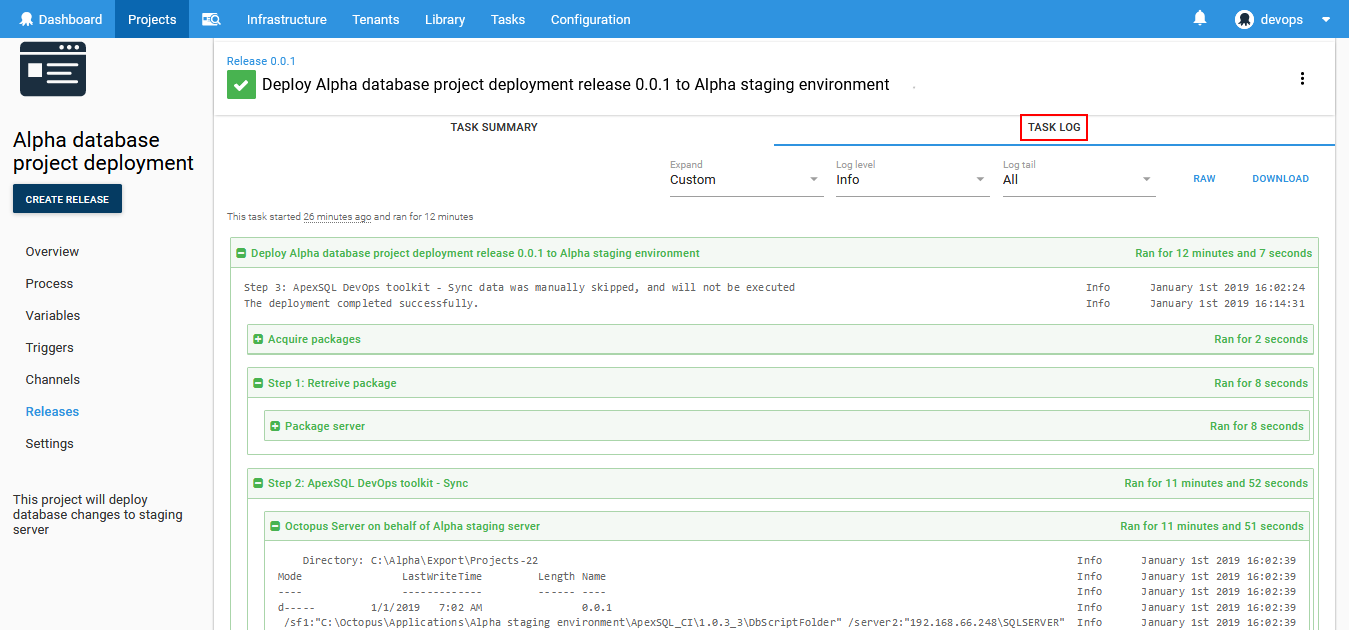
From the deployment view the execution process can be monitored:

When the execution process is done the execution logs and summaries can be observed from the Task log view. Those summaries will be also saved for later review as output files in the export location along with synchronization scripts.